
AI Crawl Control metrics have been enhanced with new views, improved filtering, and better data visualization.
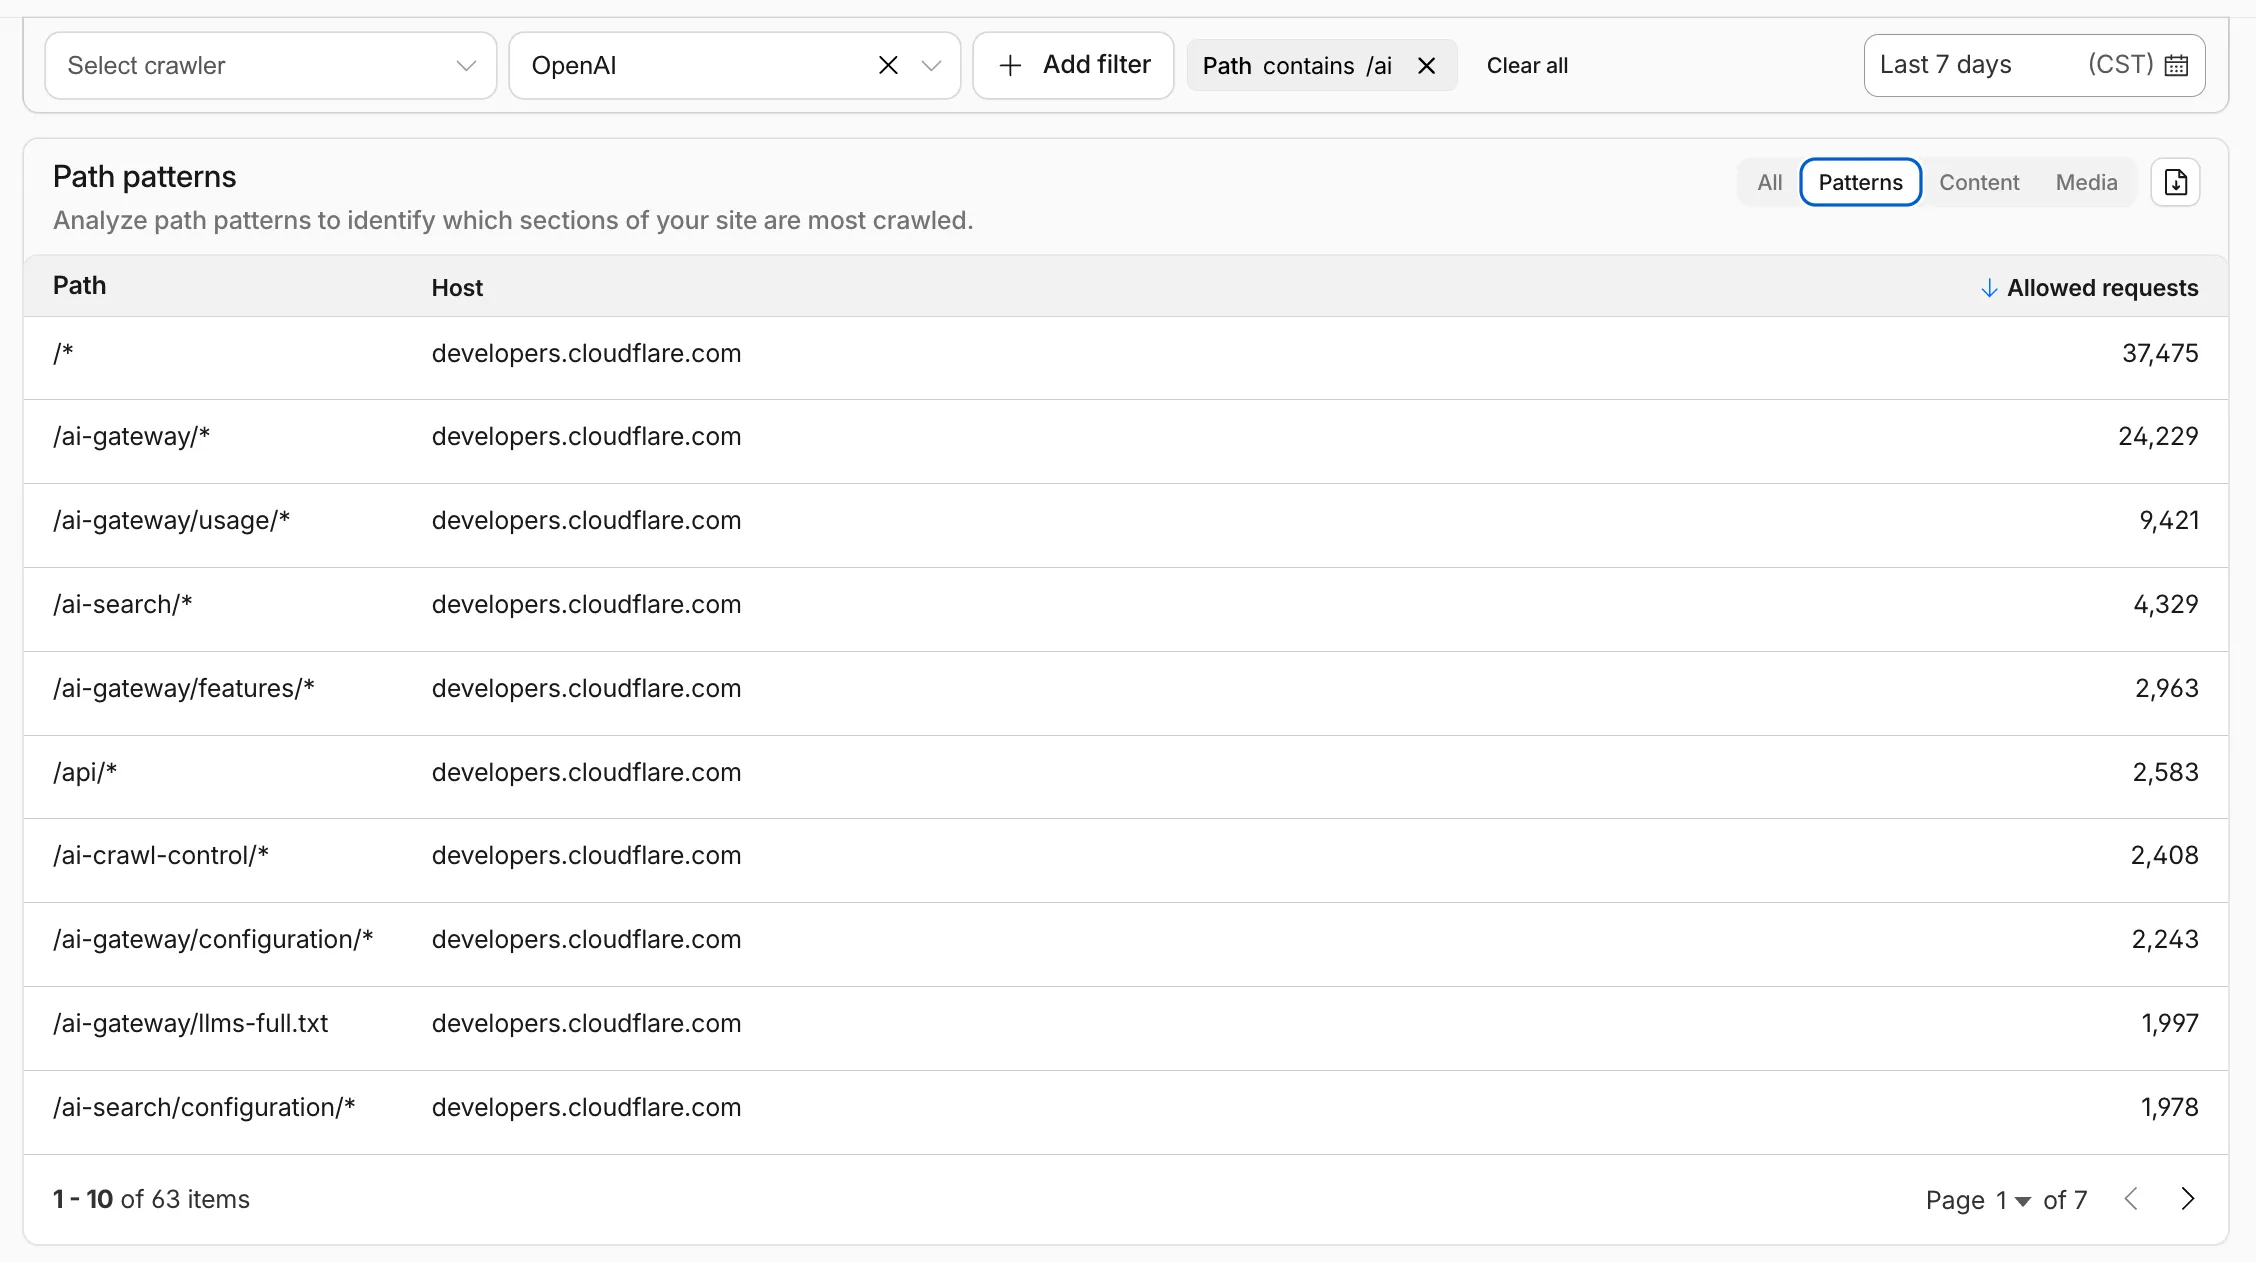
Path pattern grouping
- In the Metrics tab > Most popular paths table, use the new Patterns tab that groups requests by URI pattern (
/blog/*,/api/v1/*,/docs/*) to identify which site areas crawlers target most. Refer to the screenshot above.
Enhanced referral analytics
- Destination patterns show which site areas receive AI-driven referral traffic.
- In the Metrics tab, a new Referrals over time chart shows trends by operator or source.
Data transfer metrics
- In the Metrics tab > Allowed requests over time chart, toggle Bytes to show bandwidth consumption.
- In the Crawlers tab, a new Bytes Transferred column shows bandwidth per crawler.
Image exports
- Export charts and tables as images for reports and presentations.
Learn more about analyzing AI traffic.
- In the Metrics tab > Most popular paths table, use the new Patterns tab that groups requests by URI pattern (
Get your content updates into AI Search faster and avoid a full rescan when you do not need it.
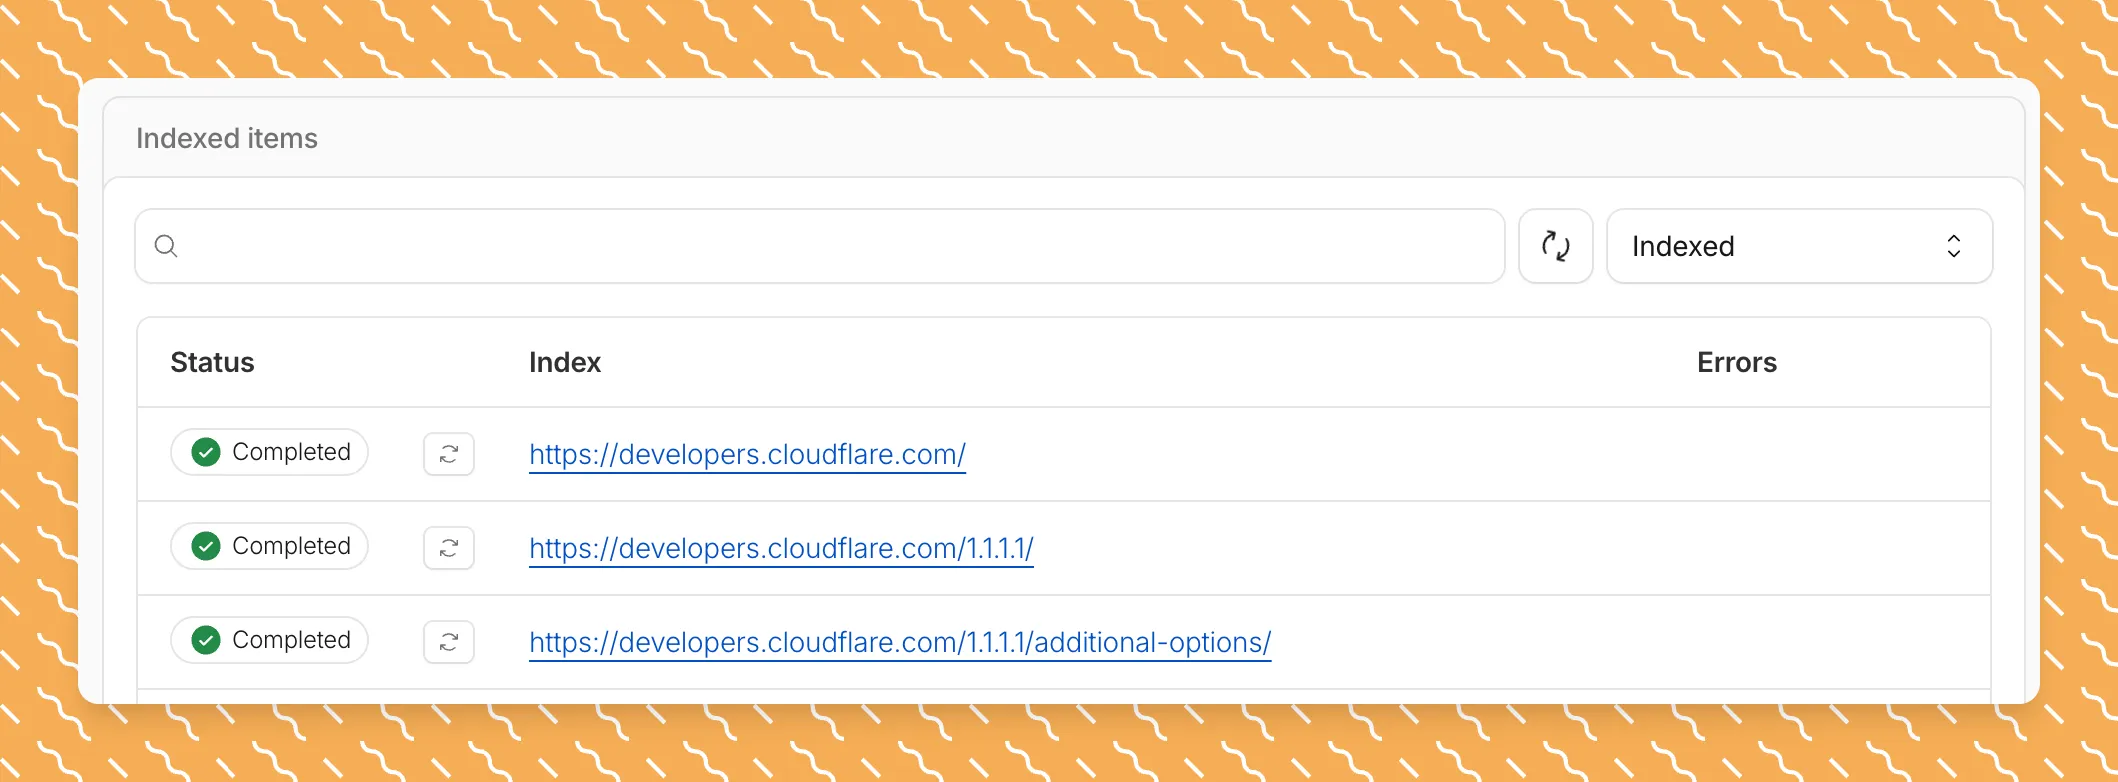
Updated a file or need to retry one that errored? When you know exactly which file changed, you can now reindex it directly instead of rescanning your entire data source.
Go to Overview > Indexed Items and select the sync icon next to any file to reindex it immediately.
By default, AI Search crawls all sitemaps listed in your
robots.txt, up to the maximum files per index limit. If your site has multiple sitemaps but you only want to index a specific set, you can now specify a single sitemap URL to limit what the crawler visits.For example, if your
robots.txtlists bothblog-sitemap.xmlanddocs-sitemap.xml, you can specify justhttps://example.com/docs-sitemap.xmlto index only your documentation.Configure your selection anytime in Settings > Parsing options > Specific sitemaps, then trigger a sync to apply the changes.

Learn more about indexing controls and website crawling configuration.
New reference documentation is now available for AI Crawl Control:
- GraphQL API reference — Query examples for crawler requests, top paths, referral traffic, and data transfer. Includes key filters for detection IDs, user agents, and referrer domains.
- Bot reference — Detection IDs and user agents for major AI crawlers from OpenAI, Anthropic, Google, Meta, and others.
- Worker templates — Deploy the x402 Payment-Gated Proxy to monetize crawler access or charge bots while letting humans through free.
The latest release of the Agents SDK ↗ brings first-class support for Cloudflare Workflows, synchronous state management, and new scheduling capabilities.
Agents excel at real-time communication and state management. Workflows excel at durable execution. Together, they enable powerful patterns where Agents handle WebSocket connections while Workflows handle long-running tasks, retries, and human-in-the-loop flows.
Use the new
AgentWorkflowclass to define workflows with typed access to your Agent:JavaScript import { AgentWorkflow } from "agents/workflows";export class ProcessingWorkflow extends AgentWorkflow {async run(event, step) {// Call Agent methods via RPCawait this.agent.updateStatus(event.payload.taskId, "processing");// Non-durable: progress reporting to clientsawait this.reportProgress({ step: "process", percent: 0.5 });this.broadcastToClients({ type: "update", taskId: event.payload.taskId });// Durable via step: idempotent, won't repeat on retryawait step.mergeAgentState({ taskProgress: 0.5 });const result = await step.do("process", async () => {return processData(event.payload.data);});await step.reportComplete(result);return result;}}TypeScript import { AgentWorkflow } from "agents/workflows";import type { AgentWorkflowEvent, AgentWorkflowStep } from "agents/workflows";export class ProcessingWorkflow extends AgentWorkflow<MyAgent, TaskParams> {async run(event: AgentWorkflowEvent<TaskParams>, step: AgentWorkflowStep) {// Call Agent methods via RPCawait this.agent.updateStatus(event.payload.taskId, "processing");// Non-durable: progress reporting to clientsawait this.reportProgress({ step: "process", percent: 0.5 });this.broadcastToClients({ type: "update", taskId: event.payload.taskId });// Durable via step: idempotent, won't repeat on retryawait step.mergeAgentState({ taskProgress: 0.5 });const result = await step.do("process", async () => {return processData(event.payload.data);});await step.reportComplete(result);return result;}}Start workflows from your Agent with
runWorkflow()and handle lifecycle events:JavaScript export class MyAgent extends Agent {async startTask(taskId, data) {const instanceId = await this.runWorkflow("PROCESSING_WORKFLOW", {taskId,data,});return { instanceId };}async onWorkflowProgress(workflowName, instanceId, progress) {this.broadcast(JSON.stringify({ type: "progress", progress }));}async onWorkflowComplete(workflowName, instanceId, result) {console.log(`Workflow ${instanceId} completed`);}async onWorkflowError(workflowName, instanceId, error) {console.error(`Workflow ${instanceId} failed:`, error);}}TypeScript export class MyAgent extends Agent {async startTask(taskId: string, data: string) {const instanceId = await this.runWorkflow("PROCESSING_WORKFLOW", {taskId,data,});return { instanceId };}async onWorkflowProgress(workflowName: string,instanceId: string,progress: unknown,) {this.broadcast(JSON.stringify({ type: "progress", progress }));}async onWorkflowComplete(workflowName: string,instanceId: string,result?: unknown,) {console.log(`Workflow ${instanceId} completed`);}async onWorkflowError(workflowName: string,instanceId: string,error: unknown,) {console.error(`Workflow ${instanceId} failed:`, error);}}Key workflow methods on your Agent:
runWorkflow(workflowName, params, options?)— Start a workflow with optional metadatagetWorkflow(workflowId)/getWorkflows(criteria?)— Query workflows with cursor-based paginationapproveWorkflow(workflowId)/rejectWorkflow(workflowId)— Human-in-the-loop approval flowspauseWorkflow(),resumeWorkflow(),terminateWorkflow()— Workflow control
State updates are now synchronous with a new
validateStateChange()validation hook:JavaScript export class MyAgent extends Agent {validateStateChange(oldState, newState) {// Return false to reject the changeif (newState.count < 0) return false;// Return modified state to transformreturn { ...newState, lastUpdated: Date.now() };}}TypeScript export class MyAgent extends Agent<Env, State> {validateStateChange(oldState: State, newState: State): State | false {// Return false to reject the changeif (newState.count < 0) return false;// Return modified state to transformreturn { ...newState, lastUpdated: Date.now() };}}The new
scheduleEvery()method enables fixed-interval recurring tasks with built-in overlap prevention:JavaScript // Run every 5 minutesawait this.scheduleEvery("syncData", 5 * 60 * 1000, { source: "api" });TypeScript // Run every 5 minutesawait this.scheduleEvery("syncData", 5 * 60 * 1000, { source: "api" });- Client-side RPC timeout — Set timeouts on callable method invocations
StreamingResponse.error(message)— Graceful stream error signalinggetCallableMethods()— Introspection API for discovering callable methods- Connection close handling — Pending calls are automatically rejected on disconnect
JavaScript await agent.call("method", [args], {timeout: 5000,stream: { onChunk, onDone, onError },});TypeScript await agent.call("method", [args], {timeout: 5000,stream: { onChunk, onDone, onError },});Secure email reply routing — Email replies are now secured with HMAC-SHA256 signed headers, preventing unauthorized routing of emails to agent instances.
Routing improvements:
basePathoption to bypass default URL construction for custom routing- Server-sent identity — Agents send
nameandagenttype on connect - New
onIdentityandonIdentityChangecallbacks on the client
JavaScript const agent = useAgent({basePath: "user",onIdentity: (name, agentType) => console.log(`Connected to ${name}`),});TypeScript const agent = useAgent({basePath: "user",onIdentity: (name, agentType) => console.log(`Connected to ${name}`),});To update to the latest version:
Terminal window npm i agents@latestFor the complete Workflows API reference and patterns, see Run Workflows.
We have partnered with Black Forest Labs (BFL) again to bring their optimized FLUX.2 [klein] 9B model to Workers AI. This distilled model offers enhanced quality compared to the 4B variant, while maintaining cost-effective pricing. With a fixed 4-step inference process, Klein 9B is ideal for rapid prototyping and real-time applications where both speed and quality matter.
Read the BFL blog ↗ to learn more about the model itself, or try it out yourself on our multi modal playground ↗.
Pricing documentation is available on the model page or pricing page.
The model hosted on Workers AI is optimized for speed with a fixed 4-step inference process and supports up to 4 image inputs. Since this is a distilled model, the
stepsparameter is fixed at 4 and cannot be adjusted. Like FLUX.2 [dev] and FLUX.2 [klein] 4B, this image model uses multipart form data inputs, even if you just have a prompt.With the REST API, the multipart form data input looks like this:
Terminal window curl --request POST \--url 'https://api.cloudflare.com/client/v4/accounts/{ACCOUNT}/ai/run/@cf/black-forest-labs/flux-2-klein-9b' \--header 'Authorization: Bearer {TOKEN}' \--header 'Content-Type: multipart/form-data' \--form 'prompt=a sunset at the alps' \--form width=1024 \--form height=1024With the Workers AI binding, you can use it as such:
JavaScript const form = new FormData();form.append("prompt", "a sunset with a dog");form.append("width", "1024");form.append("height", "1024");// FormData doesn't expose its serialized body or boundary. Passing it to a// Request (or Response) constructor serializes it and generates the Content-Type// header with the boundary, which is required for the server to parse the multipart fields.const formResponse = new Response(form);const formStream = formResponse.body;const formContentType = formResponse.headers.get('content-type');const resp = await env.AI.run("@cf/black-forest-labs/flux-2-klein-9b", {multipart: {body: formStream,contentType: formContentType,},});The parameters you can send to the model are detailed here:
JSON Schema for Model
Required Parametersprompt(string) - Text description of the image to generate
Optional Parameters
input_image_0(string) - Binary imageinput_image_1(string) - Binary imageinput_image_2(string) - Binary imageinput_image_3(string) - Binary imageguidance(float) - Guidance scale for generation. Higher values follow the prompt more closelywidth(integer) - Width of the image, default1024Range: 256-1920height(integer) - Height of the image, default768Range: 256-1920seed(integer) - Seed for reproducibility
Note: Since this is a distilled model, the
stepsparameter is fixed at 4 and cannot be adjusted.The FLUX.2 klein-9b model supports generating images based on reference images, just like FLUX.2 [dev] and FLUX.2 [klein] 4B. You can use this feature to apply the style of one image to another, add a new character to an image, or iterate on past generated images. You would use it with the same multipart form data structure, with the input images in binary. The model supports up to 4 input images.
For the prompt, you can reference the images based on the index, like
take the subject of image 1 and style it like image 0or even use natural language likeplace the dog beside the woman.You must name the input parameter as
input_image_0,input_image_1,input_image_2,input_image_3for it to work correctly. All input images must be smaller than 512x512.Terminal window curl --request POST \--url 'https://api.cloudflare.com/client/v4/accounts/{ACCOUNT}/ai/run/@cf/black-forest-labs/flux-2-klein-9b' \--header 'Authorization: Bearer {TOKEN}' \--header 'Content-Type: multipart/form-data' \--form 'prompt=take the subject of image 1 and style it like image 0' \--form input_image_0=@/Users/johndoe/Desktop/icedoutkeanu.png \--form input_image_1=@/Users/johndoe/Desktop/me.png \--form width=1024 \--form height=1024Through Workers AI Binding:
JavaScript //helper function to convert ReadableStream to Blobasync function streamToBlob(stream: ReadableStream, contentType: string): Promise<Blob> {const reader = stream.getReader();const chunks = [];while (true) {const { done, value } = await reader.read();if (done) break;chunks.push(value);}return new Blob(chunks, { type: contentType });}const image0 = await fetch("http://image-url");const image1 = await fetch("http://image-url");const form = new FormData();const image_blob0 = await streamToBlob(image0.body, "image/png");const image_blob1 = await streamToBlob(image1.body, "image/png");form.append('input_image_0', image_blob0)form.append('input_image_1', image_blob1)form.append('prompt', 'take the subject of image 1 and style it like image 0')// FormData doesn't expose its serialized body or boundary. Passing it to a// Request (or Response) constructor serializes it and generates the Content-Type// header with the boundary, which is required for the server to parse the multipart fields.const formResponse = new Response(form);const formStream = formResponse.body;const formContentType = formResponse.headers.get('content-type');const resp = await env.AI.run("@cf/black-forest-labs/flux-2-klein-9b", {multipart: {body: formStream,contentType: formContentType}})
You can now store up to 10 million vectors in a single Vectorize index, doubling the previous limit of 5 million vectors. This enables larger-scale semantic search, recommendation systems, and retrieval-augmented generation (RAG) applications without splitting data across multiple indexes.
Vectorize continues to support indexes with up to 1,536 dimensions per vector at 32-bit precision. Refer to the Vectorize limits documentation for complete details.
AI Search now includes path filtering for both website and R2 data sources. You can now control which content gets indexed by defining include and exclude rules for paths.
By controlling what gets indexed, you can improve the relevance and quality of your search results. You can also use path filtering to split a single data source across multiple AI Search instances for specialized search experiences.
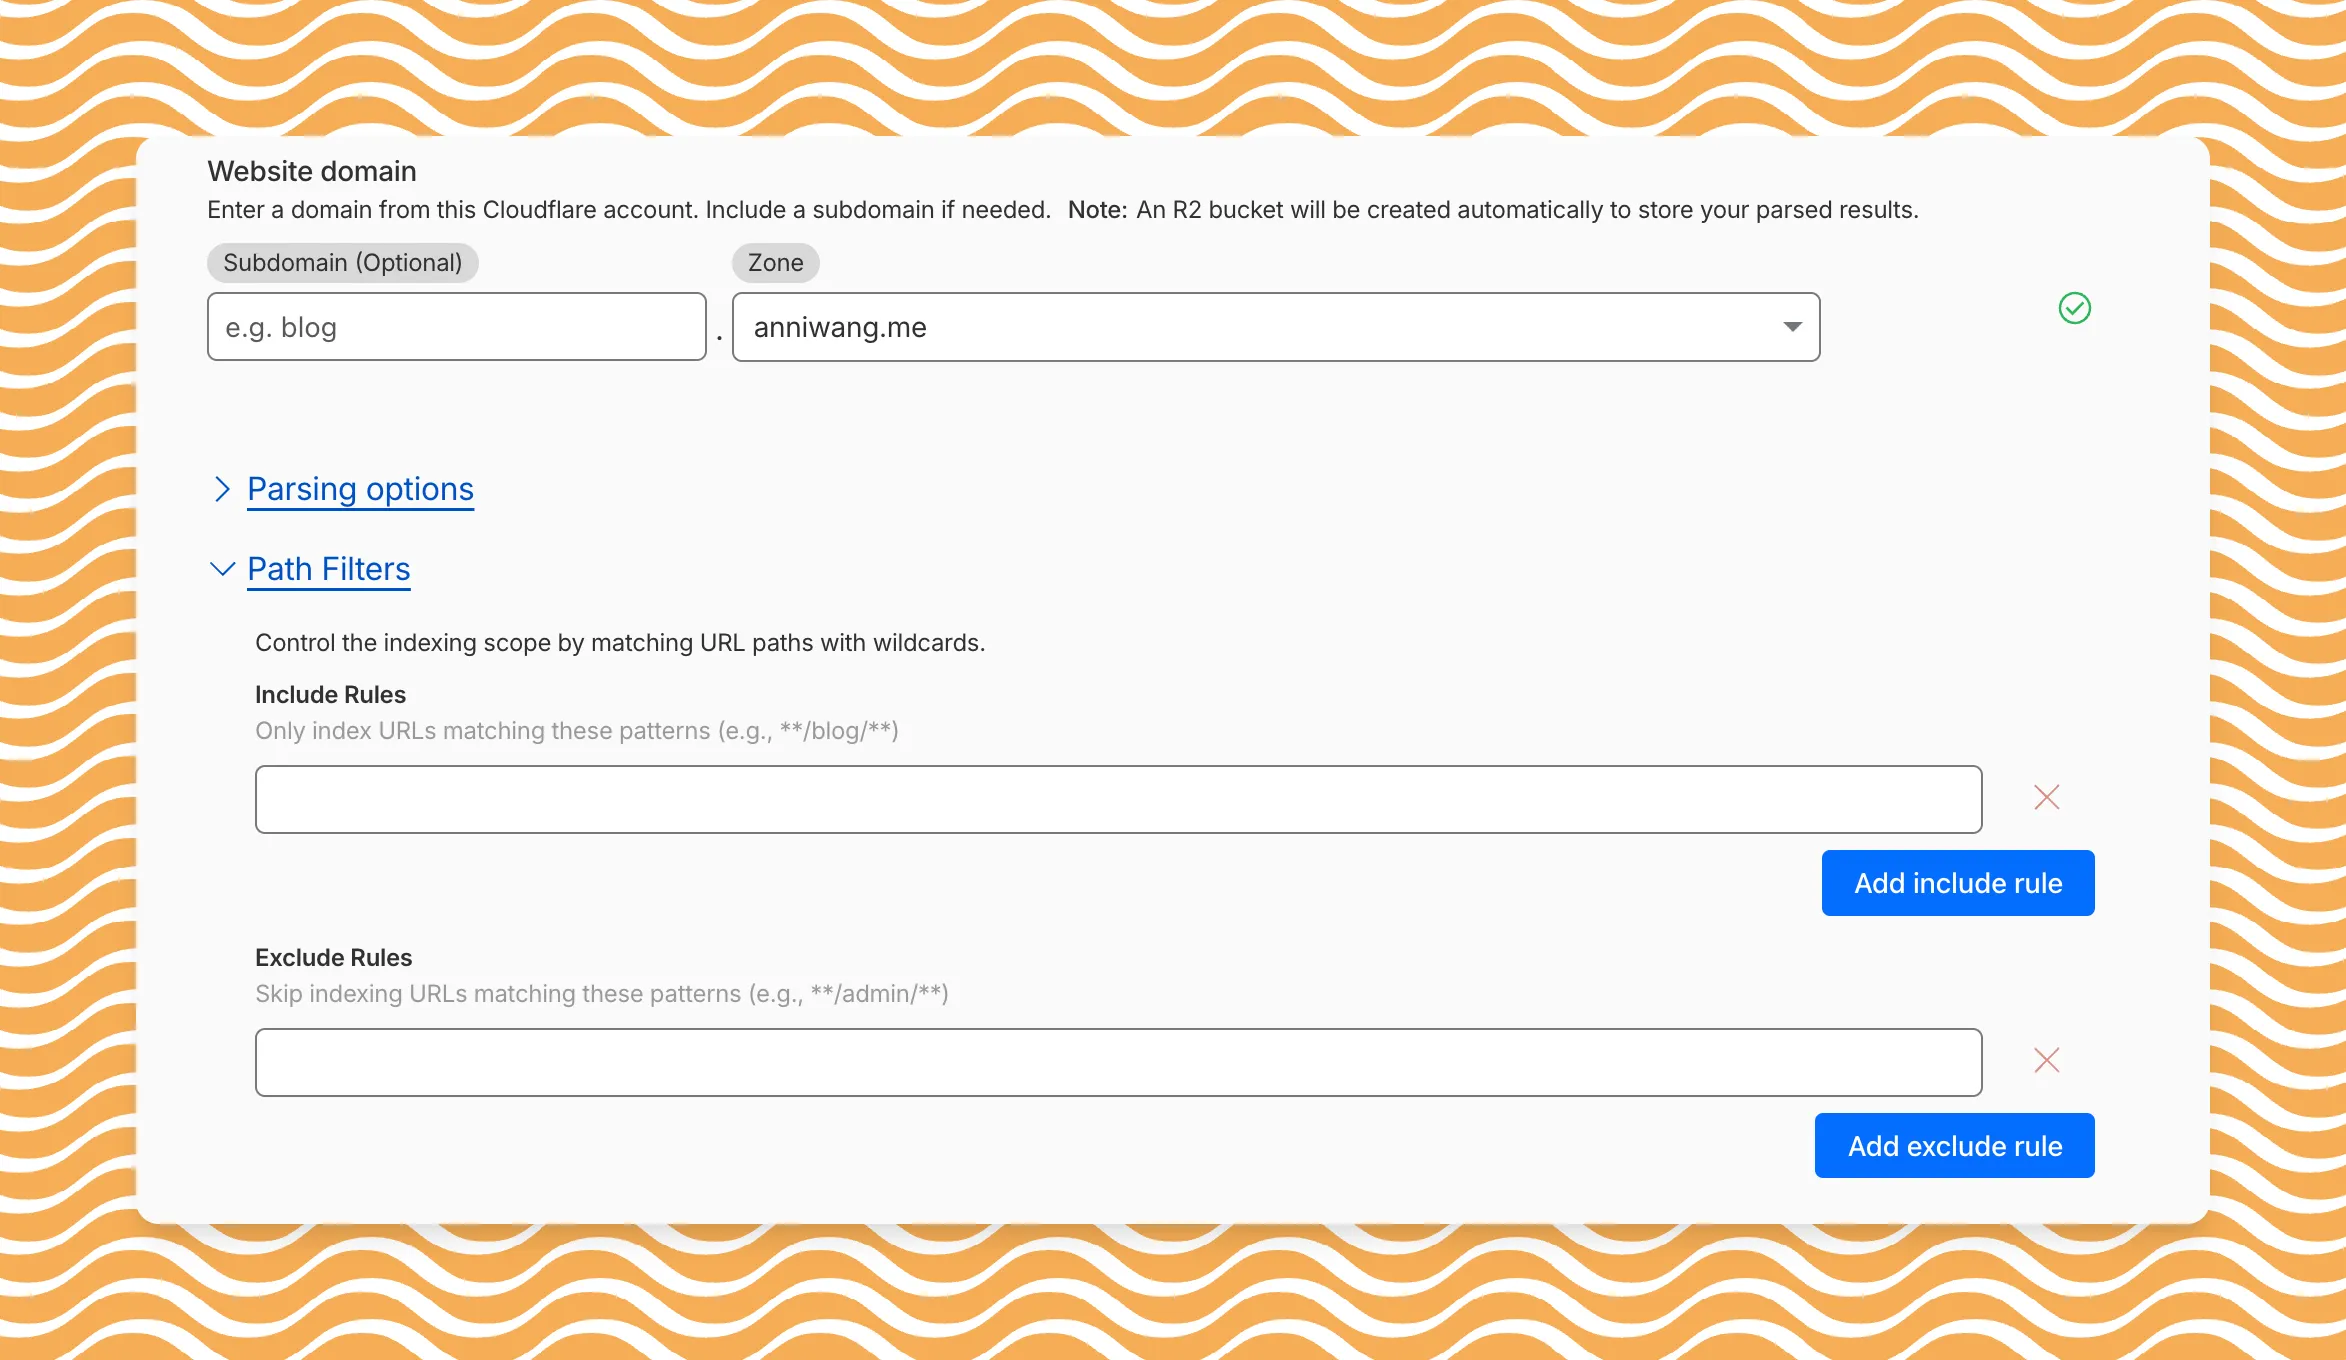
Path filtering uses micromatch ↗ patterns, so you can use
*to match within a directory and**to match across directories.Use case Include Exclude Index docs but skip drafts **/docs/****/docs/drafts/**Keep admin pages out of results — **/admin/**Index only English content **/en/**— Configure path filters when creating a new instance or update them anytime from Settings. Check out path filtering to learn more.
You can now create AI Search instances programmatically using the API. For example, use the API to create instances for each customer in a multi-tenant application or manage AI Search alongside your other infrastructure.
If you have created an AI Search instance via the dashboard before, you already have a service API token registered and can start creating instances programmatically right away. If not, follow the API guide to set up your first instance.
For example, you can now create separate search instances for each language on your website:
Terminal window for lang in en fr es de; docurl -X POST "https://api.cloudflare.com/client/v4/accounts/$ACCOUNT_ID/ai-search/instances" \-H "Authorization: Bearer $API_TOKEN" \-H "Content-Type: application/json" \--data '{"id": "docs-'"$lang"'","type": "web-crawler","source": "example.com","source_params": {"path_include": ["**/'"$lang"'/**"]}}'doneRefer to the REST API reference for additional configuration options.
We've partnered with Black Forest Labs (BFL) again to bring their optimized FLUX.2 [klein] 4B model to Workers AI! This distilled model offers faster generation and cost-effective pricing, while maintaining great output quality. With a fixed 4-step inference process, Klein 4B is ideal for rapid prototyping and real-time applications where speed matters.
Read the BFL blog ↗ to learn more about the model itself, or try it out yourself on our multi modal playground ↗.
Pricing documentation is available on the model page or pricing page.
The model hosted on Workers AI is optimized for speed with a fixed 4-step inference process and supports up to 4 image inputs. Since this is a distilled model, the
stepsparameter is fixed at 4 and cannot be adjusted. Like FLUX.2 [dev], this image model uses multipart form data inputs, even if you just have a prompt.With the REST API, the multipart form data input looks like this:
Terminal window curl --request POST \--url 'https://api.cloudflare.com/client/v4/accounts/{ACCOUNT}/ai/run/@cf/black-forest-labs/flux-2-klein-4b' \--header 'Authorization: Bearer {TOKEN}' \--header 'Content-Type: multipart/form-data' \--form 'prompt=a sunset at the alps' \--form width=1024 \--form height=1024With the Workers AI binding, you can use it as such:
JavaScript const form = new FormData();form.append("prompt", "a sunset with a dog");form.append("width", "1024");form.append("height", "1024");// FormData doesn't expose its serialized body or boundary. Passing it to a// Request (or Response) constructor serializes it and generates the Content-Type// header with the boundary, which is required for the server to parse the multipart fields.const formResponse = new Response(form);const formStream = formResponse.body;const formContentType = formResponse.headers.get('content-type');const resp = await env.AI.run("@cf/black-forest-labs/flux-2-klein-4b", {multipart: {body: formStream,contentType: formContentType,},});The parameters you can send to the model are detailed here:
JSON Schema for Model
Required Parametersprompt(string) - Text description of the image to generate
Optional Parameters
input_image_0(string) - Binary imageinput_image_1(string) - Binary imageinput_image_2(string) - Binary imageinput_image_3(string) - Binary imageguidance(float) - Guidance scale for generation. Higher values follow the prompt more closelywidth(integer) - Width of the image, default1024Range: 256-1920height(integer) - Height of the image, default768Range: 256-1920seed(integer) - Seed for reproducibility
Note: Since this is a distilled model, the
stepsparameter is fixed at 4 and cannot be adjusted.## Multi-Reference ImagesThe FLUX.2 klein-4b model supports generating images based on reference images, just like FLUX.2 [dev]. You can use this feature to apply the style of one image to another, add a new character to an image, or iterate on past generated images. You would use it with the same multipart form data structure, with the input images in binary. The model supports up to 4 input images.For the prompt, you can reference the images based on the index, like `take the subject of image 1 and style it like image 0` or even use natural language like `place the dog beside the woman`.Note: you have to name the input parameter as `input_image_0`, `input_image_1`, `input_image_2`, `input_image_3` for it to work correctly. All input images must be smaller than 512x512.```bashcurl --request POST \--url 'https://api.cloudflare.com/client/v4/accounts/{ACCOUNT}/ai/run/@cf/black-forest-labs/flux-2-klein-4b' \--header 'Authorization: Bearer {TOKEN}' \--header 'Content-Type: multipart/form-data' \--form 'prompt=take the subject of image 1 and style it like image 0' \--form input_image_0=@/Users/johndoe/Desktop/icedoutkeanu.png \--form input_image_1=@/Users/johndoe/Desktop/me.png \--form width=1024 \--form height=1024Through Workers AI Binding:
JavaScript //helper function to convert ReadableStream to Blobasync function streamToBlob(stream: ReadableStream, contentType: string): Promise<Blob> {const reader = stream.getReader();const chunks = [];while (true) {const { done, value } = await reader.read();if (done) break;chunks.push(value);}return new Blob(chunks, { type: contentType });}const image0 = await fetch("http://image-url");const image1 = await fetch("http://image-url");const form = new FormData();const image_blob0 = await streamToBlob(image0.body, "image/png");const image_blob1 = await streamToBlob(image1.body, "image/png");form.append('input_image_0', image_blob0)form.append('input_image_1', image_blob1)form.append('prompt', 'take the subject of image 1 and style it like image 0')// FormData doesn't expose its serialized body or boundary. Passing it to a// Request (or Response) constructor serializes it and generates the Content-Type// header with the boundary, which is required for the server to parse the multipart fields.const formResponse = new Response(form);const formStream = formResponse.body;const formContentType = formResponse.headers.get('content-type');const resp = await env.AI.run("@cf/black-forest-labs/flux-2-klein-4b", {multipart: {body: formStream,contentType: formContentType}})
Account administrators can now assign the AI Crawl Control Read Only role to provide read-only access to AI Crawl Control at the domain level.
Users with this role can view the Overview, Crawlers, Metrics, Robots.txt, and Settings tabs but cannot modify crawler actions or settings.
This role is specific for AI Crawl Control. You still require correct permissions to access other areas / features of the dashboard.
To assign, go to Manage Account > Members and add a policy with the AI Crawl Control Read Only role scoped to the desired domain.
Agents SDK v0.3.0, workers-ai-provider v3.0.0, and ai-gateway-provider v3.0.0 with AI SDK v6 support
We've shipped a new release for the Agents SDK ↗ v0.3.0 bringing full compatibility with AI SDK v6 ↗ and introducing the unified tool pattern, dynamic tool approval, and enhanced React hooks with improved tool handling.
This release includes improved streaming and tool support, dynamic tool approval (for "human in the loop" systems), enhanced React hooks with
onToolCallcallback, improved error handling for streaming responses, and seamless migration from v5 patterns.This makes it ideal for building production AI chat interfaces with Cloudflare Workers AI models, agent workflows, human-in-the-loop systems, or any application requiring reliable tool execution and approval workflows.
Additionally, we've updated workers-ai-provider v3.0.0, the official provider for Cloudflare Workers AI models, and ai-gateway-provider v3.0.0, the provider for Cloudflare AI Gateway, to be compatible with AI SDK v6.
AI SDK v6 introduces a unified tool pattern where all tools are defined on the server using the
tool()function. This replaces the previous client-sideAIToolpattern.TypeScript import { tool } from "ai";import { z } from "zod";// Server: Define ALL tools on the serverconst tools = {// Server-executed toolgetWeather: tool({description: "Get weather for a city",inputSchema: z.object({ city: z.string() }),execute: async ({ city }) => fetchWeather(city)}),// Client-executed tool (no execute = client handles via onToolCall)getLocation: tool({description: "Get user location from browser",inputSchema: z.object({})// No execute function}),// Tool requiring approval (dynamic based on input)processPayment: tool({description: "Process a payment",inputSchema: z.object({ amount: z.number() }),needsApproval: async ({ amount }) => amount > 100,execute: async ({ amount }) => charge(amount)})};TypeScript // Client: Handle client-side tools via onToolCall callbackimport { useAgentChat } from "agents/ai-react";const { messages, sendMessage, addToolOutput } = useAgentChat({agent,onToolCall: async ({ toolCall, addToolOutput }) => {if (toolCall.toolName === "getLocation") {const position = await new Promise((resolve, reject) => {navigator.geolocation.getCurrentPosition(resolve, reject);});addToolOutput({toolCallId: toolCall.toolCallId,output: {lat: position.coords.latitude,lng: position.coords.longitude}});}}});Key benefits of the unified tool pattern:
- Server-defined tools: All tools are defined in one place on the server
- Dynamic approval: Use
needsApprovalto conditionally require user confirmation - Cleaner client code: Use
onToolCallcallback instead of managing tool configs - Type safety: Full TypeScript support with proper tool typing
Creates a new chat interface with enhanced v6 capabilities.
TypeScript // Basic chat setup with onToolCallconst { messages, sendMessage, addToolOutput } = useAgentChat({agent,onToolCall: async ({ toolCall, addToolOutput }) => {// Handle client-side tool executionawait addToolOutput({toolCallId: toolCall.toolCallId,output: { result: "success" }});}});Use
needsApprovalon server tools to conditionally require user confirmation:TypeScript const paymentTool = tool({description: "Process a payment",inputSchema: z.object({amount: z.number(),recipient: z.string()}),needsApproval: async ({ amount }) => amount > 1000,execute: async ({ amount, recipient }) => {return await processPayment(amount, recipient);}});The
isToolUIPartandgetToolNamefunctions now check both static and dynamic tool parts:TypeScript import { isToolUIPart, getToolName } from "ai";const pendingToolCallConfirmation = messages.some((m) =>m.parts?.some((part) => isToolUIPart(part) && part.state === "input-available",),);// Handle tool confirmationif (pendingToolCallConfirmation) {await addToolOutput({toolCallId: part.toolCallId,output: "User approved the action"});}If you need the v5 behavior (static-only checks), use the new functions:
TypeScript import { isStaticToolUIPart, getStaticToolName } from "ai";The
convertToModelMessages()function is now asynchronous. Update all calls to await the result:TypeScript import { convertToModelMessages } from "ai";const result = streamText({messages: await convertToModelMessages(this.messages),model: openai("gpt-4o")});The
CoreMessagetype has been removed. UseModelMessageinstead:TypeScript import { convertToModelMessages, type ModelMessage } from "ai";const modelMessages: ModelMessage[] = await convertToModelMessages(messages);The
modeoption forgenerateObjecthas been removed:TypeScript // Before (v5)const result = await generateObject({mode: "json",model,schema,prompt});// After (v6)const result = await generateObject({model,schema,prompt});While
generateObjectandstreamObjectare still functional, the recommended approach is to usegenerateText/streamTextwith theOutput.object()helper:TypeScript import { generateText, Output, stepCountIs } from "ai";const { output } = await generateText({model: openai("gpt-4"),output: Output.object({schema: z.object({ name: z.string() })}),stopWhen: stepCountIs(2),prompt: "Generate a name"});Note: When using structured output with
generateText, you must configure multiple steps withstopWhenbecause generating the structured output is itself a step.Seamless integration with Cloudflare Workers AI models through the updated workers-ai-provider v3.0.0 with AI SDK v6 support.
Use Cloudflare Workers AI models directly in your agent workflows:
TypeScript import { createWorkersAI } from "workers-ai-provider";import { useAgentChat } from "agents/ai-react";// Create Workers AI model (v3.0.0 - enhanced v6 internals)const model = createWorkersAI({binding: env.AI,})("@cf/meta/llama-3.2-3b-instruct");Workers AI models now support v6 file handling with automatic conversion:
TypeScript // Send images and files to Workers AI modelssendMessage({role: "user",parts: [{ type: "text", text: "Analyze this image:" },{type: "file",data: imageBuffer,mediaType: "image/jpeg",},],});// Workers AI provider automatically converts to proper formatEnhanced streaming support with automatic warning detection:
TypeScript // Streaming with Workers AI modelsconst result = await streamText({model: createWorkersAI({ binding: env.AI })("@cf/meta/llama-3.2-3b-instruct"),messages: await convertToModelMessages(messages),onChunk: (chunk) => {// Enhanced streaming with warning handlingconsole.log(chunk);},});The ai-gateway-provider v3.0.0 now supports AI SDK v6, enabling you to use Cloudflare AI Gateway with multiple AI providers including Anthropic, Azure, AWS Bedrock, Google Vertex, and Perplexity.
Use Cloudflare AI Gateway to add analytics, caching, and rate limiting to your AI applications:
TypeScript import { createAIGateway } from "ai-gateway-provider";// Create AI Gateway provider (v3.0.0 - enhanced v6 internals)const model = createAIGateway({gatewayUrl: "https://gateway.ai.cloudflare.com/v1/your-account-id/gateway",headers: {"Authorization": `Bearer ${env.AI_GATEWAY_TOKEN}`}})({provider: "openai",model: "gpt-4o"});The following APIs are deprecated in favor of the unified tool pattern:
Deprecated Replacement AITooltypeUse AI SDK's tool()function on serverextractClientToolSchemas()Define tools on server, no client schemas needed createToolsFromClientSchemas()Define tools on server with tool()toolsRequiringConfirmationoptionUse needsApprovalon server toolsexperimental_automaticToolResolutionUse onToolCallcallbacktoolsoption inuseAgentChatUse onToolCallfor client-side executionaddToolResult()Use addToolOutput()- Unified Tool Pattern: All tools must be defined on the server using
tool() convertToModelMessages()is async: Addawaitto all callsCoreMessageremoved: UseModelMessageinsteadgenerateObjectmode removed: RemovemodeoptionisToolUIPartbehavior changed: Now checks both static and dynamic tool parts
Update your dependencies to use the latest versions:
Terminal window npm install agents@^0.3.0 workers-ai-provider@^3.0.0 ai-gateway-provider@^3.0.0 ai@^6.0.0 @ai-sdk/react@^3.0.0 @ai-sdk/openai@^3.0.0- Migration Guide ↗ - Comprehensive migration documentation from v5 to v6
- AI SDK v6 Documentation ↗ - Official AI SDK migration guide
- AI SDK v6 Announcement ↗ - Learn about new features in v6
- AI SDK Documentation ↗ - Complete AI SDK reference
- GitHub Issues ↗ - Report bugs or request features
We'd love your feedback! We're particularly interested in feedback on:
- Migration experience - How smooth was the upgrade from v5 to v6?
- Unified tool pattern - How does the new server-defined tool pattern work for you?
- Dynamic tool approval - Does the
needsApprovalfeature meet your needs? - AI Gateway integration - How well does the new provider work with your setup?
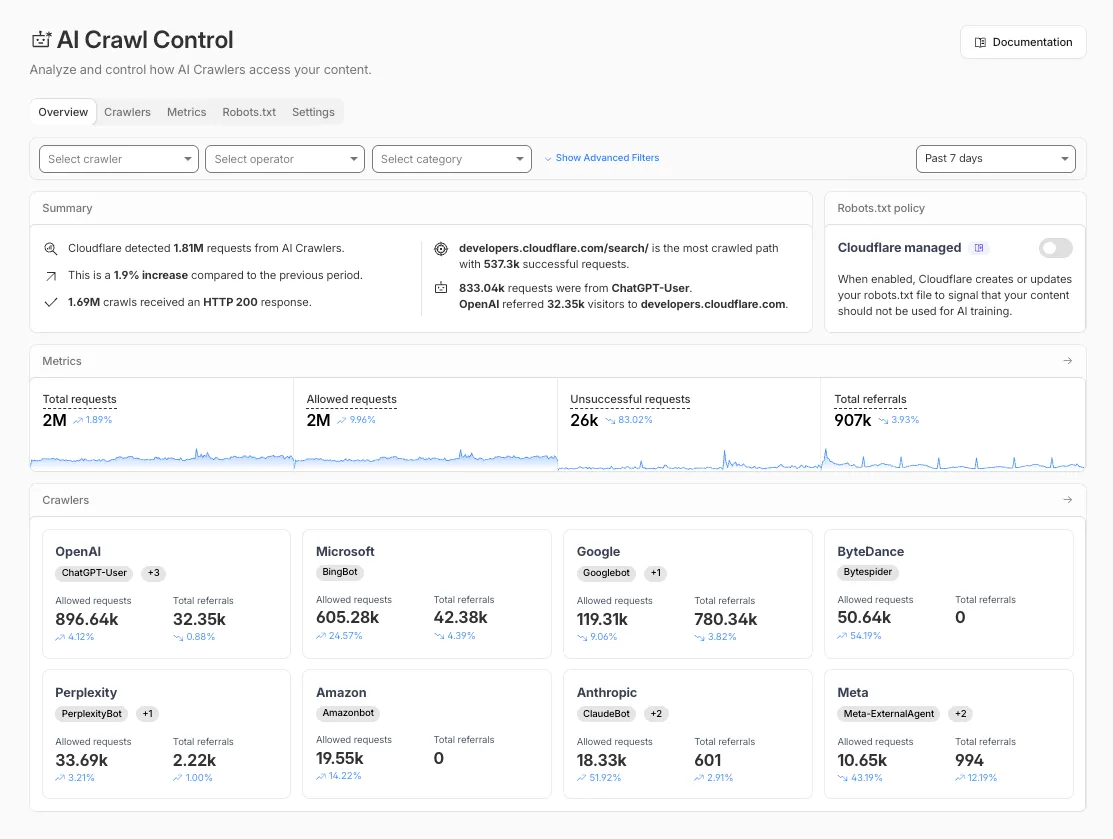
The Overview tab is now the default view in AI Crawl Control. The previous default view with controls for individual AI crawlers is available in the Crawlers tab.
- Executive summary — Monitor total requests, volume change, most common status code, most popular path, and high-volume activity
- Operator grouping — Track crawlers by their operating companies (OpenAI, Microsoft, Google, ByteDance, Anthropic, Meta)
- Customizable filters — Filter your snapshot by date range, crawler, operator, hostname, or path
- Log in to the Cloudflare dashboard and select your account and domain.
- Go to AI Crawl Control, where the Overview tab opens by default with your activity snapshot.
- Use filters to customize your view by date range, crawler, operator, hostname, or path.
- Navigate to the Crawlers tab to manage controls for individual crawlers.
Learn more about analyzing AI traffic and managing AI crawlers.
Pay Per Crawl is introducing enhancements for both AI crawler operators and site owners, focusing on programmatic discovery, flexible pricing models, and granular configuration control.
A new authenticated API endpoint allows verified crawlers to programmatically discover domains participating in Pay Per Crawl. Crawlers can use this to build optimized crawl queues, cache domain lists, and identify new participating sites. This eliminates the need to discover payable content through trial requests.
The API endpoint is
GET https://crawlers-api.ai-audit.cfdata.org/charged_zonesand requires Web Bot Auth authentication. Refer to Discover payable content for authentication steps, request parameters, and response schema.Payment headers (
crawler-exact-priceorcrawler-max-price) must now be included in the Web Bot Authsignature-inputheader components. This security enhancement prevents payment header tampering, ensures authenticated payment intent, validates crawler identity with payment commitment, and protects against replay attacks with modified pricing. Crawlers must add their payment header to the list of signed components when constructing the signature-input header.Pay Per Crawl error responses now include a new
crawler-errorheader with 11 specific error codes for programmatic handling. Error response bodies remain unchanged for compatibility. These codes enable robust error handling, automated retry logic, and accurate spending tracking.Site owners can now offer free access to specific pages like homepages, navigation, or discovery pages while charging for other content. Create a Configuration Rule in Rules > Configuration Rules, set your URI pattern using wildcard, exact, or prefix matching on the URI Full field, and enable the Disable Pay Per Crawl setting. When disabled for a URI pattern, crawler requests pass through without blocking or charging.
Some paths are always free to crawl. These paths are:
/robots.txt,/sitemap.xml,/security.txt,/.well-known/security.txt,/crawlers.json.AI crawler operators: Discover payable content | Crawl pages
Site owners: Advanced configuration
The latest release of @cloudflare/agents ↗ brings resumable streaming, significant MCP client improvements, and critical fixes for schedules and Durable Object lifecycle management.
AIChatAgentnow supports resumable streaming, allowing clients to reconnect and continue receiving streamed responses without losing data. This is useful for:- Long-running AI responses
- Users on unreliable networks
- Users switching between devices mid-conversation
- Background tasks where users navigate away and return
- Real-time collaboration where multiple clients need to stay in sync
Streams are maintained across page refreshes, broken connections, and syncing across open tabs and devices.
- Default JSON schema validator added to MCP client
- Schedules ↗ can now safely destroy the agent
The
MCPClientManagerAPI has been redesigned for better clarity and control:- New
registerServer()method: Register MCP servers without immediately connecting - New
connectToServer()method: Establish connections to registered servers - Improved reconnect logic:
restoreConnectionsFromStorage()now properly handles failed connections
TypeScript // Register a server to Agentconst { id } = await this.mcp.registerServer({name: "my-server",url: "https://my-mcp-server.example.com",});// Connect when readyawait this.mcp.connectToServer(id);// Discover tools, prompts and resourcesawait this.mcp.discoverIfConnected(id);The SDK now includes a formalized
MCPConnectionStateenum with states:idle,connecting,authenticating,connected,discovering, andready.MCP discovery fetches the available tools, prompts, and resources from an MCP server so your agent knows what capabilities are available. The
MCPClientConnectionclass now includes a dedicateddiscover()method with improved reliability:- Supports cancellation via AbortController
- Configurable timeout (default 15s)
- Discovery failures now throw errors immediately instead of silently continuing
- Fixed a bug where schedules ↗ meant to fire immediately with this.schedule(0, ...) or
this.schedule(new Date(), ...)would not fire - Fixed an issue where schedules that took longer than 30 seconds would occasionally time out
- Fixed SSE transport now properly forwards session IDs and request headers
- Fixed AI SDK stream events convertion to UIMessageStreamPart
To update to the latest version:
Terminal window npm i agents@latest
We've partnered with Black Forest Labs (BFL) to bring their latest FLUX.2 [dev] model to Workers AI! This model excels in generating high-fidelity images with physical world grounding, multi-language support, and digital asset creation. You can also create specific super images with granular controls like JSON prompting.
Read the BFL blog ↗ to learn more about the model itself. Read our Cloudflare blog ↗ to see the model in action, or try it out yourself on our multi modal playground ↗.
Pricing documentation is available on the model page or pricing page. Note, we expect to drop pricing in the next few days after iterating on the model performance.
The model hosted on Workers AI is able to support up to 4 image inputs (512x512 per input image). Note, this image model is one of the most powerful in the catalog and is expected to be slower than the other image models we currently support. One catch to look out for is that this model takes multipart form data inputs, even if you just have a prompt.
With the REST API, the multipart form data input looks like this:
Terminal window curl --request POST \--url 'https://api.cloudflare.com/client/v4/accounts/{ACCOUNT}/ai/run/@cf/black-forest-labs/flux-2-dev' \--header 'Authorization: Bearer {TOKEN}' \--header 'Content-Type: multipart/form-data' \--form 'prompt=a sunset at the alps' \--form steps=25--form width=1024--form height=1024With the Workers AI binding, you can use it as such:
JavaScript const form = new FormData();form.append('prompt', 'a sunset with a dog');form.append('width', '1024');form.append('height', '1024');//this dummy request is temporary hack//we're pushing a change to address this soonconst formRequest = new Request('http://dummy', {method: 'POST',body: form});const formStream = formRequest.body;const formContentType = formRequest.headers.get('content-type') || 'multipart/form-data';const resp = await env.AI.run("@cf/black-forest-labs/flux-2-dev", {multipart: {body: formStream,contentType: formContentType}});The parameters you can send to the model are detailed here:
JSON Schema for Model
Required Parametersprompt(string) - Text description of the image to generate
Optional Parameters
input_image_0(string) - Binary imageinput_image_1(string) - Binary imageinput_image_2(string) - Binary imageinput_image_3(string) - Binary imagesteps(integer) - Number of inference steps. Higher values may improve quality but increase generation timeguidance(float) - Guidance scale for generation. Higher values follow the prompt more closelywidth(integer) - Width of the image, default1024Range: 256-1920height(integer) - Height of the image, default768Range: 256-1920seed(integer) - Seed for reproducibility
## Multi-Reference ImagesThe FLUX.2 model is great at generating images based on reference images. You can use this feature to apply the style of one image to another, add a new character to an image, or iterate on past generate images. You would use it with the same multipart form data structure, with the input images in binary.For the prompt, you can reference the images based on the index, like `take the subject of image 1 and style it like image 0` or even use natural language like `place the dog beside the woman`.Note: you have to name the input parameter as `input_image_0`, `input_image_1`, `input_image_2` for it to work correctly. All input images must be smaller than 512x512.```bashcurl --request POST \--url 'https://api.cloudflare.com/client/v4/accounts/{ACCOUNT}/ai/run/@cf/black-forest-labs/flux-2-dev' \--header 'Authorization: Bearer {TOKEN}' \--header 'Content-Type: multipart/form-data' \--form 'prompt=take the subject of image 1 and style it like image 0' \--form input_image_0=@/Users/johndoe/Desktop/icedoutkeanu.png \--form input_image_1=@/Users/johndoe/Desktop/me.png \--form steps=25--form width=1024--form height=1024Through Workers AI Binding:
JavaScript //helper function to convert ReadableStream to Blobasync function streamToBlob(stream: ReadableStream, contentType: string): Promise<Blob> {const reader = stream.getReader();const chunks = [];while (true) {const { done, value } = await reader.read();if (done) break;chunks.push(value);}return new Blob(chunks, { type: contentType });}const image0 = await fetch("http://image-url");const image1 = await fetch("http://image-url");const form = new FormData();const image_blob0 = await streamToBlob(image0.body, "image/png");const image_blob1 = await streamToBlob(image1.body, "image/png");form.append('input_image_0', image_blob0)form.append('input_image_1', image_blob1)form.append('prompt', 'take the subject of image 1and style it like image 0')//this dummy request is temporary hack//we're pushing a change to address this soonconst formRequest = new Request('http://dummy', {method: 'POST',body: form});const formStream = formRequest.body;const formContentType = formRequest.headers.get('content-type') || 'multipart/form-data';const resp = await env.AI.run("@cf/black-forest-labs/flux-2-dev", {multipart: {body: form,contentType: "multipart/form-data"}})The model supports prompting in JSON to get more granular control over images. You would pass the JSON as the value of the 'prompt' field in the multipart form data. See the JSON schema below on the base parameters you can pass to the model.
JSON Prompting Schema
{"type": "object","properties": {"scene": {"type": "string","description": "Overall scene setting or location"},"subjects": {"type": "array","items": {"type": "object","properties": {"type": {"type": "string","description": "Type of subject (e.g., desert nomad, blacksmith, DJ, falcon)"},"description": {"type": "string","description": "Physical attributes, clothing, accessories"},"pose": {"type": "string","description": "Action or stance"},"position": {"type": "string","enum": ["foreground", "midground", "background"],"description": "Depth placement in scene"}},"required": ["type", "description", "pose", "position"]}},"style": {"type": "string","description": "Artistic rendering style (e.g., digital painting, photorealistic, pixel art, noir sci-fi, lifestyle photo, wabi-sabi photo)"},"color_palette": {"type": "array","items": { "type": "string" },"minItems": 3,"maxItems": 3,"description": "Exactly 3 main colors for the scene (e.g., ['navy', 'neon yellow', 'magenta'])"},"lighting": {"type": "string","description": "Lighting condition and direction (e.g., fog-filtered sun, moonlight with star glints, dappled sunlight)"},"mood": {"type": "string","description": "Emotional atmosphere (e.g., harsh and determined, playful and modern, peaceful and dreamy)"},"background": {"type": "string","description": "Background environment details"},"composition": {"type": "string","enum": ["rule of thirds","circular arrangement","framed by foreground","minimalist negative space","S-curve","vanishing point center","dynamic off-center","leading leads","golden spiral","diagonal energy","strong verticals","triangular arrangement"],"description": "Compositional technique"},"camera": {"type": "object","properties": {"angle": {"type": "string","enum": ["eye level", "low angle", "slightly low", "bird's-eye", "worm's-eye", "over-the-shoulder", "isometric"],"description": "Camera perspective"},"distance": {"type": "string","enum": ["close-up", "medium close-up", "medium shot", "medium wide", "wide shot", "extreme wide"],"description": "Framing distance"},"focus": {"type": "string","enum": ["deep focus", "macro focus", "selective focus", "sharp on subject", "soft background"],"description": "Focus type"},"lens": {"type": "string","enum": ["14mm", "24mm", "35mm", "50mm", "70mm", "85mm"],"description": "Focal length (wide to telephoto)"},"f-number": {"type": "string","description": "Aperture (e.g., f/2.8, the smaller the number the more blurry the background)"},"ISO": {"type": "number","description": "Light sensitivity value (comfortable range between 100 & 6400, lower = less sensitivity)"}}},"effects": {"type": "array","items": { "type": "string" },"description": "Post-processing effects (e.g., 'lens flare small', 'subtle film grain', 'soft bloom', 'god rays', 'chromatic aberration mild')"}},"required": ["scene", "subjects"]}- The model also supports the most common latin and non-latin character languages
- You can prompt the model with specific hex codes like
#2ECC71 - Try creating digital assets like landing pages, comic strips, infographics too!
AI Search now supports custom HTTP headers for website crawling, solving a common problem where valuable content behind authentication or access controls could not be indexed.
Previously, AI Search could only crawl publicly accessible pages, leaving knowledge bases, documentation, and other protected content out of your search results. With custom headers support, you can now include authentication credentials that allow the crawler to access this protected content.
This is particularly useful for indexing content like:
- Internal documentation behind corporate login systems
- Premium content that requires users to provide access to unlock
- Sites protected by Cloudflare Access using service tokens
To add custom headers when creating an AI Search instance, select Parse options. In the Extra headers section, you can add up to five custom headers per Website data source.
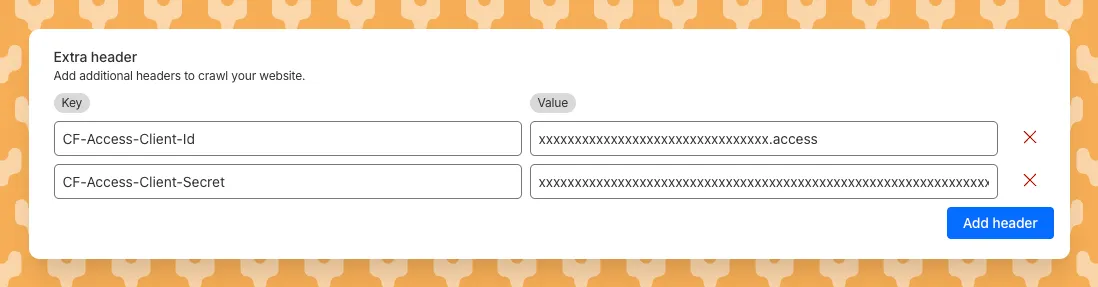
For example, to crawl a site protected by Cloudflare Access, you can add service token credentials as custom headers:
CF-Access-Client-Id: your-token-id.accessCF-Access-Client-Secret: your-token-secretThe crawler will automatically include these headers in all requests, allowing it to access protected pages that would otherwise be blocked.
Learn more about configuring custom headers for website crawling in AI Search.
AI Crawl Control now supports per-crawler drilldowns with an extended actions menu and status code analytics. Drill down into Metrics, Cloudflare Radar, and Security Analytics, or export crawler data for use in WAF custom rules, Redirect Rules, and robots.txt files.
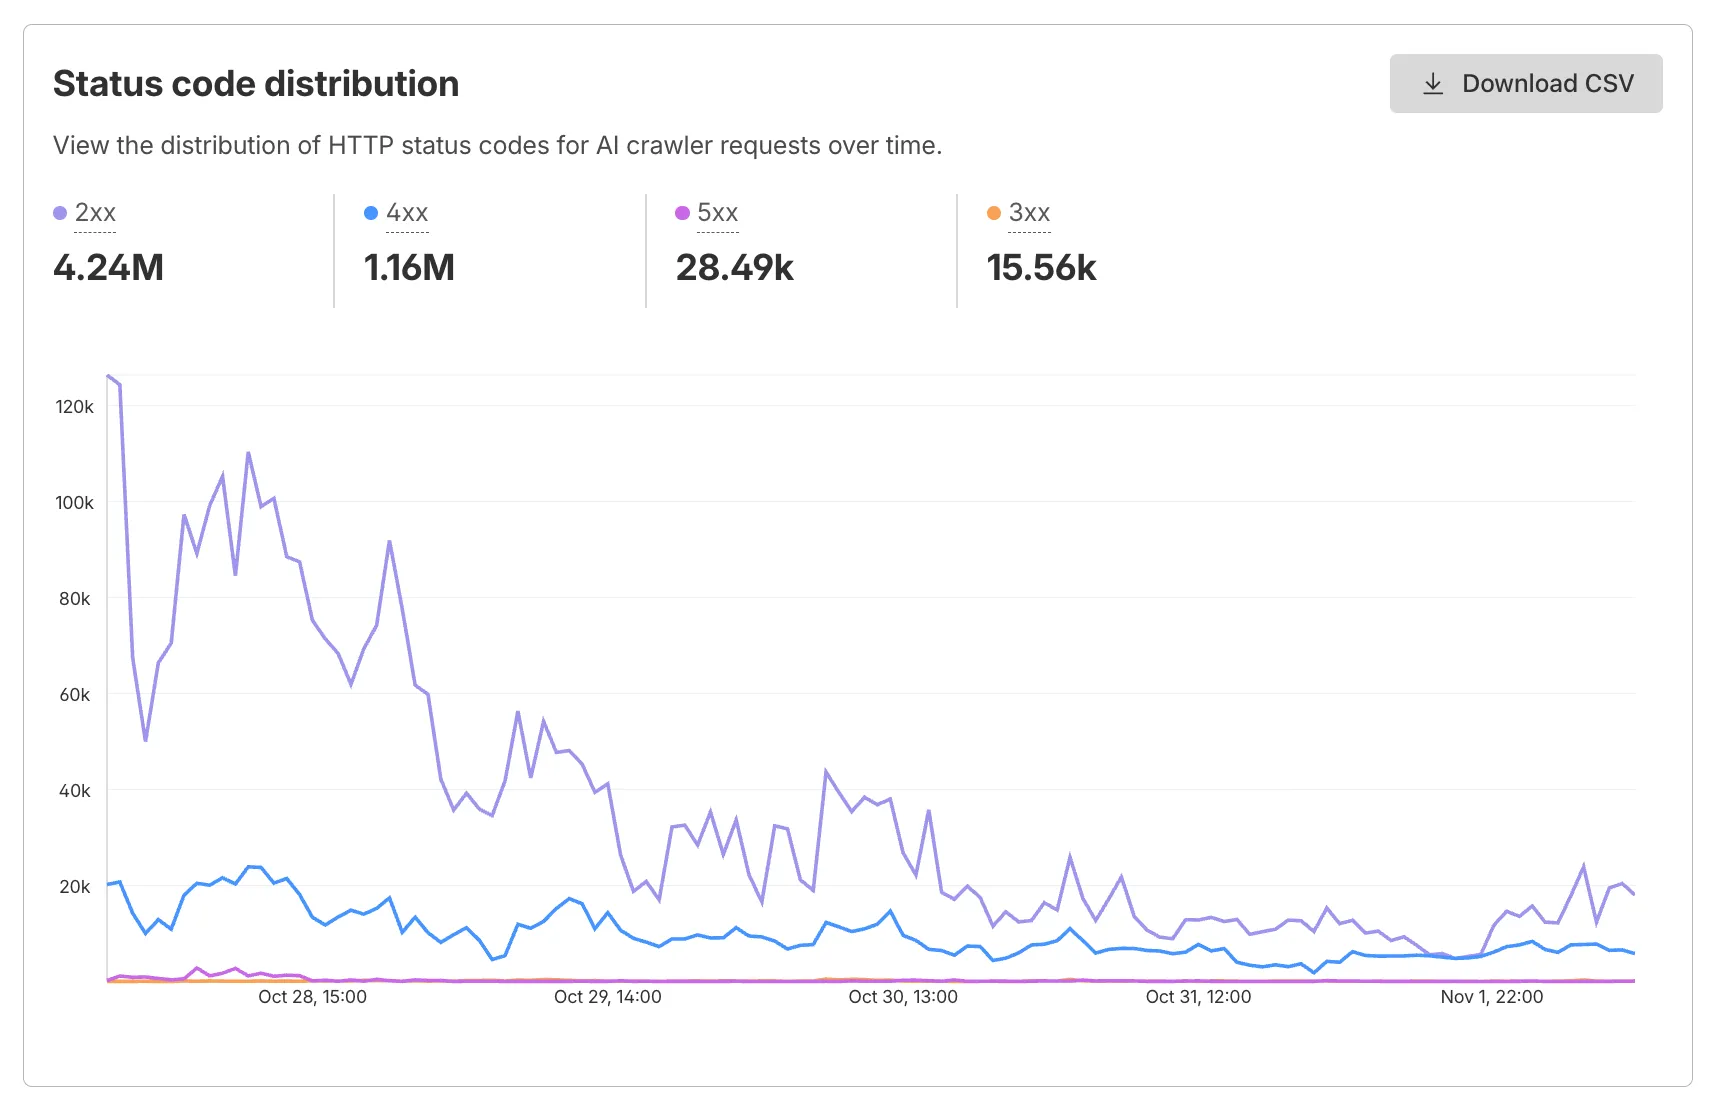
The Metrics tab includes a status code distribution chart showing HTTP response codes (2xx, 3xx, 4xx, 5xx) over time. Filter by individual crawler, category, operator, or time range to analyze how specific crawlers interact with your site.
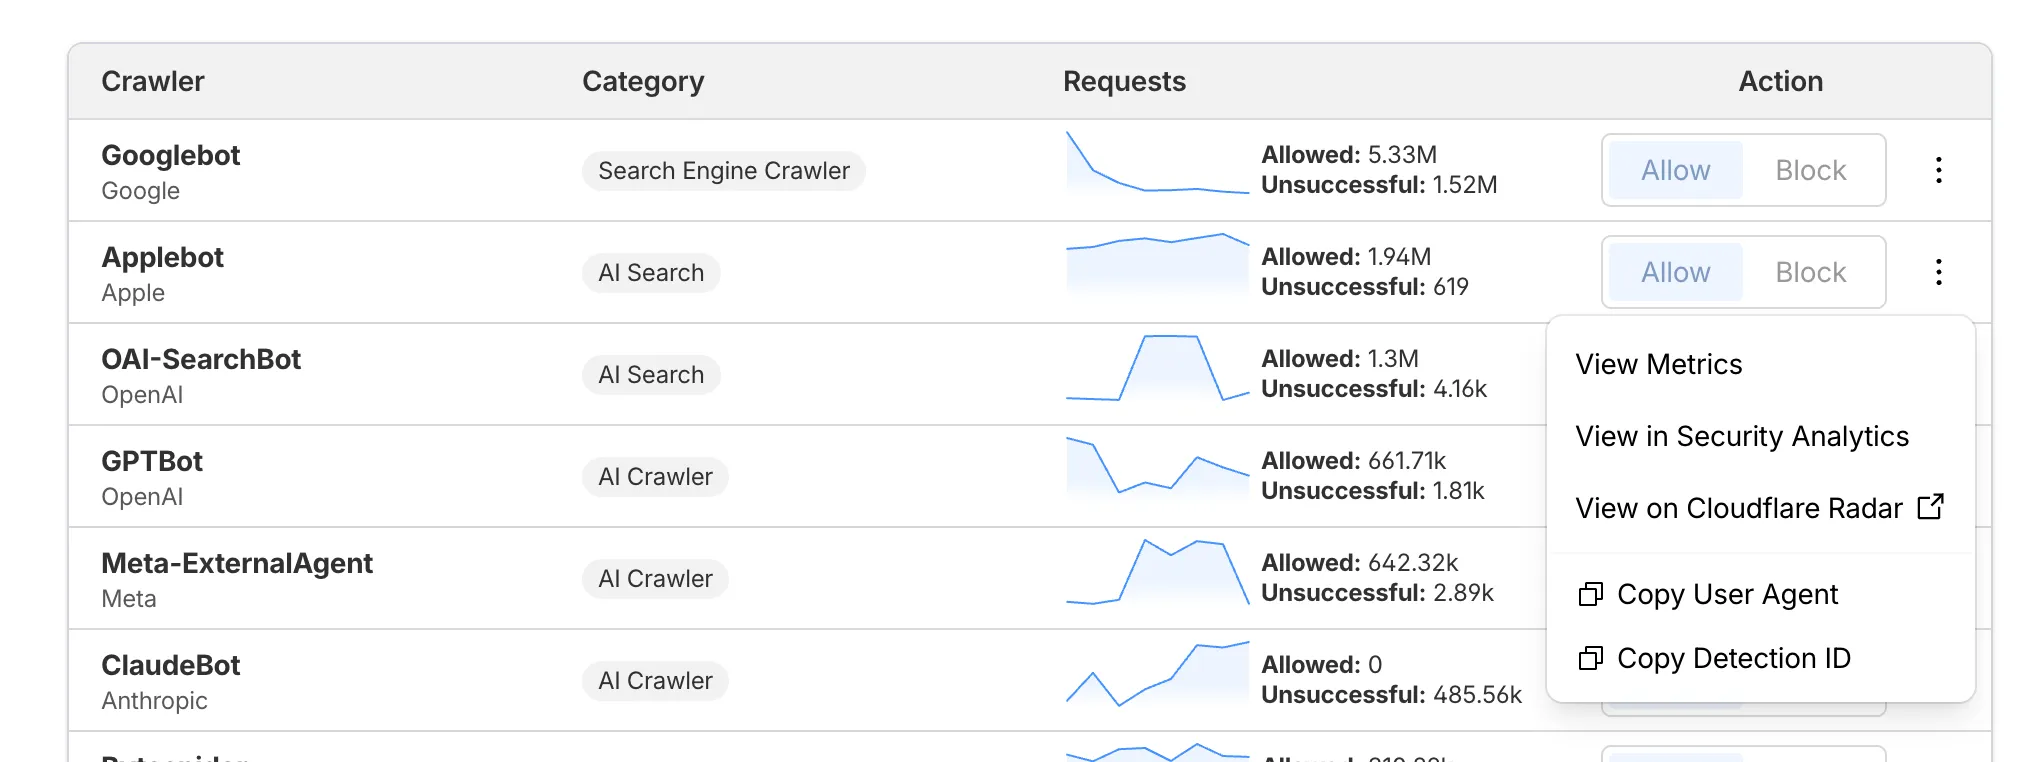
Each crawler row includes a three-dot menu with per-crawler actions:
- View Metrics — Filter the AI Crawl Control Metrics page to the selected crawler.
- View on Cloudflare Radar — Access verified crawler details on Cloudflare Radar.
- Copy User Agent — Copy user agent strings for use in WAF custom rules, Redirect Rules, or robots.txt files.
- View in Security Analytics — Filter Security Analytics by detection IDs (Bot Management customers).
- Copy Detection ID — Copy detection IDs for use in WAF custom rules (Bot Management customers).
- Log in to the Cloudflare dashboard, and select your account and domain.
- Go to AI Crawl Control > Metrics to access the status code distribution chart.
- Go to AI Crawl Control > Crawlers and select the three-dot menu for any crawler to access per-crawler actions.
- Select multiple crawlers to use bulk copy buttons for user agents or detection IDs.
Learn more about AI Crawl Control.
Workers, including those using Durable Objects and Browser Rendering, may now process WebSocket messages up to 32 MiB in size. Previously, this limit was 1 MiB.
This change allows Workers to handle use cases requiring large message sizes, such as processing Chrome Devtools Protocol messages.
For more information, please see the Durable Objects startup limits.
AI Search now supports reranking for improved retrieval quality and allows you to set the system prompt directly in your API requests.
You can now enable reranking to reorder retrieved documents based on their semantic relevance to the user’s query. Reranking helps improve accuracy, especially for large or noisy datasets where vector similarity alone may not produce the optimal ordering.
You can enable and configure reranking in the dashboard or directly in your API requests:
JavaScript const answer = await env.AI.autorag("my-autorag").aiSearch({query: "How do I train a llama to deliver coffee?",model: "@cf/meta/llama-3.3-70b-instruct-fp8-fast",reranking: {enabled: true,model: "@cf/baai/bge-reranker-base"}});Previously, system prompts could only be configured in the dashboard. You can now define them directly in your API requests, giving you per-query control over behavior. For example:
JavaScript // Dynamically set query and system prompt in AI Searchasync function getAnswer(query, tone) {const systemPrompt = `You are a ${tone} assistant.`;const response = await env.AI.autorag("my-autorag").aiSearch({query: query,system_prompt: systemPrompt});return response;}// Example usageconst query = "What is Cloudflare?";const tone = "friendly";const answer = await getAnswer(query, tone);console.log(answer);Learn more about Reranking and System Prompt in AI Search.
Developers can now programmatically retrieve a list of all file formats supported by the Markdown Conversion utility in Workers AI.
You can use the
env.AIbinding:TypeScript await env.AI.toMarkdown().supported()Or call the REST API:
Terminal window curl https://api.cloudflare.com/client/v4/accounts/{ACCOUNT_ID}/ai/tomarkdown/supported \-H 'Authorization: Bearer {API_TOKEN}'Both return a list of file formats that users can convert into Markdown:
[{"extension": ".pdf","mimeType": "application/pdf",},{"extension": ".jpeg","mimeType": "image/jpeg",},...]Learn more about our Markdown Conversion utility.
AI Crawl Control now includes a Robots.txt tab that provides insights into how AI crawlers interact with your
robots.txtfiles.The Robots.txt tab allows you to:
- Monitor the health status of
robots.txtfiles across all your hostnames, including HTTP status codes, and identify hostnames that need arobots.txtfile. - Track the total number of requests to each
robots.txtfile, with breakdowns of successful versus unsuccessful requests. - Check whether your
robots.txtfiles contain Content Signals ↗ directives for AI training, search, and AI input. - Identify crawlers that request paths explicitly disallowed by your
robots.txtdirectives, including the crawler name, operator, violated path, specific directive, and violation count. - Filter
robots.txtrequest data by crawler, operator, category, and custom time ranges.
When you identify non-compliant crawlers, you can:
- Block the crawler in the Crawlers tab
- Create custom WAF rules for path-specific security
- Use Redirect Rules to guide crawlers to appropriate areas of your site
To get started, go to AI Crawl Control > Robots.txt in the Cloudflare dashboard. Learn more in the Track robots.txt documentation.
- Monitor the health status of
AI Crawl Control now provides enhanced metrics and CSV data exports to help you better understand AI crawler activity across your sites.
Visualize crawler activity patterns over time, and group data by different dimensions:
- By Crawler — Track activity from individual AI crawlers (GPTBot, ClaudeBot, Bytespider)
- By Category — Analyze crawler purpose or type
- By Operator — Discover which companies (OpenAI, Anthropic, ByteDance) are crawling your site
- By Host — Break down activity across multiple subdomains
- By Status Code — Monitor HTTP response codes to crawlers (200s, 300s, 400s, 500s)

Interactive chart showing crawler requests over time with filterable dimensions Identify traffic sources with referrer analytics:
- View top referrers driving traffic to your site
- Understand discovery patterns and content popularity from AI operators

Bar chart showing top referrers and their respective traffic volumes Download your filtered view as a CSV:
- Includes all applied filters and groupings
- Useful for custom reporting and deeper analysis
- Log in to the Cloudflare dashboard, and select your account and domain.
- Go to AI Crawl Control > Metrics.
- Use the grouping tabs to explore different views of your data.
- Apply filters to focus on specific crawlers, time ranges, or response codes.
- Select Download CSV to export your filtered data for further analysis.
Learn more about AI Crawl Control.
Deepgram's newest Flux model
@cf/deepgram/fluxis now available on Workers AI, hosted directly on Cloudflare's infrastructure. We're excited to be a launch partner with Deepgram and offer their new Speech Recognition model built specifically for enabling voice agents. Check out Deepgram's blog ↗ for more details on the release.The Flux model can be used in conjunction with Deepgram's speech-to-text model
@cf/deepgram/nova-3and text-to-speech model@cf/deepgram/aura-1to build end-to-end voice agents. Having Deepgram on Workers AI takes advantage of our edge GPU infrastructure, for ultra low latency voice AI applications.For the month of October 2025, Deepgram's Flux model will be free to use on Workers AI. Official pricing will be announced soon and charged after the promotional pricing period ends on October 31, 2025. Check out the model page for pricing details in the future.
The new Flux model is WebSocket only as it requires live bi-directional streaming in order to recognize speech activity.
- Create a worker that establishes a websocket connection with
@cf/deepgram/flux
JavaScript export default {async fetch(request, env, ctx): Promise<Response> {const resp = await env.AI.run("@cf/deepgram/flux", {encoding: "linear16",sample_rate: "16000"}, {websocket: true});return resp;},} satisfies ExportedHandler<Env>;- Deploy your worker
Terminal window npx wrangler deploy- Write a client script to connect to your worker and start sending random audio bytes to it
JavaScript const ws = new WebSocket('wss://<your-worker-url.com>');ws.onopen = () => {console.log('Connected to WebSocket');// Generate and send random audio bytes// You can replace this part with a function// that reads from your mic or other audio sourceconst audioData = generateRandomAudio();ws.send(audioData);console.log('Audio data sent');};ws.onmessage = (event) => {// Transcription will be received here// Add your custom logic to parse the dataconsole.log('Received:', event.data);};ws.onerror = (error) => {console.error('WebSocket error:', error);};ws.onclose = () => {console.log('WebSocket closed');};// Generate random audio data (1 second of noise at 44.1kHz, mono)function generateRandomAudio() {const sampleRate = 44100;const duration = 1;const numSamples = sampleRate * duration;const buffer = new ArrayBuffer(numSamples * 2);const view = new Int16Array(buffer);for (let i = 0; i < numSamples; i++) {view[i] = Math.floor(Math.random() * 65536 - 32768);}return buffer;}- Create a worker that establishes a websocket connection with
We’re shipping three updates to Browser Rendering:
- Playwright support is now Generally Available and synced with Playwright v1.55 ↗, giving you a stable foundation for critical automation and AI-agent workflows.
- We’re also adding Stagehand support (Beta) so you can combine code with natural language instructions to build more resilient automations.
- Finally, we’ve tripled limits for paid plans across both the REST API and Workers Bindings to help you scale.
To get started with Stagehand, refer to the Stagehand example that uses Stagehand and Workers AI to search for a movie on this example movie directory ↗, extract its details using natural language (title, year, rating, duration, and genre), and return the information along with a screenshot of the webpage.
Stagehand example const stagehand = new Stagehand({env: "LOCAL",localBrowserLaunchOptions: { cdpUrl: endpointURLString(env.BROWSER) },llmClient: new WorkersAIClient(env.AI),verbose: 1,});await stagehand.init();const page = stagehand.page;await page.goto('https://demo.playwright.dev/movies');// if search is a multi-step action, stagehand will return an array of actions it needs to act onconst actions = await page.observe('Search for "Furiosa"');for (const action of actions)await page.act(action);await page.act('Click the search result');// normal playwright functions work as expectedawait page.waitForSelector('.info-wrapper .cast');let movieInfo = await page.extract({instruction: 'Extract movie information',schema: z.object({title: z.string(),year: z.number(),rating: z.number(),genres: z.array(z.string()),duration: z.number().describe("Duration in minutes"),}),});await stagehand.close();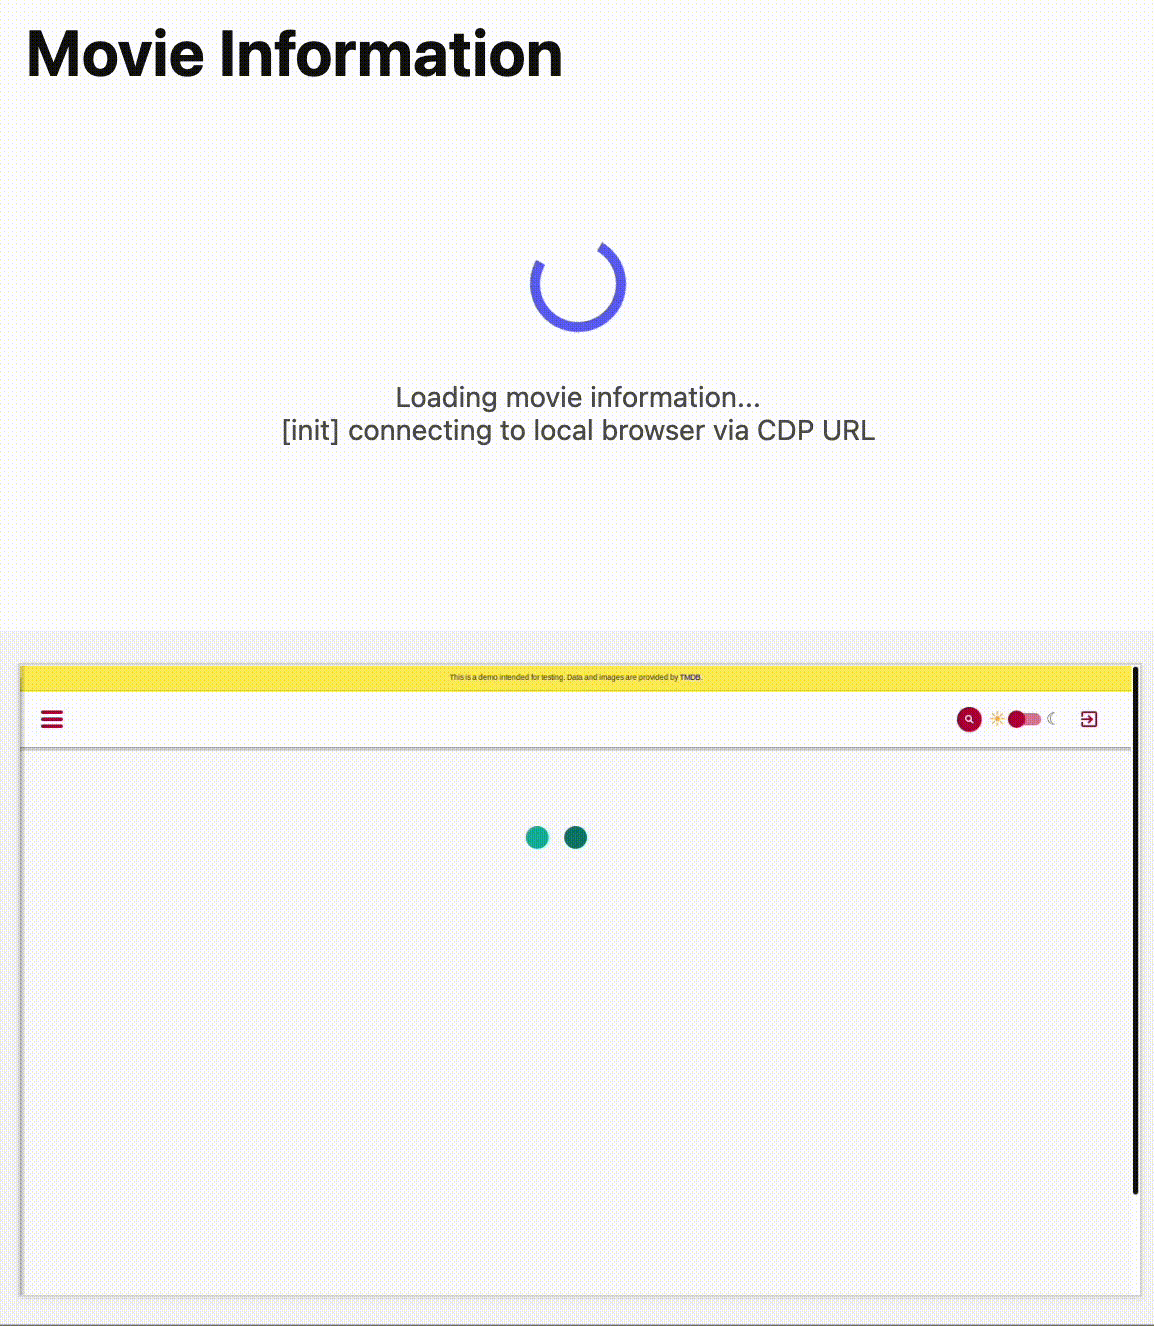
AutoRAG is now AI Search! The new name marks a new and bigger mission: to make world-class search infrastructure available to every developer and business.
With AI Search you can now use models from different providers like OpenAI and Anthropic. By attaching your provider keys to the AI Gateway linked to your AI Search instance, you can use many more models for both embedding and inference.
To use AI Search with other model providers:
- Add provider keys to AI Gateway
- Go to AI > AI Gateway in the dashboard.
- Select or create an AI gateway.
- In Provider Keys, choose your provider, click Add, and enter the key.
- Connect a gateway to AI Search: When creating a new AI Search, select the AI Gateway with your provider keys. For an existing AI Search, go to Settings and switch to a gateway that has your keys under Resources.
- Select models: Embedding models are only available to be changed when creating a new AI Search. Generation model can be selected when creating a new AI Search and can be changed at any time in Settings.
Once configured, your AI Search instance will be able to reference models available through your AI Gateway when making a
/ai-searchrequest:JavaScript export default {async fetch(request, env) {// Query your AI Search instance with a natural language question to an OpenAI modelconst result = await env.AI.autorag("my-ai-search").aiSearch({query: "What's new for Cloudflare Birthday Week?",model: "openai/gpt-5"});// Return only the generated answer as plain textreturn new Response(result.response, {headers: { "Content-Type": "text/plain" },});},};In the coming weeks we will also roll out updates to align the APIs with the new name. The existing APIs will continue to be supported for the time being. Stay tuned to the AI Search Changelog and Discord ↗ for more updates!
- Add provider keys to AI Gateway