
AutoRAG now includes a Metrics tab that shows how your data is indexed and searched. Get a clear view of the health of your indexing pipeline, compare usage between
ai-searchandsearch, and see which files are retrieved most often.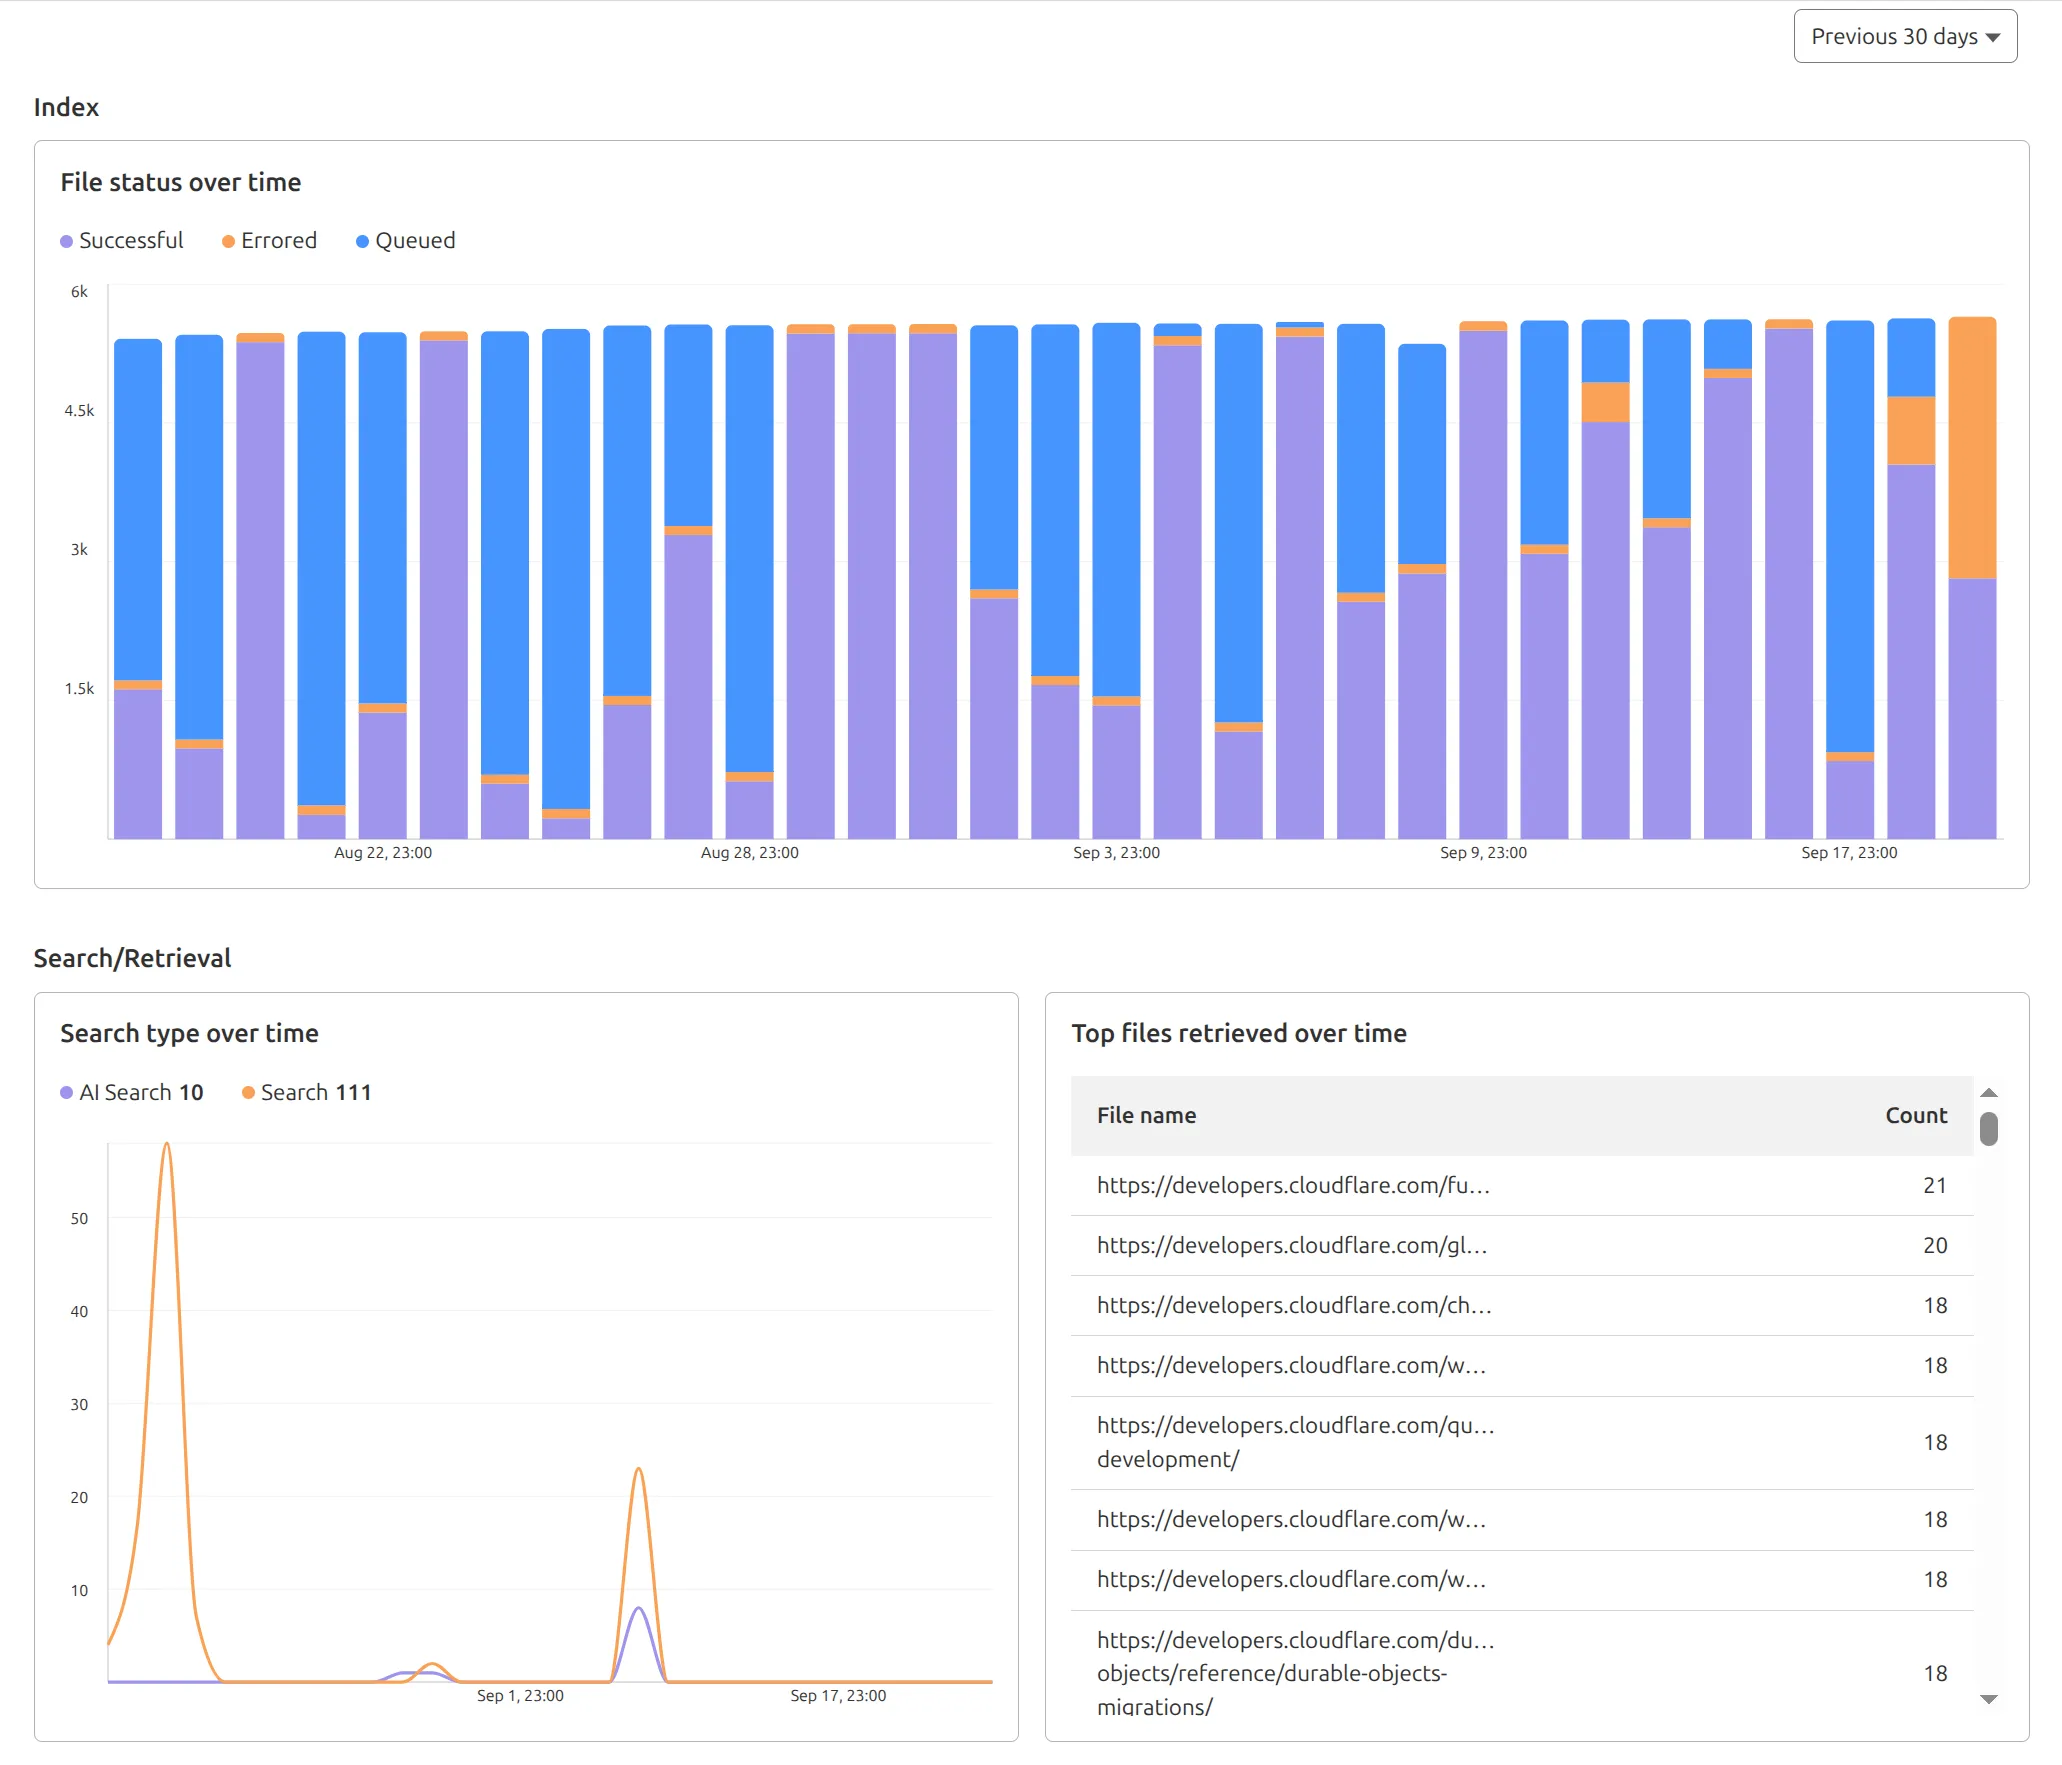
You can find these metrics within each AutoRAG instance:
- Indexing: Track how files are ingested and see status changes over time.
- Search breakdown: Compare usage between
ai-searchandsearchendpoints. - Top file retrievals: Identify which files are most frequently retrieved in a given period.
Try it today in AutoRAG.
We've shipped a new release for the Agents SDK ↗ bringing full compatibility with AI SDK v5 ↗ and introducing automatic message migration that handles all legacy formats transparently.
This release includes improved streaming and tool support, tool confirmation detection (for "human in the loop" systems), enhanced React hooks with automatic tool resolution, improved error handling for streaming responses, and seamless migration utilities that work behind the scenes.
This makes it ideal for building production AI chat interfaces with Cloudflare Workers AI models, agent workflows, human-in-the-loop systems, or any application requiring reliable message handling across SDK versions — all while maintaining backward compatibility.
Additionally, we've updated workers-ai-provider v2.0.0, the official provider for Cloudflare Workers AI models, to be compatible with AI SDK v5.
Creates a new chat interface with enhanced v5 capabilities.
TypeScript // Basic chat setupconst { messages, sendMessage, addToolResult } = useAgentChat({agent,experimental_automaticToolResolution: true,tools,});// With custom tool confirmationconst chat = useAgentChat({agent,experimental_automaticToolResolution: true,toolsRequiringConfirmation: ["dangerousOperation"],});Tools are automatically categorized based on their configuration:
TypeScript const tools = {// Auto-executes (has execute function)getLocalTime: {description: "Get current local time",inputSchema: z.object({}),execute: async () => new Date().toLocaleString(),},// Requires confirmation (no execute function)deleteFile: {description: "Delete a file from the system",inputSchema: z.object({filename: z.string(),}),},// Server-executed (no client confirmation)analyzeData: {description: "Analyze dataset on server",inputSchema: z.object({ data: z.array(z.number()) }),serverExecuted: true,},} satisfies Record<string, AITool>;Send messages using the new v5 format with parts array:
TypeScript // Text messagesendMessage({role: "user",parts: [{ type: "text", text: "Hello, assistant!" }],});// Multi-part message with filesendMessage({role: "user",parts: [{ type: "text", text: "Analyze this image:" },{ type: "image", image: imageData },],});Simplified logic for detecting pending tool confirmations:
TypeScript const pendingToolCallConfirmation = messages.some((m) =>m.parts?.some((part) => isToolUIPart(part) && part.state === "input-available",),);// Handle tool confirmationif (pendingToolCallConfirmation) {await addToolResult({toolCallId: part.toolCallId,tool: getToolName(part),output: "User approved the action",});}Seamlessly handle legacy message formats without code changes.
TypeScript // All these formats are automatically converted:// Legacy v4 string contentconst legacyMessage = {role: "user",content: "Hello world",};// Legacy v4 with tool callsconst legacyWithTools = {role: "assistant",content: "",toolInvocations: [{toolCallId: "123",toolName: "weather",args: { city: "SF" },state: "result",result: "Sunny, 72°F",},],};// Automatically becomes v5 format:// {// role: "assistant",// parts: [{// type: "tool-call",// toolCallId: "123",// toolName: "weather",// args: { city: "SF" },// state: "result",// result: "Sunny, 72°F"// }]// }Migrate tool definitions to use the new
inputSchemaproperty.TypeScript // Before (AI SDK v4)const tools = {weather: {description: "Get weather information",parameters: z.object({city: z.string(),}),execute: async (args) => {return await getWeather(args.city);},},};// After (AI SDK v5)const tools = {weather: {description: "Get weather information",inputSchema: z.object({city: z.string(),}),execute: async (args) => {return await getWeather(args.city);},},};Seamless integration with Cloudflare Workers AI models through the updated workers-ai-provider v2.0.0.
Use Cloudflare Workers AI models directly in your agent workflows:
TypeScript import { createWorkersAI } from "workers-ai-provider";import { useAgentChat } from "agents/ai-react";// Create Workers AI model (v2.0.0 - same API, enhanced v5 internals)const model = createWorkersAI({binding: env.AI,})("@cf/meta/llama-3.2-3b-instruct");Workers AI models now support v5 file handling with automatic conversion:
TypeScript // Send images and files to Workers AI modelssendMessage({role: "user",parts: [{ type: "text", text: "Analyze this image:" },{type: "file",data: imageBuffer,mediaType: "image/jpeg",},],});// Workers AI provider automatically converts to proper formatEnhanced streaming support with automatic warning detection:
TypeScript // Streaming with Workers AI modelsconst result = await streamText({model: createWorkersAI({ binding: env.AI })("@cf/meta/llama-3.2-3b-instruct"),messages,onChunk: (chunk) => {// Enhanced streaming with warning handlingconsole.log(chunk);},});Update your imports to use the new v5 types:
TypeScript // Before (AI SDK v4)import type { Message } from "ai";import { useChat } from "ai/react";// After (AI SDK v5)import type { UIMessage } from "ai";// or alias for compatibilityimport type { UIMessage as Message } from "ai";import { useChat } from "@ai-sdk/react";- Migration Guide ↗ - Comprehensive migration documentation
- AI SDK v5 Documentation ↗ - Official AI SDK migration guide
- An Example PR showing the migration from AI SDK v4 to v5 ↗
- GitHub Issues ↗ - Report bugs or request features
We'd love your feedback! We're particularly interested in feedback on:
- Migration experience - How smooth was the upgrade process?
- Tool confirmation workflow - Does the new automatic detection work as expected?
- Message format handling - Any edge cases with legacy message conversion?
We're excited to be a launch partner alongside Google ↗ to bring their newest embedding model, EmbeddingGemma, to Workers AI that delivers best-in-class performance for its size, enabling RAG and semantic search use cases.
@cf/google/embeddinggemma-300mis a 300M parameter embedding model from Google, built from Gemma 3 and the same research used to create Gemini models. This multilingual model supports 100+ languages, making it ideal for RAG systems, semantic search, content classification, and clustering tasks.Using EmbeddingGemma in AI Search: Now you can leverage EmbeddingGemma directly through AI Search for your RAG pipelines. EmbeddingGemma's multilingual capabilities make it perfect for global applications that need to understand and retrieve content across different languages with exceptional accuracy.
To use EmbeddingGemma for your AI Search projects:
- Go to Create in the AI Search dashboard ↗
- Follow the setup flow for your new RAG instance
- In the Generate Index step, open up More embedding models and select
@cf/google/embeddinggemma-300mas your embedding model - Complete the setup to create an AI Search
Try it out and let us know what you think!
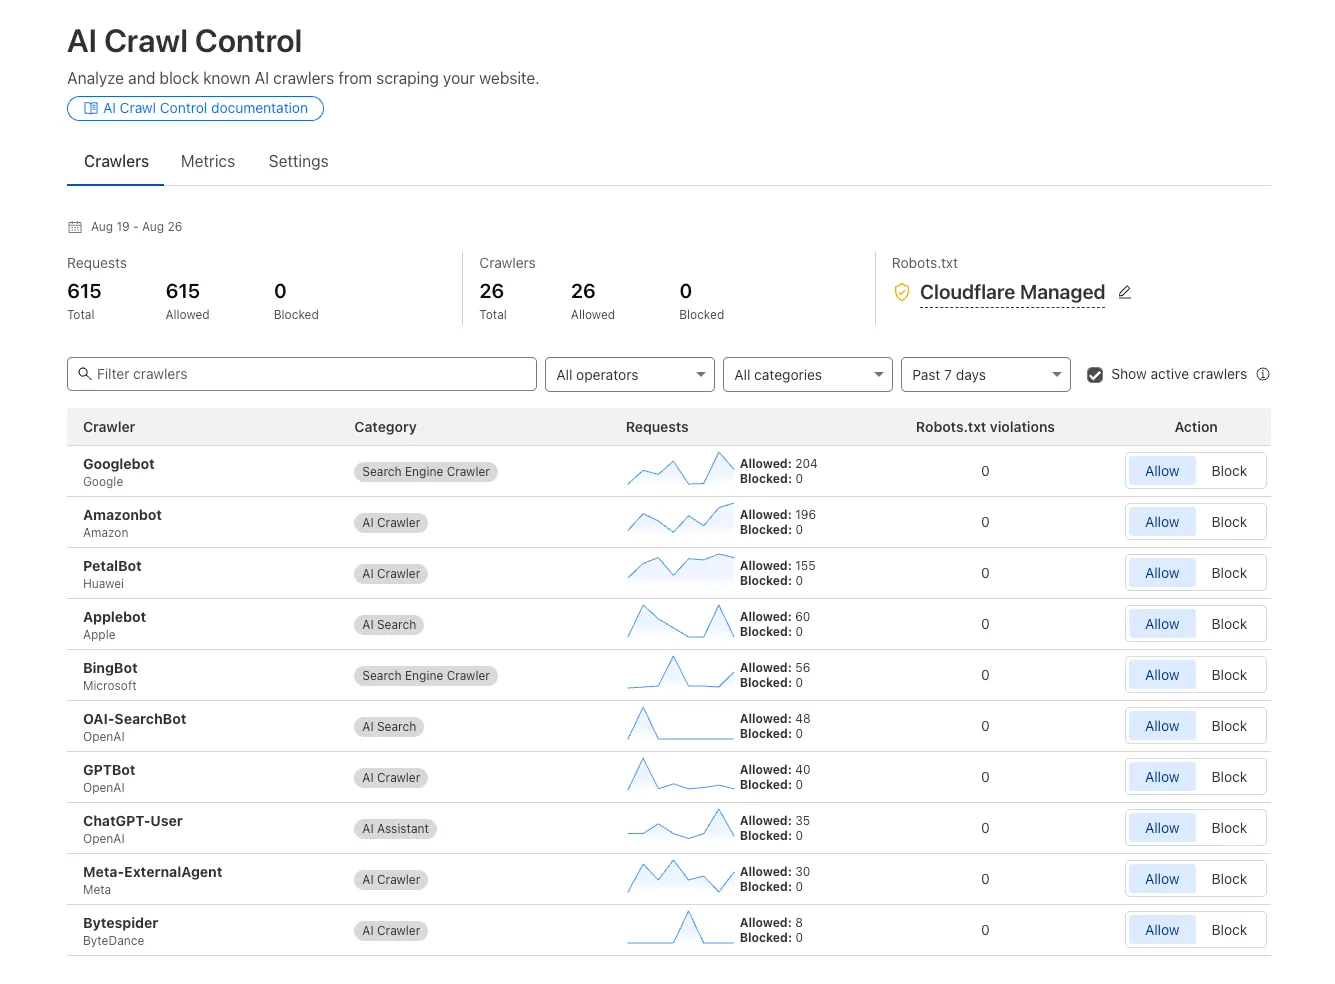
We improved AI crawler management with detailed analytics and introduced custom HTTP 402 responses for blocked crawlers. AI Audit has been renamed to AI Crawl Control and is now generally available.
Enhanced Crawlers tab:
- View total allowed and blocked requests for each AI crawler
- Trend charts show crawler activity over your selected time range per crawler
Custom block responses (paid plans): You can now return HTTP 402 "Payment Required" responses when blocking AI crawlers, enabling direct communication with crawler operators about licensing terms.
For users on paid plans, when blocking AI crawlers you can configure:
- Response code: Choose between 403 Forbidden or 402 Payment Required
- Response body: Add a custom message with your licensing contact information
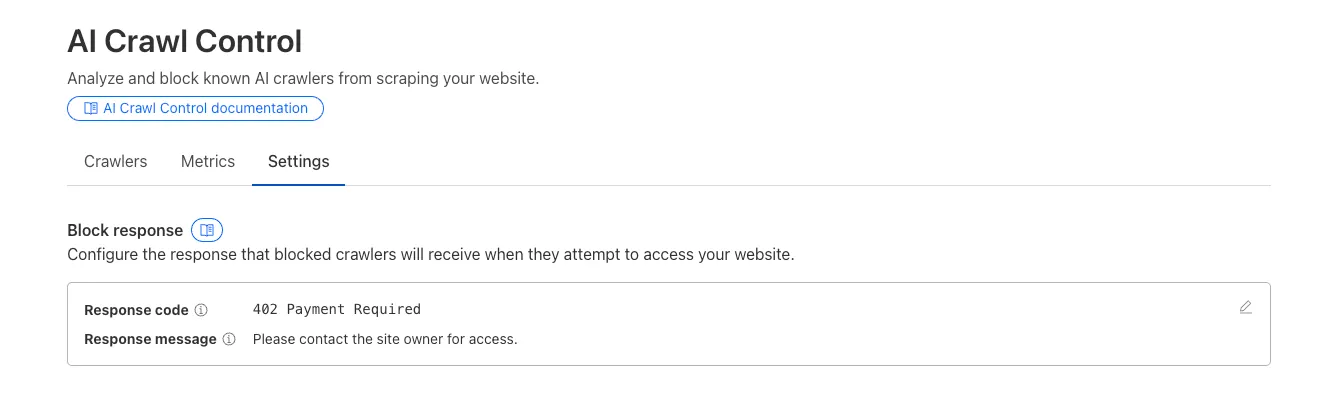
Example 402 response:
HTTP 402 Payment RequiredDate: Mon, 24 Aug 2025 12:56:49 GMTContent-type: application/jsonServer: cloudflareCf-Ray: 967e8da599d0c3fa-EWRCf-Team: 2902f6db750000c3fa1e2ef400000001{"message": "Please contact the site owner for access."}
New state-of-the-art models have landed on Workers AI! This time, we're introducing new partner models trained by our friends at Deepgram ↗ and Leonardo ↗, hosted on Workers AI infrastructure.
As well, we're introuding a new turn detection model that enables you to detect when someone is done speaking — useful for building voice agents!
Read the blog ↗ for more details and check out some of the new models on our platform:
@cf/deepgram/aura-1is a text-to-speech model that allows you to input text and have it come to life in a customizable voice@cf/deepgram/nova-3is speech-to-text model that transcribes multilingual audio at a blazingly fast speed@cf/pipecat-ai/smart-turn-v2helps you detect when someone is done speaking@cf/leonardo/lucid-originis a text-to-image model that generates images with sharp graphic design, stunning full-HD renders, or highly specific creative direction@cf/leonardo/phoenix-1.0is a text-to-image model with exceptional prompt adherence and coherent text
You can filter out new partner models with the
Partnercapability on our Models page.As well, we're introducing WebSocket support for some of our audio models, which you can filter though the
Realtimecapability on our Models page. WebSockets allows you to create a bi-directional connection to our inference server with low latency — perfect for those that are building voice agents.An example python snippet on how to use WebSockets with our new Aura model:
import jsonimport osimport asyncioimport websocketsuri = f"wss://api.cloudflare.com/client/v4/accounts/{ACCOUNT_ID}/ai/run/@cf/deepgram/aura-1"input = ["Line one, out of three lines that will be provided to the aura model.","Line two, out of three lines that will be provided to the aura model.","Line three, out of three lines that will be provided to the aura model. This is a last line.",]async def text_to_speech():async with websockets.connect(uri, additional_headers={"Authorization": os.getenv("CF_TOKEN")}) as websocket:print("connection established")for line in input:print(f"sending `{line}`")await websocket.send(json.dumps({"type": "Speak", "text": line}))print("line was sent, flushing")await websocket.send(json.dumps({"type": "Flush"}))print("flushed, recving")resp = await websocket.recv()print(f"response received {resp}")if __name__ == "__main__":asyncio.run(text_to_speech())
You can now list all vector identifiers in a Vectorize index using the new
list-vectorsoperation. This enables bulk operations, auditing, and data migration workflows through paginated requests that maintain snapshot consistency.The operation is available via Wrangler CLI and REST API. Refer to the list-vectors best practices guide for detailed usage guidance.
Cloudflare Secrets Store is now integrated with AI Gateway, allowing you to store, manage, and deploy your AI provider keys in a secure and seamless configuration through Bring Your Own Key ↗. Instead of passing your AI provider keys directly in every request header, you can centrally manage each key with Secrets Store and deploy in your gateway configuration using only a reference, rather than passing the value in plain text.
You can now create a secret directly from your AI Gateway in the dashboard ↗ by navigating into your gateway -> Provider Keys -> Add.
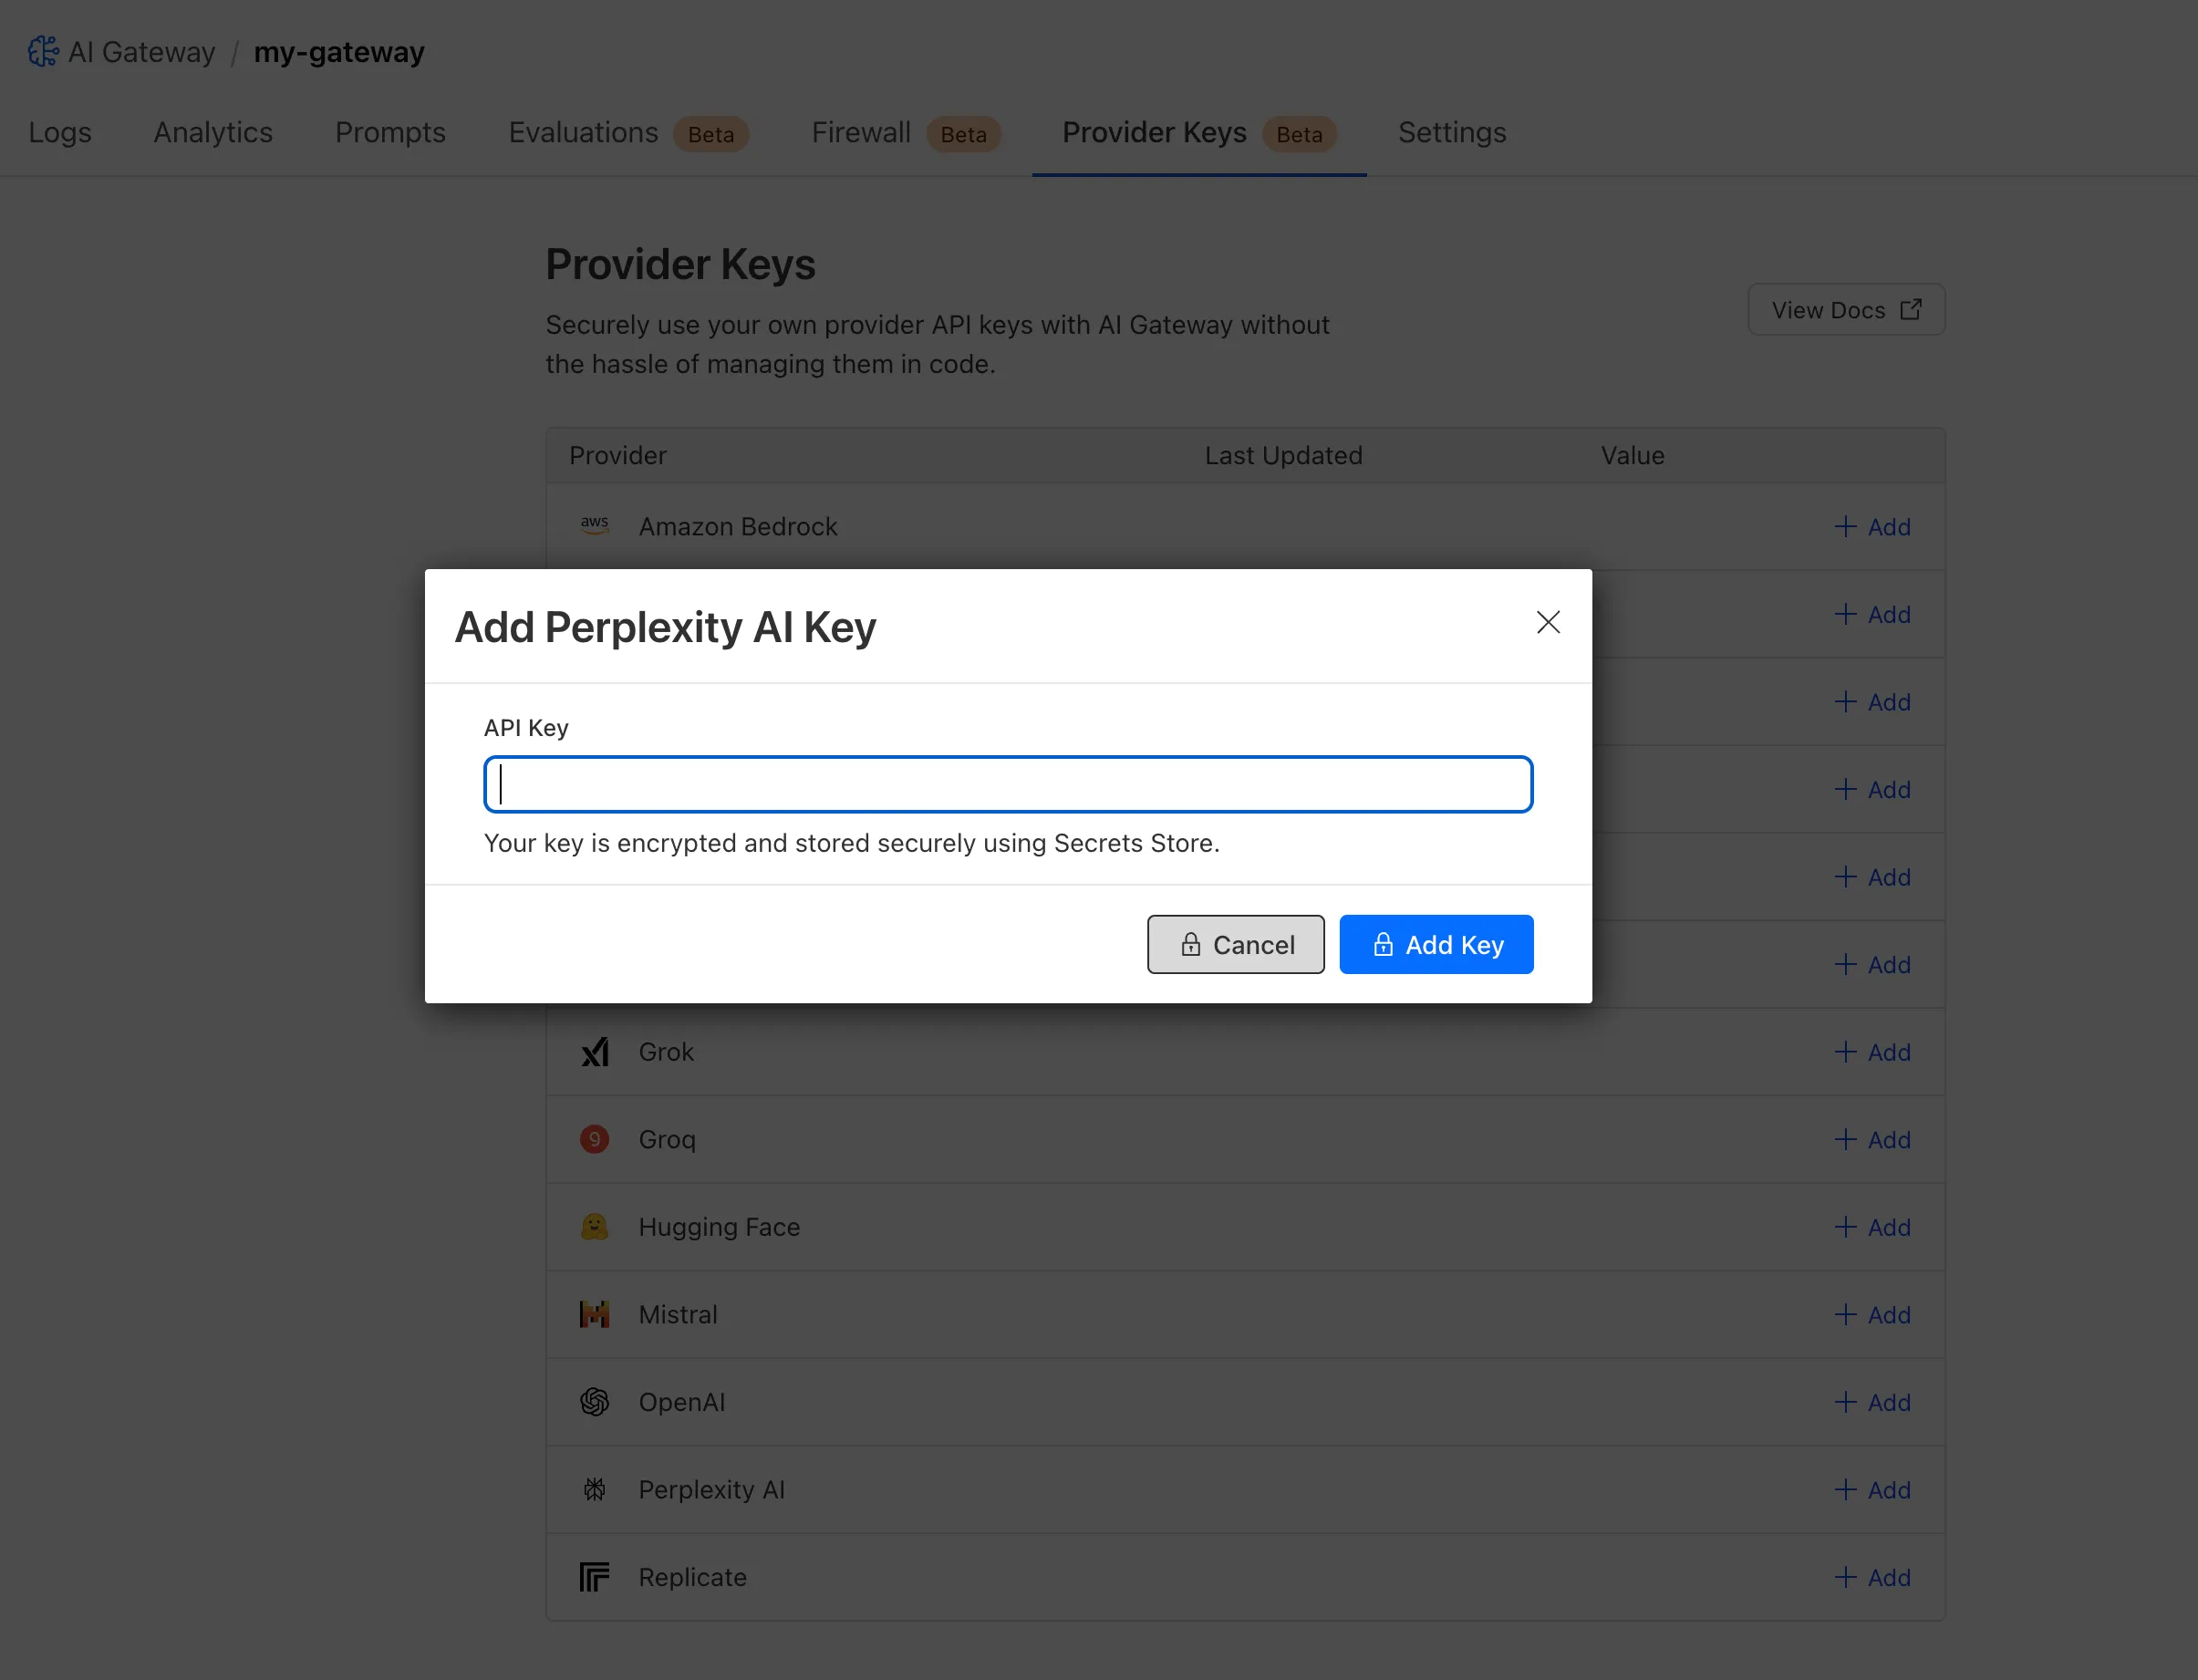
You can also create your secret with the newly available ai_gateway scope via wrangler ↗, the Secrets Store dashboard ↗, or the API ↗.
Then, pass the key in the request header using its Secrets Store reference:
curl -X POST https://gateway.ai.cloudflare.com/v1/<ACCOUNT_ID>/my-gateway/anthropic/v1/messages \--header 'cf-aig-authorization: ANTHROPIC_KEY_1 \--header 'anthropic-version: 2023-06-01' \--header 'Content-Type: application/json' \--data '{"model": "claude-3-opus-20240229", "messages": [{"role": "user", "content": "What is Cloudflare?"}]}'Or, using Javascript:
import Anthropic from '@anthropic-ai/sdk';const anthropic = new Anthropic({apiKey: "ANTHROPIC_KEY_1",baseURL: "https://gateway.ai.cloudflare.com/v1/<ACCOUNT_ID>/my-gateway/anthropic",});const message = await anthropic.messages.create({model: 'claude-3-opus-20240229',messages: [{role: "user", content: "What is Cloudflare?"}],max_tokens: 1024});For more information, check out the blog ↗!
The latest releases of @cloudflare/agents ↗ brings major improvements to MCP transport protocols support and agents connectivity. Key updates include:
MCP servers can now request user input during tool execution, enabling interactive workflows like confirmations, forms, and multi-step processes. This feature uses durable storage to preserve elicitation state even during agent hibernation, ensuring seamless user interactions across agent lifecycle events.
TypeScript // Request user confirmation via elicitationconst confirmation = await this.elicitInput({message: `Are you sure you want to increment the counter by ${amount}?`,requestedSchema: {type: "object",properties: {confirmed: {type: "boolean",title: "Confirm increment",description: "Check to confirm the increment",},},required: ["confirmed"],},});Check out our demo ↗ to see elicitation in action.
MCP now supports HTTP streamable transport which is recommended over SSE. This transport type offers:
- Better performance: More efficient data streaming and reduced overhead
- Improved reliability: Enhanced connection stability and error recover- Automatic fallback: If streamable transport is not available, it gracefully falls back to SSE
TypeScript export default MyMCP.serve("/mcp", {binding: "MyMCP",});The SDK automatically selects the best available transport method, gracefully falling back from streamable-http to SSE when needed.
Significant improvements to MCP server connections and transport reliability:
- Auto transport selection: Automatically determines the best transport method, falling back from streamable-http to SSE as needed
- Improved error handling: Better connection state management and error reporting for MCP servers
- Reliable prop updates: Centralized agent property updates ensure consistency across different contexts
You can use
.queue()to enqueue background work — ideal for tasks like processing user messages, sending notifications etc.TypeScript class MyAgent extends Agent {doSomethingExpensive(payload) {// a long running process that you want to run in the background}queueSomething() {await this.queue("doSomethingExpensive", somePayload); // this will NOT block further execution, and runs in the backgroundawait this.queue("doSomethingExpensive", someOtherPayload); // the callback will NOT run until the previous callback is complete// ... call as many times as you want}}Want to try it yourself? Just define a method like processMessage in your agent, and you’re ready to scale.
Want to build an AI agent that can receive and respond to emails automatically? With the new email adapter and onEmail lifecycle method, now you can.
TypeScript export class EmailAgent extends Agent {async onEmail(email: AgentEmail) {const raw = await email.getRaw();const parsed = await PostalMime.parse(raw);// create a response based on the email contents// and then send a replyawait this.replyToEmail(email, {fromName: "Email Agent",body: `Thanks for your email! You've sent us "${parsed.subject}". We'll process it shortly.`,});}}You route incoming mail like this:
TypeScript export default {async email(email, env) {await routeAgentEmail(email, env, {resolver: createAddressBasedEmailResolver("EmailAgent"),});},};You can find a full example here ↗.
Custom methods are now automatically wrapped with the agent's context, so calling
getCurrentAgent()should work regardless of where in an agent's lifecycle it's called. Previously this would not work on RPC calls, but now just works out of the box.TypeScript export class MyAgent extends Agent {async suggestReply(message) {// getCurrentAgent() now correctly works, even when called inside an RPC methodconst { agent } = getCurrentAgent()!;return generateText({prompt: `Suggest a reply to: "${message}" from "${agent.name}"`,tools: [replyWithEmoji],});}}Try it out and tell us what you build!
We’ve shipped a major release for the @cloudflare/sandbox ↗ SDK, turning it into a full-featured, container-based execution platform that runs securely on Cloudflare Workers.
This update adds live streaming of output, persistent Python and JavaScript code interpreters with rich output support (charts, tables, HTML, JSON), file system access, Git operations, full background process control, and the ability to expose running services via public URLs.
This makes it ideal for building AI agents, CI runners, cloud REPLs, data analysis pipelines, or full developer tools — all without managing infrastructure.
Create persistent code contexts with support for rich visual + structured outputs.
Creates a new code execution context with persistent state.
TypeScript // Create a Python contextconst pythonCtx = await sandbox.createCodeContext({ language: "python" });// Create a JavaScript contextconst jsCtx = await sandbox.createCodeContext({ language: "javascript" });Options:
- language: Programming language ('python' | 'javascript' | 'typescript')
- cwd: Working directory (default: /workspace)
- envVars: Environment variables for the context
Executes code with optional streaming callbacks.
TypeScript // Simple executionconst execution = await sandbox.runCode('print("Hello World")', {context: pythonCtx,});// With streaming callbacksawait sandbox.runCode(`for i in range(5):print(f"Step {i}")time.sleep(1)`,{context: pythonCtx,onStdout: (output) => console.log("Real-time:", output.text),onResult: (result) => console.log("Result:", result),},);Options:
- language: Programming language ('python' | 'javascript' | 'typescript')
- cwd: Working directory (default: /workspace)
- envVars: Environment variables for the context
Returns a streaming response for real-time processing.
TypeScript const stream = await sandbox.runCodeStream("import time; [print(i) for i in range(10)]",);// Process the stream as neededInterpreter outputs are auto-formatted and returned in multiple formats:
- text
- html (e.g., Pandas tables)
- png, svg (e.g., Matplotlib charts)
- json (structured data)
- chart (parsed visualizations)
TypeScript const result = await sandbox.runCode(`import seaborn as snsimport matplotlib.pyplot as pltdata = sns.load_dataset("flights")pivot = data.pivot("month", "year", "passengers")sns.heatmap(pivot, annot=True, fmt="d")plt.title("Flight Passengers")plt.show()pivot.to_dict()`,{ context: pythonCtx },);if (result.png) {console.log("Chart output:", result.png);}Start background processes and expose them with live URLs.
TypeScript await sandbox.startProcess("python -m http.server 8000");const preview = await sandbox.exposePort(8000);console.log("Live preview at:", preview.url);Start, inspect, and terminate long-running background processes.
TypeScript const process = await sandbox.startProcess("node server.js");console.log(`Started process ${process.id} with PID ${process.pid}`);// Monitor the processconst logStream = await sandbox.streamProcessLogs(process.id);for await (const log of parseSSEStream<LogEvent>(logStream)) {console.log(`Server: ${log.data}`);}- listProcesses() - List all running processes
- getProcess(id) - Get detailed process status
- killProcess(id, signal) - Terminate specific processes
- killAllProcesses() - Kill all processes
- streamProcessLogs(id, options) - Stream logs from running processes
- getProcessLogs(id) - Get accumulated process output
Clone Git repositories directly into the sandbox.
TypeScript await sandbox.gitCheckout("https://github.com/user/repo", {branch: "main",targetDir: "my-project",});Sandboxes are still experimental. We're using them to explore how isolated, container-like workloads might scale on Cloudflare — and to help define the developer experience around them.
We're thrilled to be a Day 0 partner with OpenAI ↗ to bring their latest open models ↗ to Workers AI, including support for Responses API, Code Interpreter, and Web Search (coming soon).
Get started with the new models at
@cf/openai/gpt-oss-120band@cf/openai/gpt-oss-20b. Check out the blog ↗ for more details about the new models, and thegpt-oss-120bandgpt-oss-20bmodel pages for more information about pricing and context windows.If you call the model through:
- Workers Binding, it will accept/return Responses API –
env.AI.run(“@cf/openai/gpt-oss-120b”) - REST API on
/runendpoint, it will accept/return Responses API –https://api.cloudflare.com/client/v4/accounts/<account_id>/ai/run/@cf/openai/gpt-oss-120b - REST API on new
/responsesendpoint, it will accept/return Responses API –https://api.cloudflare.com/client/v4/accounts/<account_id>/ai/v1/responses - REST API for OpenAI Compatible endpoint, it will return Chat Completions (coming soon) –
https://api.cloudflare.com/client/v4/accounts/<account_id>/ai/v1/chat/completions
curl https://api.cloudflare.com/client/v4/accounts/<account_id>/ai/v1/responses \-H "Content-Type: application/json" \-H "Authorization: Bearer $CLOUDFLARE_API_KEY" \-d '{"model": "@cf/openai/gpt-oss-120b","reasoning": {"effort": "medium"},"input": [{"role": "user","content": "What are the benefits of open-source models?"}]}'The model is natively trained to support stateful code execution, and we've implemented support for this feature using our Sandbox SDK ↗ and Containers ↗. Cloudflare's Developer Platform is uniquely positioned to support this feature, so we're very excited to bring our products together to support this new use case.
We are working to implement Web Search for the model, where users can bring their own Exa API Key so the model can browse the Internet.
- Workers Binding, it will accept/return Responses API –
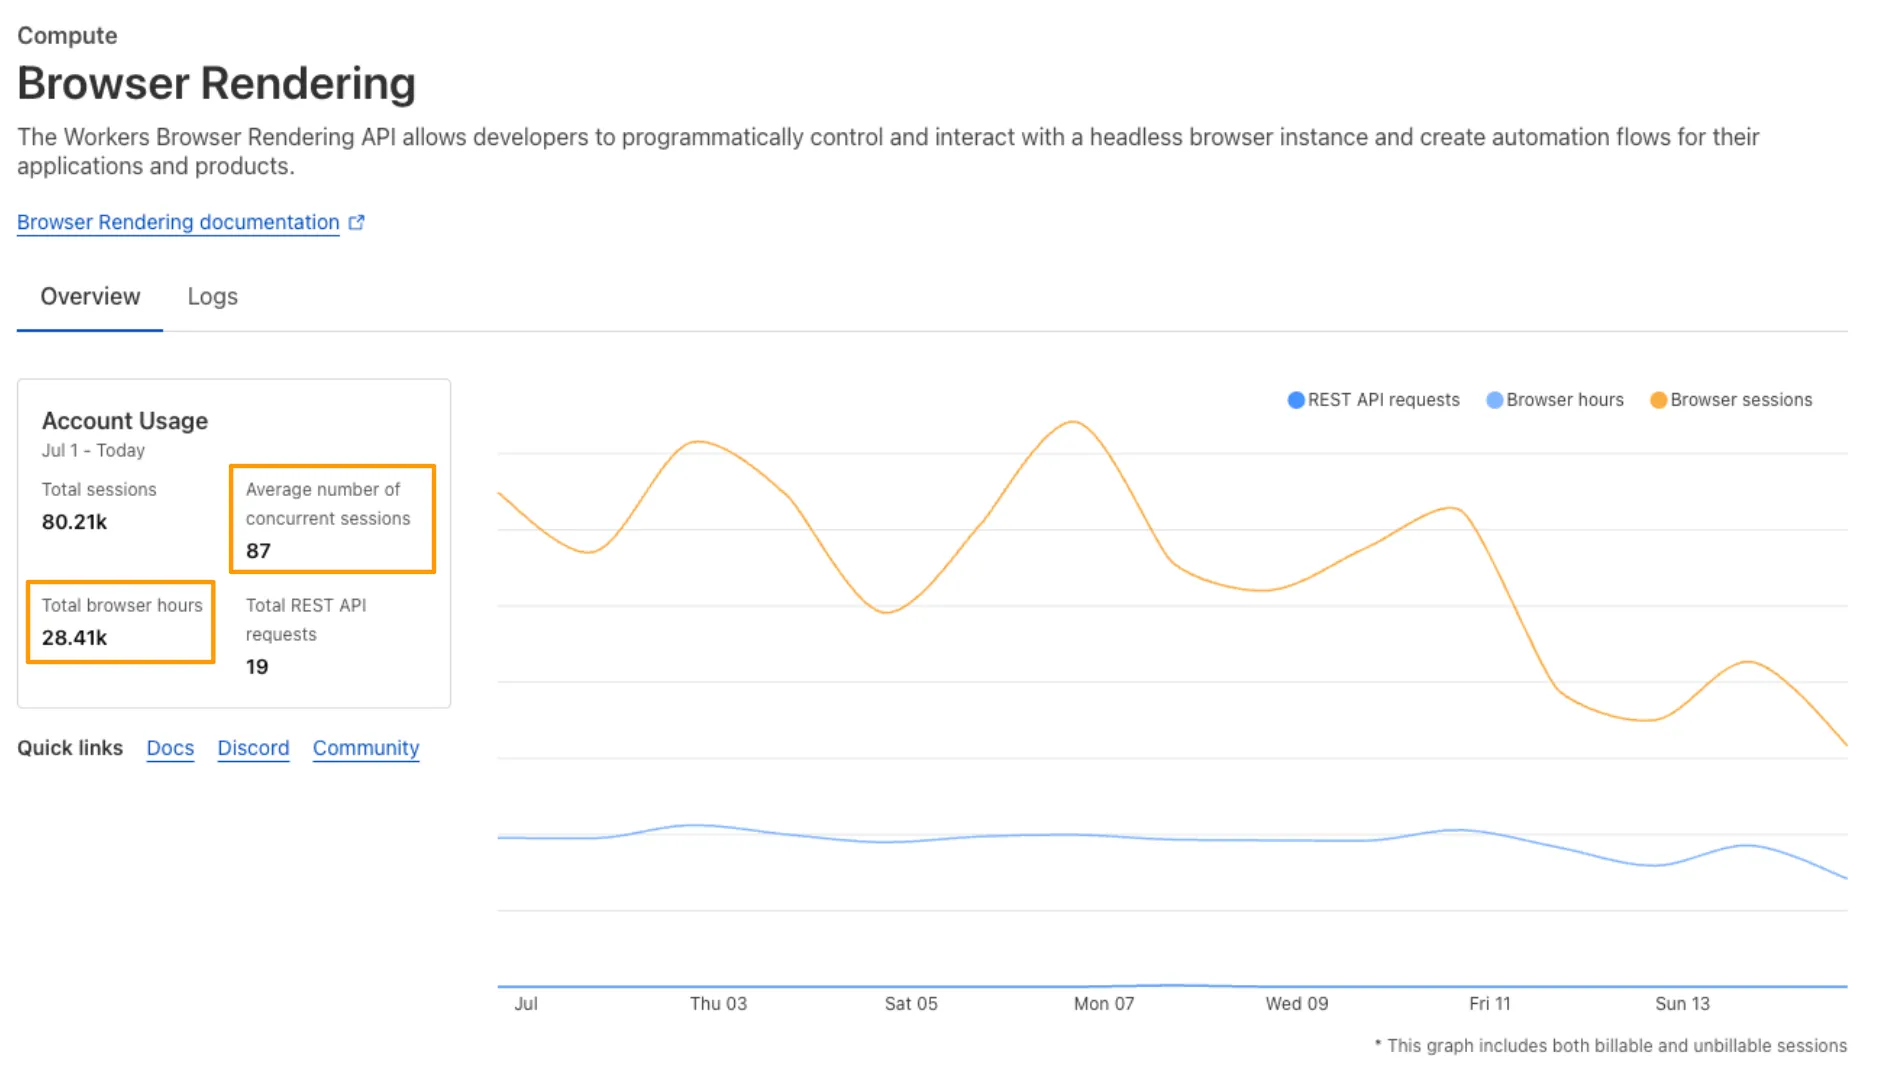
We’ve launched pricing for Browser Rendering, including a free tier and a pay-as-you-go model that scales with your needs. Starting August 20, 2025, Cloudflare will begin billing for Browser Rendering.
There are two ways to use Browser Rendering. Depending on the method you use, here’s how billing will work:
- REST API: Charged for Duration only ($/browser hour)
- Workers Bindings: Charged for both Duration and Concurrency ($/browser hour and # of concurrent browsers)
Included usage and pricing by plan
Plan Included duration Included concurrency Price (beyond included) Workers Free 10 minutes per day 3 concurrent browsers N/A Workers Paid 10 hours per month 10 concurrent browsers (averaged monthly) 1. REST API: $0.09 per additional browser hour
2. Workers Bindings: $0.09 per additional browser hour
$2.00 per additional concurrent browserWhat you need to know:
- Workers Free Plan: 10 minutes of browser usage per day with 3 concurrent browsers at no charge.
- Workers Paid Plan: 10 hours of browser usage per month with 10 concurrent browsers (averaged monthly) at no charge. Additional usage is charged as shown above.
You can monitor usage via the Cloudflare dashboard ↗. Go to Compute (Workers) > Browser Rendering.
If you've been using Browser Rendering and do not wish to incur charges, ensure your usage stays within your plan's included usage. To estimate costs, take a look at these example pricing scenarios.
You can now run your Browser Rendering locally using
npx wrangler dev, which spins up a browser directly on your machine before deploying to Cloudflare's global network. By running tests locally, you can quickly develop, debug, and test changes without needing to deploy or worry about usage costs.Get started with this example guide that shows how to use Cloudflare's fork of Puppeteer (you can also use Playwright) to take screenshots of webpages and store the results in Workers KV.
You can now expect 3-5× faster indexing in AutoRAG, and with it, a brand new Jobs view to help you monitor indexing progress.
With each AutoRAG, indexing jobs are automatically triggered to sync your data source (i.e. R2 bucket) with your Vectorize index, ensuring new or updated files are reflected in your query results. You can also trigger jobs manually via the Sync API or by clicking “Sync index” in the dashboard.
With the new jobs observability, you can now:
- View the status, job ID, source, start time, duration and last sync time for each indexing job
- Inspect real-time logs of job events (e.g.
Starting indexing data source...) - See a history of past indexing jobs under the Jobs tab of your AutoRAG
This makes it easier to understand what’s happening behind the scenes.
Coming soon: We’re adding APIs to programmatically check indexing status, making it even easier to integrate AutoRAG into your workflows.
Try it out today on the Cloudflare dashboard ↗.
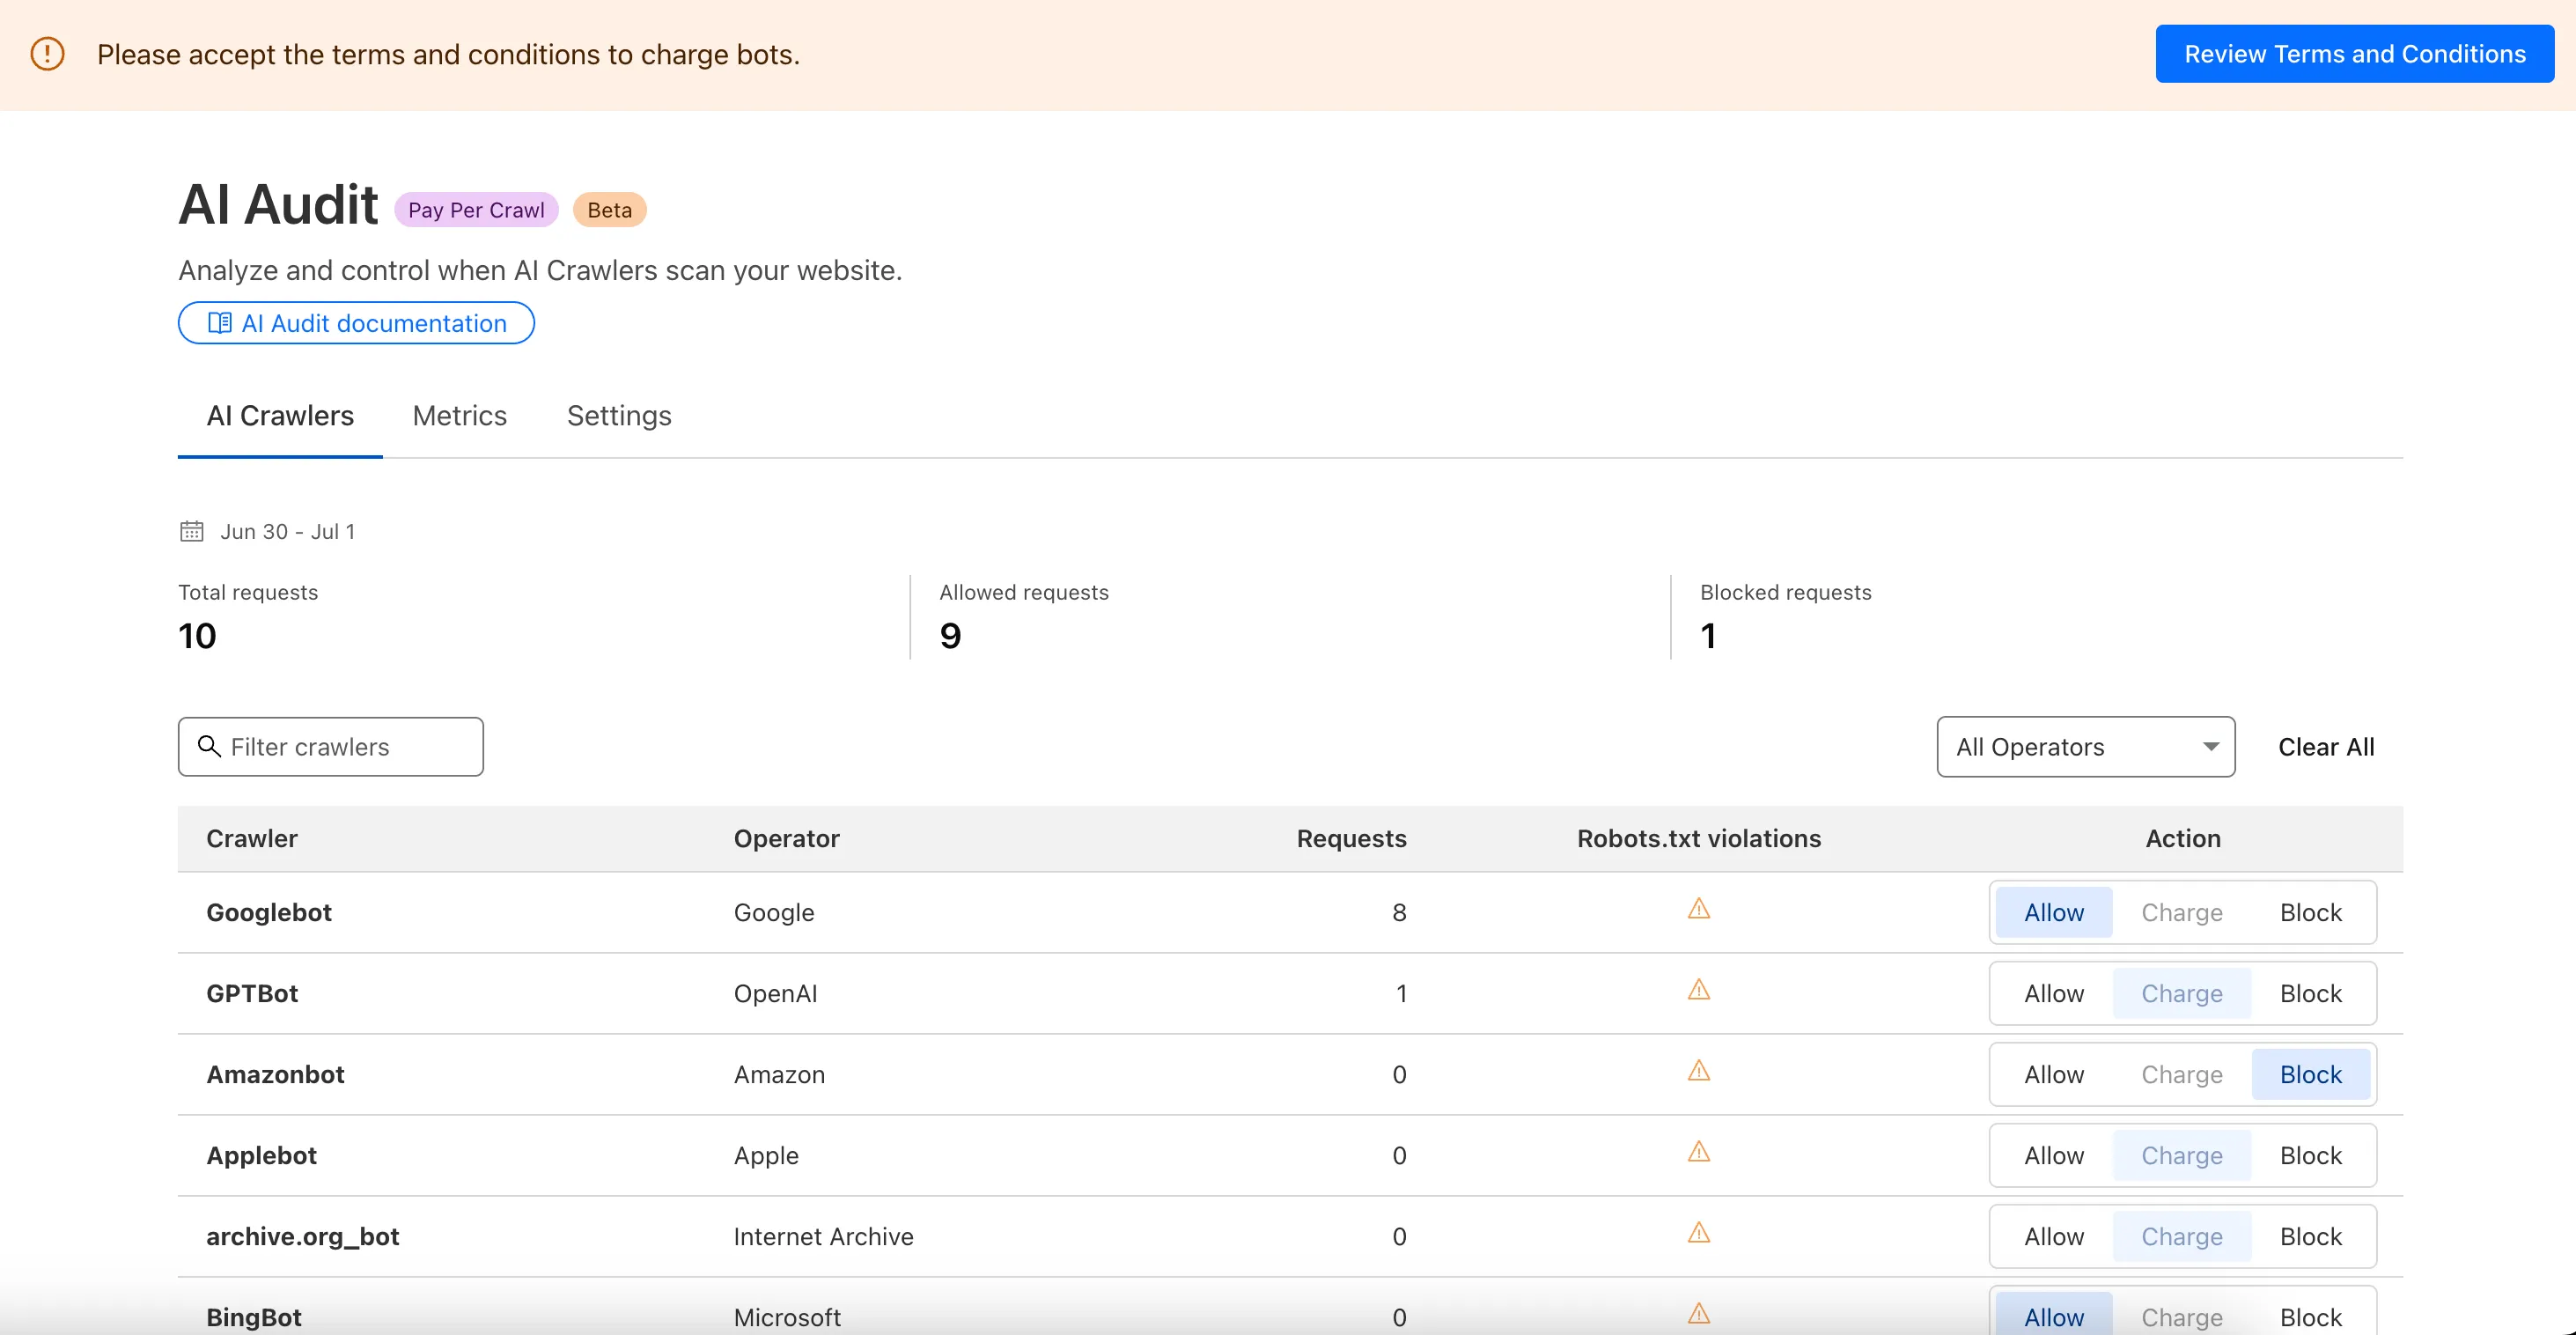
We are introducing a new feature of AI Crawl Control — Pay Per Crawl. Pay Per Crawl enables site owners to require payment from AI crawlers every time the crawlers access their content, thereby fostering a fairer Internet by enabling site owners to control and monetize how their content gets used by AI.
For Site Owners:
- Set pricing and select which crawlers to charge for content access
- Manage payments via Stripe
- Monitor analytics on successful content deliveries
For AI Crawler Owners:
- Use HTTP headers to request and accept pricing
- Receive clear confirmations on charges for accessed content
Learn more in the Pay Per Crawl documentation.
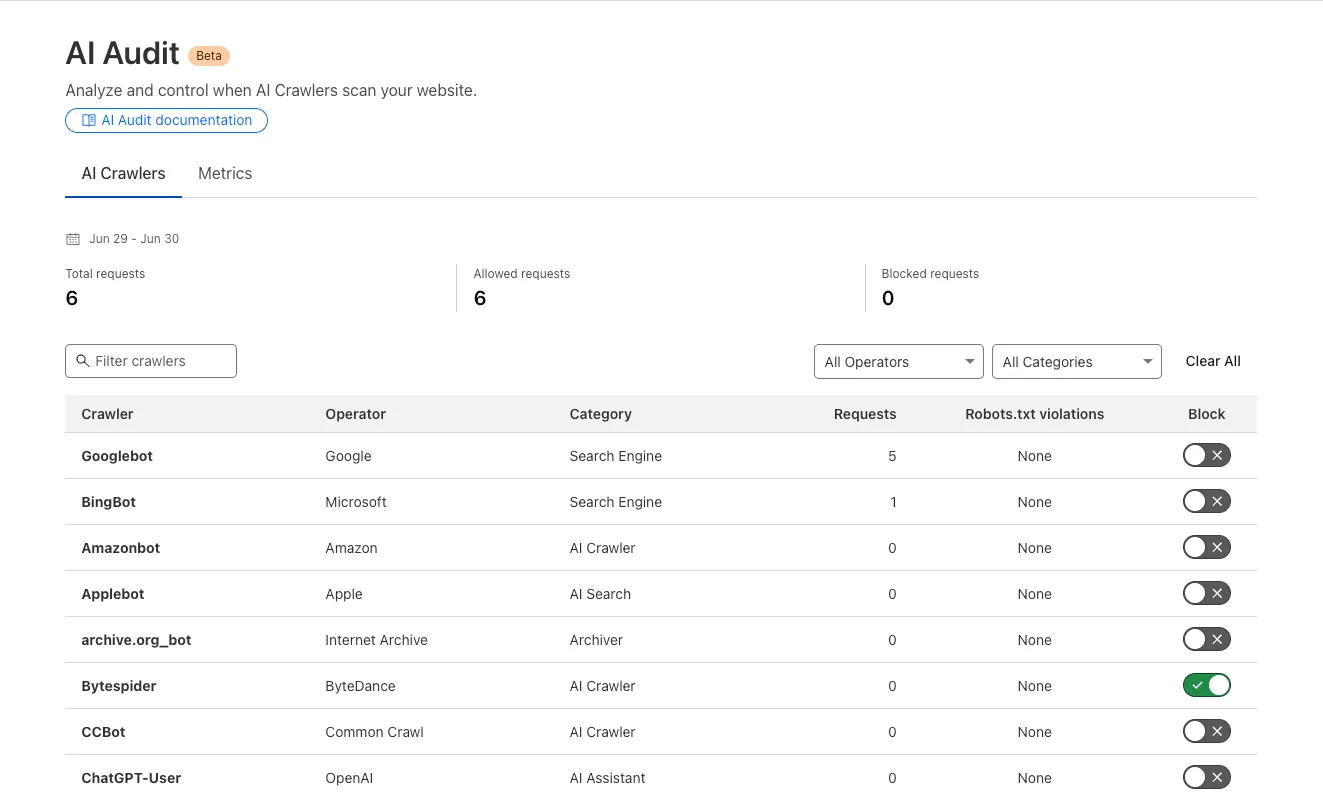
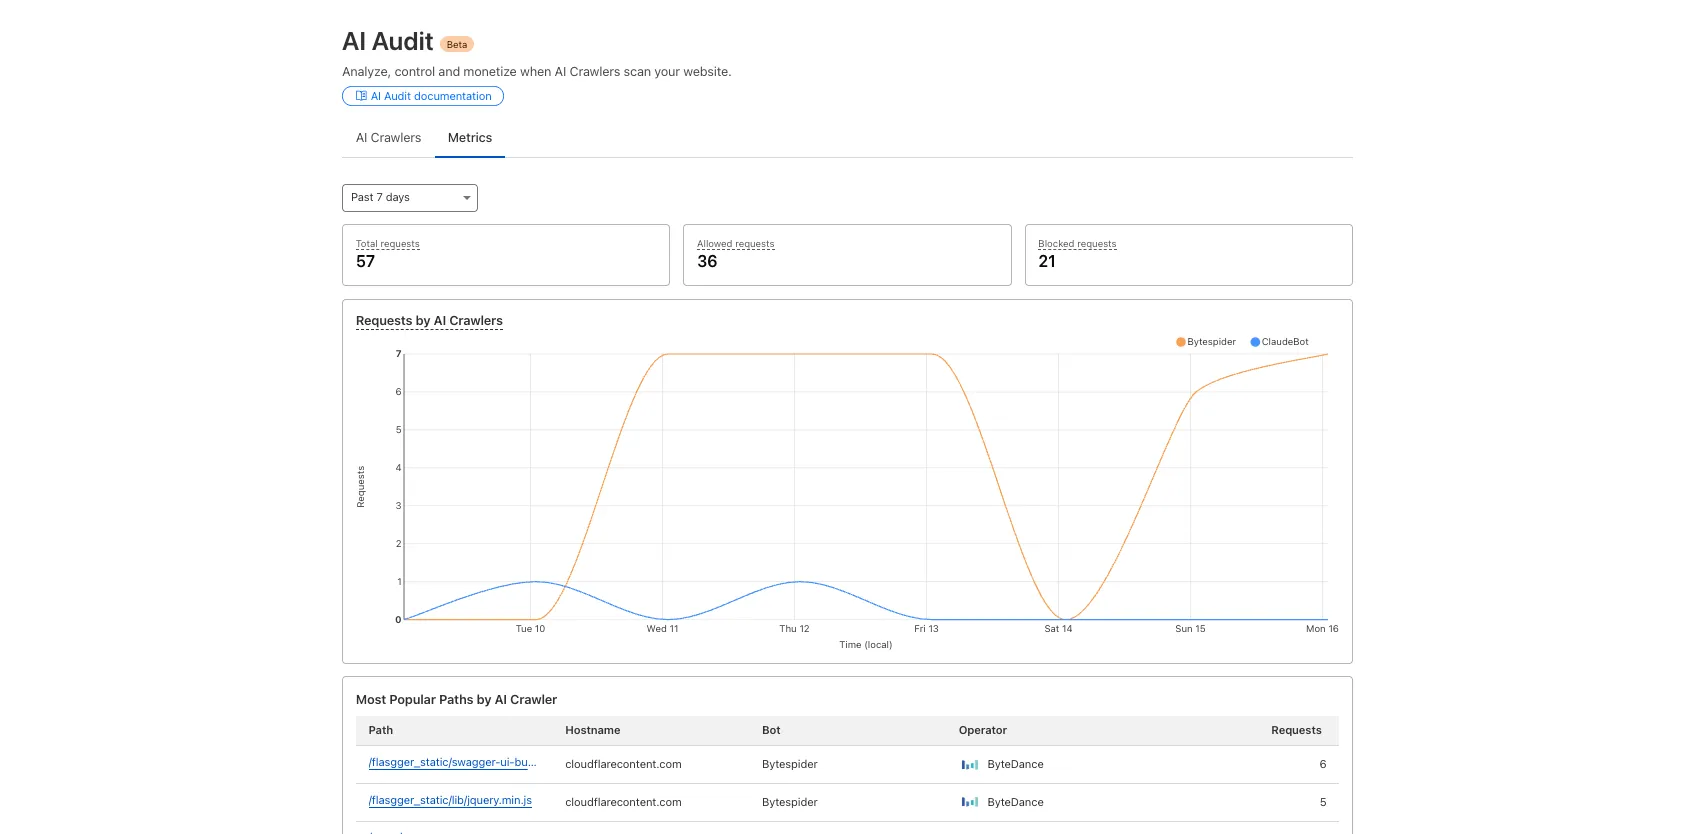
We redesigned the AI Crawl Control dashboard to provide more intuitive and granular control over AI crawlers.
- From the new AI Crawlers tab: block specific AI crawlers.
- From the new Metrics tab: view AI Crawl Control metrics.
To get started, explore:
AI is supercharging app development for everyone, but we need a safe way to run untrusted, LLM-written code. We’re introducing Sandboxes ↗, which let your Worker run actual processes in a secure, container-based environment.
TypeScript import { getSandbox } from "@cloudflare/sandbox";export { Sandbox } from "@cloudflare/sandbox";export default {async fetch(request: Request, env: Env) {const sandbox = getSandbox(env.Sandbox, "my-sandbox");return sandbox.exec("ls", ["-la"]);},};exec(command: string, args: string[], options?: { stream?: boolean }):Execute a command in the sandbox.gitCheckout(repoUrl: string, options: { branch?: string; targetDir?: string; stream?: boolean }): Checkout a git repository in the sandbox.mkdir(path: string, options: { recursive?: boolean; stream?: boolean }): Create a directory in the sandbox.writeFile(path: string, content: string, options: { encoding?: string; stream?: boolean }): Write content to a file in the sandbox.readFile(path: string, options: { encoding?: string; stream?: boolean }): Read content from a file in the sandbox.deleteFile(path: string, options?: { stream?: boolean }): Delete a file from the sandbox.renameFile(oldPath: string, newPath: string, options?: { stream?: boolean }): Rename a file in the sandbox.moveFile(sourcePath: string, destinationPath: string, options?: { stream?: boolean }): Move a file from one location to another in the sandbox.ping(): Ping the sandbox.
Sandboxes are still experimental. We're using them to explore how isolated, container-like workloads might scale on Cloudflare — and to help define the developer experience around them.
You can try it today from your Worker, with just a few lines of code. Let us know what you build.
In AutoRAG, you can now view your object's custom metadata in the response from
/searchand/ai-search, and optionally add acontextfield in the custom metadata of an object to provide additional guidance for AI-generated answers.You can add custom metadata to an object when uploading it to your R2 bucket.
When you run a search, AutoRAG now returns any custom metadata associated with the object. This metadata appears in the response inside
attributesthenfile, and can be used for downstream processing.For example, the
attributessection of your search response may look like:{"attributes": {"timestamp": 1750001460000,"folder": "docs/","filename": "launch-checklist.md","file": {"url": "https://wiki.company.com/docs/launch-checklist","context": "A checklist for internal launch readiness, including legal, engineering, and marketing steps."}}}When you include a custom metadata field named
context, AutoRAG attaches that value to each chunk of the file. When you run an/ai-searchquery, thiscontextis passed to the LLM and can be used as additional input when generating an answer.We recommend using the
contextfield to describe supplemental information you want the LLM to consider, such as a summary of the document or a source URL. If you have several different metadata attributes, you can join them together however you choose within thecontextstring.For example:
{"context": "summary: 'Checklist for internal product launch readiness, including legal, engineering, and marketing steps.'; url: 'https://wiki.company.com/docs/launch-checklist'"}This gives you more control over how your content is interpreted, without requiring you to modify the original contents of the file.
Learn more in AutoRAG's metadata filtering documentation.
In AutoRAG, you can now filter by an object's file name using the
filenameattribute, giving you more control over which files are searched for a given query.This is useful when your application has already determined which files should be searched. For example, you might query a PostgreSQL database to get a list of files a user has access to based on their permissions, and then use that list to limit what AutoRAG retrieves.
For example, your search query may look like:
JavaScript const response = await env.AI.autorag("my-autorag").search({query: "what is the project deadline?",filters: {type: "eq",key: "filename",value: "project-alpha-roadmap.md",},});This allows you to connect your application logic with AutoRAG's retrieval process, making it easy to control what gets searched without needing to reindex or modify your data.
Learn more in AutoRAG's metadata filtering documentation.
Users can now use an OpenAI Compatible endpoint in AI Gateway to easily switch between providers, while keeping the exact same request and response formats. We're launching now with the chat completions endpoint, with the embeddings endpoint coming up next.
To get started, use the OpenAI compatible chat completions endpoint URL with your own account id and gateway id and switch between providers by changing the
modelandapiKeyparameters.OpenAI SDK Example import OpenAI from "openai";const client = new OpenAI({apiKey: "YOUR_PROVIDER_API_KEY", // Provider API keybaseURL:"https://gateway.ai.cloudflare.com/v1/{account_id}/{gateway_id}/compat",});const response = await client.chat.completions.create({model: "google-ai-studio/gemini-2.0-flash",messages: [{ role: "user", content: "What is Cloudflare?" }],});console.log(response.choices[0].message.content);Additionally, the OpenAI Compatible endpoint can be combined with our Universal Endpoint to add fallbacks across multiple providers. That means AI Gateway will return every response in the same standardized format, no extra parsing logic required!
Learn more in the OpenAI Compatibility documentation.
We're excited to share that you can now use the Playwright MCP ↗ server with Browser Rendering.
Once you deploy the server, you can use any MCP client with it to interact with Browser Rendering. This allows you to run AI models that can automate browser tasks, such as taking screenshots, filling out forms, or scraping data.
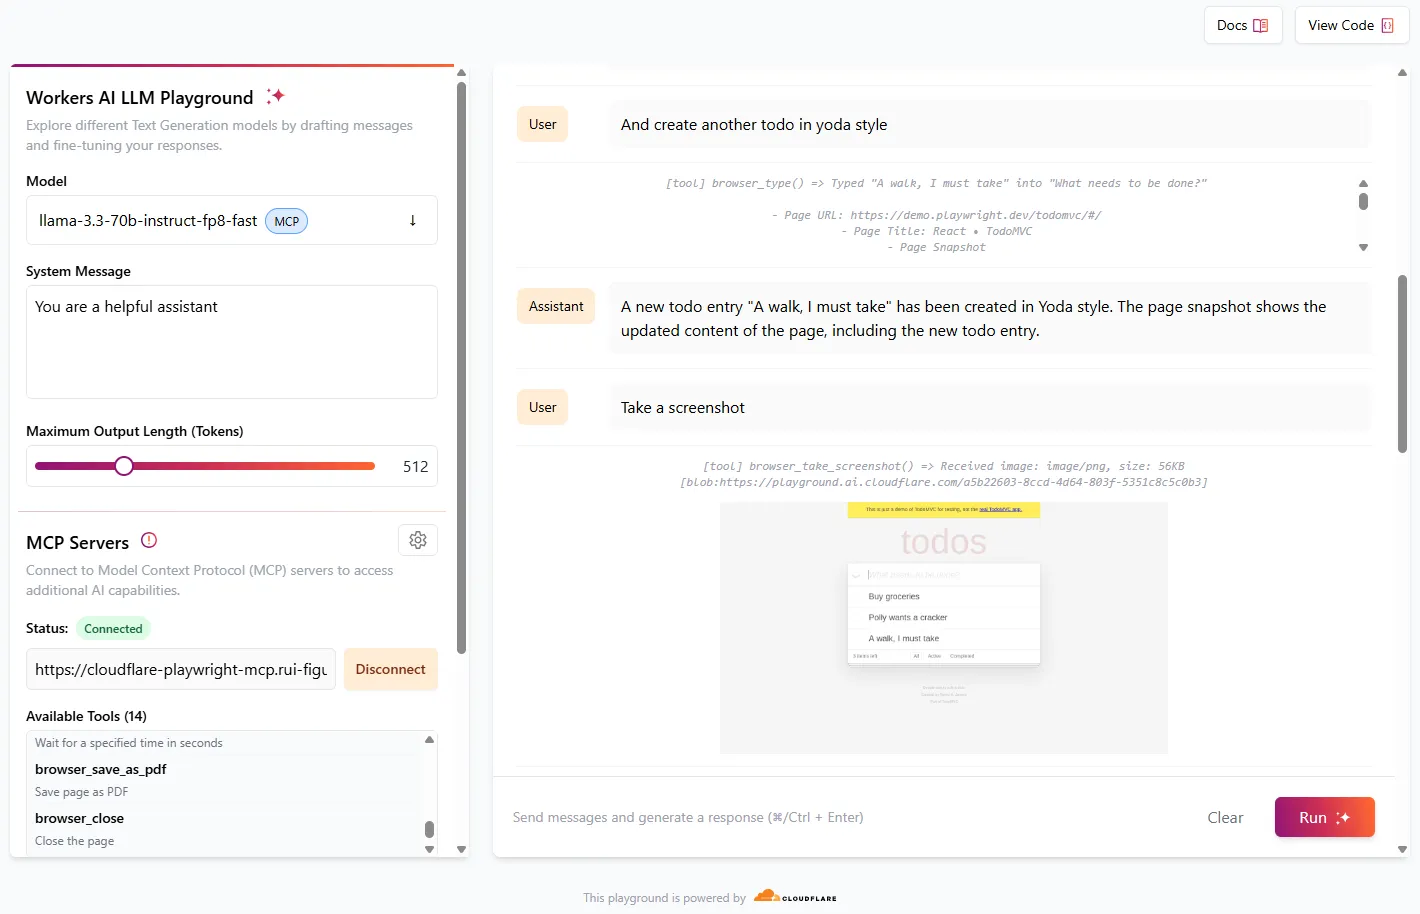
Playwright MCP is available as an npm package at
@cloudflare/playwright-mcp↗. To install it, type:Terminal window npm i -D @cloudflare/playwright-mcpTerminal window yarn add -D @cloudflare/playwright-mcpTerminal window pnpm add -D @cloudflare/playwright-mcpDeploying the server is then as easy as:
TypeScript import { env } from "cloudflare:workers";import { createMcpAgent } from "@cloudflare/playwright-mcp";export const PlaywrightMCP = createMcpAgent(env.BROWSER);export default PlaywrightMCP.mount("/sse");Check out the full code at GitHub ↗.
Learn more about Playwright MCP in our documentation.
You can now filter AutoRAG search results by
folderandtimestampusing metadata filtering to narrow down the scope of your query.This makes it easy to build multitenant experiences where each user can only access their own data. By organizing your content into per-tenant folders and applying a
folderfilter at query time, you ensure that each tenant retrieves only their own documents.Example folder structure:
Terminal window customer-a/logs/customer-a/contracts/customer-b/contracts/Example query:
JavaScript const response = await env.AI.autorag("my-autorag").search({query: "When did I sign my agreement contract?",filters: {type: "eq",key: "folder",value: "customer-a/contracts/",},});You can use metadata filtering by creating a new AutoRAG or reindexing existing data. To reindex all content in an existing AutoRAG, update any chunking setting and select Sync index. Metadata filtering is available for all data indexed on or after April 21, 2025.
If you are new to AutoRAG, get started with the Get started AutoRAG guide.
Workers AI for Developer Week - faster inference, new models, async batch API, expanded LoRA support
Happy Developer Week 2025! Workers AI is excited to announce a couple of new features and improvements available today. Check out our blog ↗ for all the announcement details.
We’re rolling out some in-place improvements to our models that can help speed up inference by 2-4x! Users of the models below will enjoy an automatic speed boost starting today:
@cf/meta/llama-3.3-70b-instruct-fp8-fastgets a speed boost of 2-4x, leveraging techniques like speculative decoding, prefix caching, and an updated inference backend.@cf/baai/bge-small-en-v1.5,@cf/baai/bge-base-en-v1.5,@cf/baai/bge-large-en-v1.5get an updated back end, which should improve inference times by 2x.- With the
bgemodels, we’re also announcing a new parameter calledpoolingwhich can takeclsormeanas options. We highly recommend usingpooling: clswhich will help generate more accurate embeddings. However, embeddings generated with cls pooling are not backwards compatible with mean pooling. For this to not be a breaking change, the default remains as mean pooling. Please specifypooling: clsto enjoy more accurate embeddings going forward.
- With the
We’re also excited to launch a few new models in our catalog to help round out your experience with Workers AI. We’ll be deprecating some older models in the future, so stay tuned for a deprecation announcement. Today’s new models include:
@cf/mistralai/mistral-small-3.1-24b-instruct: a 24B parameter model achieving state-of-the-art capabilities comparable to larger models, with support for vision and tool calling.@cf/google/gemma-3-12b-it: well-suited for a variety of text generation and image understanding tasks, including question answering, summarization and reasoning, with a 128K context window, and multilingual support in over 140 languages.@cf/qwen/qwq-32b: a medium-sized reasoning model, which is capable of achieving competitive performance against state-of-the-art reasoning models, e.g., DeepSeek-R1, o1-mini.@cf/qwen/qwen2.5-coder-32b-instruct: the current state-of-the-art open-source code LLM, with its coding abilities matching those of GPT-4o.
Introducing a new batch inference feature that allows you to send us an array of requests, which we will fulfill as fast as possible and send them back as an array. This is really helpful for large workloads such as summarization, embeddings, etc. where you don’t have a human-in-the-loop. Using the batch API will guarantee that your requests are fulfilled eventually, rather than erroring out if we don’t have enough capacity at a given time.
Check out the tutorial to get started! Models that support batch inference today include:
@cf/meta/llama-3.3-70b-instruct-fp8-fast@cf/baai/bge-small-en-v1.5@cf/baai/bge-base-en-v1.5@cf/baai/bge-large-en-v1.5@cf/baai/bge-m3@cf/meta/m2m100-1.2b
We’ve upgraded our LoRA experience to include 8 newer models, and can support ranks of up to 32 with a 300MB safetensors file limit (previously limited to rank of 8 and 100MB safetensors) Check out our LoRAs page to get started. Models that support LoRAs now include:
@cf/meta/llama-3.2-11b-vision-instruct@cf/meta/llama-3.3-70b-instruct-fp8-fast@cf/meta/llama-guard-3-8b@cf/meta/llama-3.1-8b-instruct-fast(coming soon)@cf/deepseek-ai/deepseek-r1-distill-qwen-32b(coming soon)@cf/qwen/qwen2.5-coder-32b-instruct@cf/qwen/qwq-32b@cf/mistralai/mistral-small-3.1-24b-instruct@cf/google/gemma-3-12b-it
The Agents SDK now includes built-in support for building remote MCP (Model Context Protocol) servers directly as part of your Agent. This allows you to easily create and manage MCP servers, without the need for additional infrastructure or configuration.
The SDK includes a new
MCPAgentclass that extends theAgentclass and allows you to expose resources and tools over the MCP protocol, as well as authorization and authentication to enable remote MCP servers.JavaScript export class MyMCP extends McpAgent {server = new McpServer({name: "Demo",version: "1.0.0",});async init() {this.server.resource(`counter`, `mcp://resource/counter`, (uri) => {// ...});this.server.tool("add","Add two numbers together",{ a: z.number(), b: z.number() },async ({ a, b }) => {// ...},);}}TypeScript export class MyMCP extends McpAgent<Env> {server = new McpServer({name: "Demo",version: "1.0.0",});async init() {this.server.resource(`counter`, `mcp://resource/counter`, (uri) => {// ...});this.server.tool("add","Add two numbers together",{ a: z.number(), b: z.number() },async ({ a, b }) => {// ...},);}}See the example ↗ for the full code and as the basis for building your own MCP servers, and the client example ↗ for how to build an Agent that acts as an MCP client.
To learn more, review the announcement blog ↗ as part of Developer Week 2025.
We've made a number of improvements to the Agents SDK, including:
- Support for building MCP servers with the new
MCPAgentclass. - The ability to export the current agent, request and WebSocket connection context using
import { context } from "agents", allowing you to minimize or avoid direct dependency injection when calling tools. - Fixed a bug that prevented query parameters from being sent to the Agent server from the
useAgentReact hook. - Automatically converting the
agentname inuseAgentoruseAgentChatto kebab-case to ensure it matches the naming convention expected byrouteAgentRequest.
To install or update the Agents SDK, run
npm i agents@latestin an existing project, or explore theagents-starterproject:Terminal window npm create cloudflare@latest -- --template cloudflare/agents-starterSee the full release notes and changelog on the Agents SDK repository ↗ and
- Support for building MCP servers with the new
AutoRAG is now in open beta, making it easy for you to build fully-managed retrieval-augmented generation (RAG) pipelines without managing infrastructure. Just upload your docs to R2, and AutoRAG handles the rest: embeddings, indexing, retrieval, and response generation via API.
With AutoRAG, you can:
- Customize your pipeline: Choose from Workers AI models, configure chunking strategies, edit system prompts, and more.
- Instant setup: AutoRAG provisions everything you need from Vectorize, AI gateway, to pipeline logic for you, so you can go from zero to a working RAG pipeline in seconds.
- Keep your index fresh: AutoRAG continuously syncs your index with your data source to ensure responses stay accurate and up to date.
- Ask questions: Query your data and receive grounded responses via a Workers binding or API.
Whether you're building internal tools, AI-powered search, or a support assistant, AutoRAG gets you from idea to deployment in minutes.
Get started in the Cloudflare dashboard ↗ or check out the guide for instructions on how to build your RAG pipeline today.
We’re excited to announce Browser Rendering is now available on the Workers Free plan ↗, making it even easier to prototype and experiment with web search and headless browser use-cases when building applications on Workers.
The Browser Rendering REST API is now Generally Available, allowing you to control browser instances from outside of Workers applications. We've added three new endpoints to help automate more browser tasks:
- Extract structured data – Use
/jsonto retrieve structured data from a webpage. - Retrieve links – Use
/linksto pull all links from a webpage. - Convert to Markdown – Use
/markdownto convert webpage content into Markdown format.
For example, to fetch the Markdown representation of a webpage:
Markdown example curl -X 'POST' 'https://api.cloudflare.com/client/v4/accounts/<accountId>/browser-rendering/markdown' \-H 'Content-Type: application/json' \-H 'Authorization: Bearer <apiToken>' \-d '{"url": "https://example.com"}'For the full list of endpoints, check out our REST API documentation. You can also interact with Browser Rendering via the Cloudflare TypeScript SDK ↗.
We also recently landed support for Playwright in Browser Rendering for browser automation from Cloudflare Workers, in addition to Puppeteer, giving you more flexibility to test across different browser environments.
Visit the Browser Rendering docs to learn more about how to use headless browsers in your applications.
- Extract structured data – Use