
You can now have up to 1000 Workers KV namespaces per account.
Workers KV namespace limits were increased from 200 to 1000 for all accounts. Higher limits for Workers KV namespaces enable better organization of key-value data, such as by category, tenant, or environment.
Consult the Workers KV limits documentation for the rest of the limits. This increased limit is available for both the Free and Paid Workers plans.
When using a Worker with the
nodejs_compatcompatibility flag enabled, you can now use the following Node.js APIs:You can use
node:net↗ to create a direct connection to servers via a TCP sockets withnet.Socket↗.index.js import net from "node:net";const exampleIP = "127.0.0.1";export default {async fetch(req) {const socket = new net.Socket();socket.connect(4000, exampleIP, function () {console.log("Connected");});socket.write("Hello, Server!");socket.end();return new Response("Wrote to server", { status: 200 });},};index.ts import net from "node:net";const exampleIP = "127.0.0.1";export default {async fetch(req): Promise<Response> {const socket = new net.Socket();socket.connect(4000, exampleIP, function () {console.log("Connected");});socket.write("Hello, Server!");socket.end();return new Response("Wrote to server", { status: 200 });},} satisfies ExportedHandler;Additionally, you can now use other APIs including
net.BlockList↗ andnet.SocketAddress↗.Note that
net.Server↗ is not supported.You can use
node:dns↗ for name resolution via DNS over HTTPS using Cloudflare DNS ↗ at 1.1.1.1.index.js import dns from "node:dns";let response = await dns.promises.resolve4("cloudflare.com", "NS");index.ts import dns from 'node:dns';let response = await dns.promises.resolve4('cloudflare.com', 'NS');All
node:dnsfunctions are available, exceptlookup,lookupService, andresolvewhich throw "Not implemented" errors when called.You can use
node:timers↗ to schedule functions to be called at some future period of time.This includes
setTimeout↗ for calling a function after a delay,setInterval↗ for calling a function repeatedly, andsetImmediate↗ for calling a function in the next iteration of the event loop.index.js import timers from "node:timers";console.log("first");timers.setTimeout(() => {console.log("last");}, 10);timers.setTimeout(() => {console.log("next");});index.ts import timers from "node:timers";console.log("first");timers.setTimeout(() => {console.log("last");}, 10);timers.setTimeout(() => {console.log("next");});
Ruleset Rule ID Legacy Rule ID Description Previous Action New Action Comments Cloudflare Managed Ruleset 100303 Command Injection - Nslookup Log Block This was released as
Cloudflare Managed Ruleset 100534 Web Shell Activity Log Block This was released as
You can now detect source code leaks with Data Loss Prevention (DLP) with predefined checks against common programming languages.
The following programming languages are validated with natural language processing (NLP).
- C
- C++
- C#
- Go
- Haskell
- Java
- JavaScript
- Lua
- Python
- R
- Rust
- Swift
DLP also supports confidence level for source code profiles.
For more details, refer to DLP profiles.
-
Cloudflare now allows you to send SSH command logs to storage destinations configured in Logpush, including third-party destinations. Once exported, analyze and audit the data as best fits your organization! For a list of available data fields, refer to the SSH logs dataset.
To set up a Logpush job, refer to Logpush integration.
Workflows (beta) now allows you to define up to 1024 steps.
sleepsteps do not count against this limit.We've also added:
instanceIdas property to theWorkflowEventtype, allowing you to retrieve the current instance ID from within a running Workflow instance- Improved queueing logic for Workflow instances beyond the current maximum concurrent instances, reducing the cases where instances are stuck in the queued state.
- Support for
pauseandresumefor Workflow instances in a queued state.
We're continuing to work on increases to the number of concurrent Workflow instances, steps, and support for a new
waitForEventAPI over the coming weeks.
Ruleset Rule ID Legacy Rule ID Description Previous Action New Action Comments Cloudflare Managed Ruleset 100704 Cleo Harmony - Auth Bypass - CVE:CVE-2024-55956, CVE:CVE-2024-55953
Log Block New Detection Cloudflare Managed Ruleset 100705 Sentry - SSRF Log Block New Detection Cloudflare Managed Ruleset 100706 Apache Struts - Remote Code Execution - CVE:CVE-2024-53677 Log Block New Detection Cloudflare Managed Ruleset 100707 FortiWLM - Remote Code Execution - CVE:CVE-2023-48782, CVE:CVE-2023-34993, CVE:CVE-2023-34990
Log Block New Detection Cloudflare Managed Ruleset 100007C_BETA Command Injection - Common Attack Commands Disabled
Rules Overview gives you a single page to manage all your Cloudflare Rules.
What you can do:
- See all your rules in one place – No more clicking around.
- Find rules faster – Search by name.
- Understand execution order – See how rules run in sequence.
- Debug easily – Use Trace without switching tabs.
Check it out in Rules > Overview ↗.
You can now achieve higher cache hit rates and reduce origin load when using Load Balancing with Smart Tiered Cache. Cloudflare automatically selects a single, optimal tiered data center for all origins in your Load Balancing Pool.
When you use Load Balancing with Smart Tiered Cache, Cloudflare analyzes performance metrics across your pool's origins and automatically selects the optimal Upper Tier data center for the entire pool. This means:
- Consistent cache location: All origins in the pool share the same Upper Tier cache.
- Higher HIT rates: Requests for the same content hit the cache more frequently.
- Reduced origin requests: Fewer requests reach your origin servers.
- Improved performance: Faster response times for cache HITs.
Load Balancing Pool: api-pool├── Origin 1: api-1.example.com├── Origin 2: api-2.example.com└── Origin 3: api-3.example.com↓Selected Upper Tier: [Optimal data center based on pool performance]To get started, enable Smart Tiered Cache on your zone and configure your Load Balancing Pool.
Users making D1 requests via the Workers API can see up to a 60% end-to-end latency improvement due to the removal of redundant network round trips needed for each request to a D1 database.
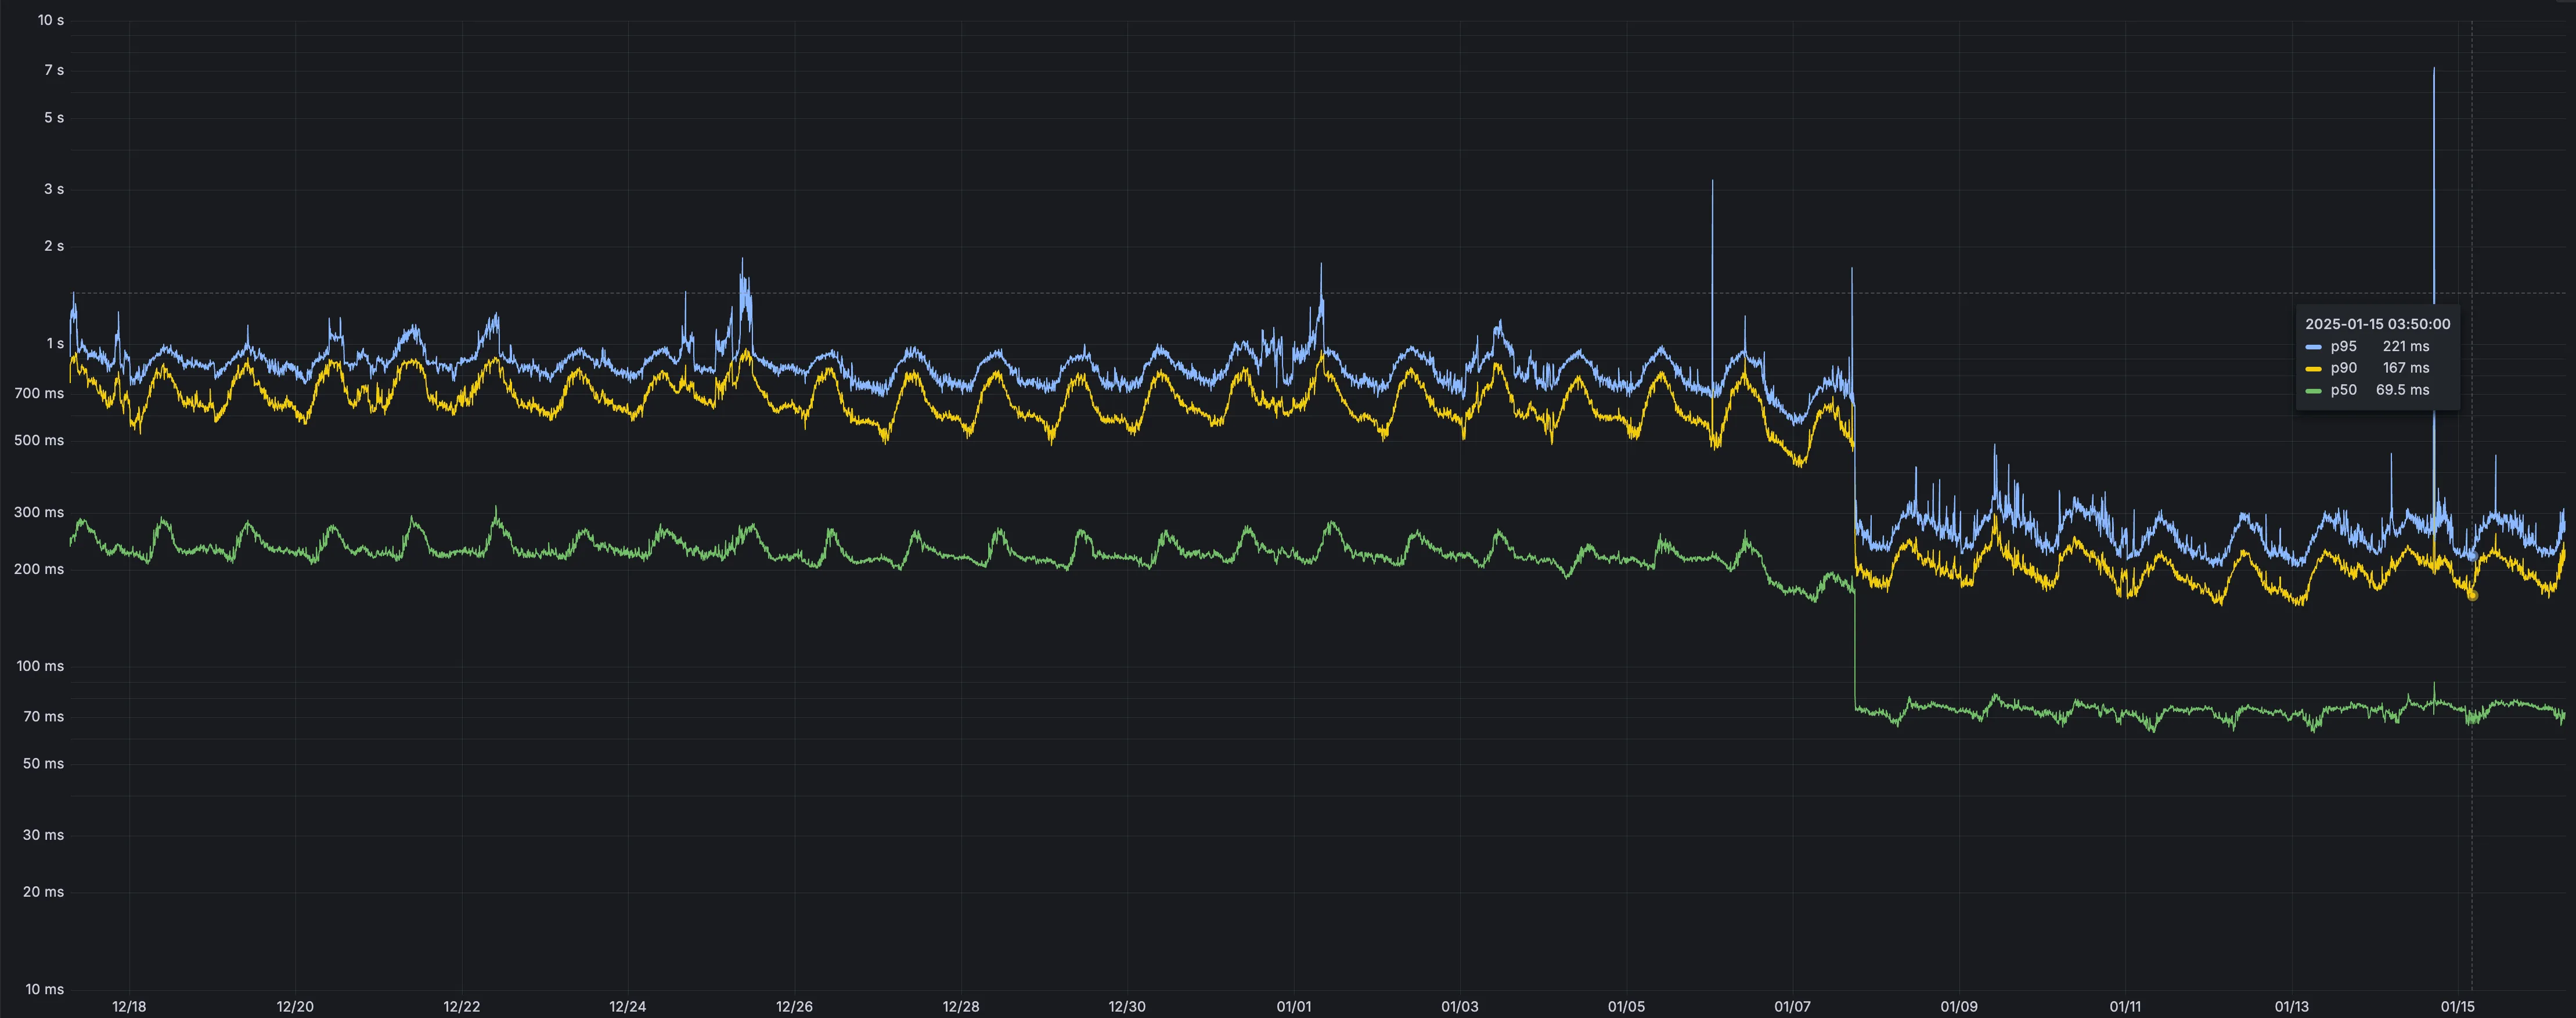
p50, p90, and p95 request latency aggregated across entire D1 service. These latencies are a reference point and should not be viewed as your exact workload improvement.
This performance improvement benefits all D1 Worker API traffic, especially cross-region requests where network latency is an outsized latency factor. For example, a user in Europe talking to a database in North America. D1 location hints can be used to influence the geographic location of a database.
For more details on how D1 removed redundant round trips, see the D1 specific release note entry.
Ruleset Rule ID Legacy Rule ID Description Previous Action New Action Comments Cloudflare Specials 100678 Pandora FMS - Remote Code Execution - CVE:CVE-2024-11320 Log Block New Detection Cloudflare Specials 100679 Palo Alto Networks - Remote Code Execution - CVE:CVE-2024-0012, CVE:CVE-2024-9474
Log Block New Detection Cloudflare Specials 100680 Ivanti - Command Injection - CVE:CVE-2024-37397 Log Block New Detection Cloudflare Specials 100681 Really Simple Security - Auth Bypass - CVE:CVE-2024-10924 Log Block New Detection Cloudflare Specials 100682 Magento - XXE - CVE:CVE-2024-34102 Log Block New Detection Cloudflare Specials 100683 CyberPanel - Remote Code Execution - CVE:CVE-2024-51567 Log Block New Detection Cloudflare Specials 100684 Microsoft SharePoint - Remote Code Execution - CVE:CVE-2024-38094, CVE:CVE-2024-38024, CVE:CVE-2024-38023
Log Block New Detection Cloudflare Specials 100685 CyberPanel - Remote Code Execution - CVE:CVE-2024-51568 Log Block New Detection Cloudflare Specials 100686 Seeyon - Remote Code Execution Log Block New Detection Cloudflare Specials 100687 WordPress - Remote Code Execution - CVE:CVE-2024-10781, CVE:CVE-2024-10542
Log Block New Detection Cloudflare Specials 100688 ProjectSend - Remote Code Execution - CVE:CVE-2024-11680 Log Block New Detection Cloudflare Specials 100689 Palo Alto GlobalProtect - Remote Code Execution - CVE:CVE-2024-5921
Log Block New Detection Cloudflare Specials 100690 Ivanti - Remote Code Execution - CVE:CVE-2024-37404 Log Block New Detection Cloudflare Specials 100691 Array Networks - Remote Code Execution - CVE:CVE-2023-28461 Log Block New Detection Cloudflare Specials 100692 CyberPanel - Remote Code Execution - CVE:CVE-2024-51378 Log Block New Detection Cloudflare Specials 100693 Symfony Profiler - Auth Bypass - CVE:CVE-2024-50340 Log Block New Detection Cloudflare Specials 100694 Citrix Virtual Apps - Remote Code Execution - CVE:CVE-2024-8069 Log Block New Detection Cloudflare Specials 100695 MSMQ Service - Remote Code Execution - CVE:CVE-2023-21554 Log Block New Detection Cloudflare Specials 100696 Nginxui - Remote Code Execution - CVE:CVE-2024-49368 Log Block New Detection Cloudflare Specials 100697 Apache ShardingSphere - Remote Code Execution - CVE:CVE-2022-22733
Log Block New Detection Cloudflare Specials 100698 Mitel MiCollab - Auth Bypass - CVE:CVE-2024-41713 Log Block New Detection Cloudflare Specials 100699 Apache Solr - Auth Bypass - CVE:CVE-2024-45216 Log Block New Detection
AI Gateway now supports DeepSeek, including their cutting-edge DeepSeek-V3 model. With this addition, you have even more flexibility to manage and optimize your AI workloads using AI Gateway. Whether you're leveraging DeepSeek or other providers, like OpenAI, Anthropic, or Workers AI, AI Gateway empowers you to:
- Monitor: Gain actionable insights with analytics and logs.
- Control: Implement caching, rate limiting, and fallbacks.
- Optimize: Improve performance with feedback and evaluations.

To get started, simply update the base URL of your DeepSeek API calls to route through AI Gateway. Here's how you can send a request using cURL:
Example fetch request curl https://gateway.ai.cloudflare.com/v1/{account_id}/{gateway_id}/deepseek/chat/completions \--header 'content-type: application/json' \--header 'Authorization: Bearer DEEPSEEK_TOKEN' \--data '{"model": "deepseek-chat","messages": [{"role": "user","content": "What is Cloudflare?"}]}'For detailed setup instructions, see our DeepSeek provider documentation.


Workers Builds, the integrated CI/CD system for Workers (currently in beta), now lets you cache artifacts across builds, speeding up build jobs by eliminating repeated work, such as downloading dependencies at the start of each build.
-
Build Caching: Cache dependencies and build outputs between builds with a shared project-wide cache, ensuring faster builds for the entire team.
-
Build Watch Paths: Define paths to include or exclude from the build process, ideal for monorepos to target only the files that need to be rebuilt per Workers project.
To get started, select your Worker on the Cloudflare dashboard ↗ then go to Settings > Builds, and connect a GitHub or GitLab repository. Once connected, you'll see options to configure Build Caching and Build Watch Paths.
-
After you triage your users' submissions (that are machine reviewed), you can now escalate them to our team for reclassification (which are instead human reviewed). User submissions from the submission alias, PhishNet, and our API can all be escalated.
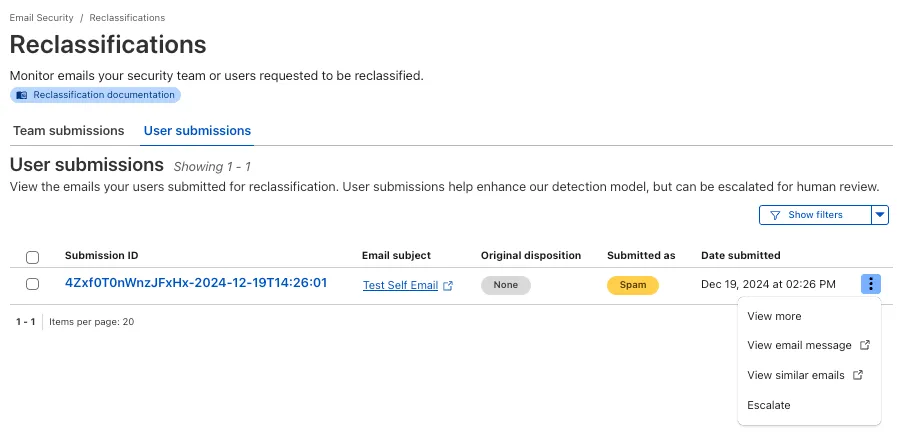
From Reclassifications, go to User submissions. Select the three dots next to any of the user submissions, then select Escalate to create a team request for reclassification. The Cloudflare dashboard will then show you the submissions on the Team Submissions tab.
Refer to User submissions to learn more about this feature.
This feature is available across these Email security packages:
- Advantage
- Enterprise
- Enterprise + PhishGuard
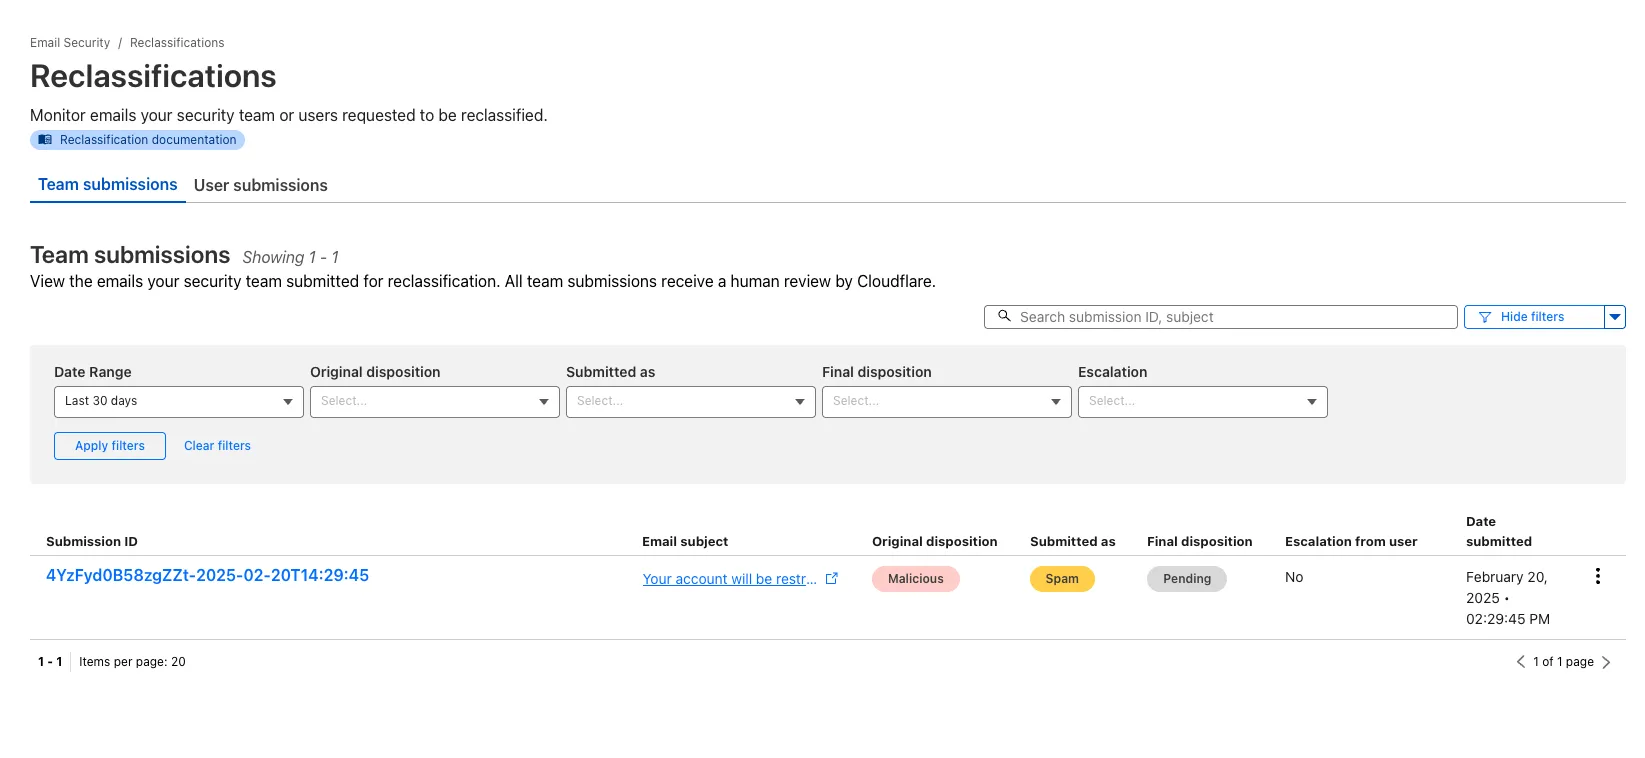
You now have more transparency about team and user submissions for phishing emails through a Reclassification tab in the Zero Trust dashboard.
Reclassifications happen when users or admins submit a phish to Email security. Cloudflare reviews and - in some cases - reclassifies these emails based on improvements to our machine learning models.
This new tab increases your visibility into this process, allowing you to view what submissions you have made and what the outcomes of those submissions are.
The latest
cloudflaredbuild 2024.12.2 ↗ introduces the ability to collect all the diagnostic logs needed to troubleshoot acloudflaredinstance.A diagnostic report collects data from a single instance of
cloudflaredrunning on the local machine and outputs it to acloudflared-diagfile.For more information, refer to Diagnostic logs.
Magic WAN and Magic Transit customers can use the Cloudflare dashboard to configure and manage BGP peering between their networks and their Magic routing table when using a Direct CNI on-ramp.
Using BGP peering allows customers to:
- Automate the process of adding or removing networks and subnets.
- Take advantage of failure detection and session recovery features.
With this functionality, customers can:
- Establish an eBGP session between their devices and the Magic WAN / Magic Transit service when connected via CNI.
- Secure the session by MD5 authentication to prevent misconfigurations.
- Exchange routes dynamically between their devices and their Magic routing table.
Refer to Magic WAN BGP peering or Magic Transit BGP peering to learn more about this feature and how to set it up.
Hyperdrive now caches queries in all Cloudflare locations, decreasing cache hit latency by up to 90%.
When you make a query to your database and Hyperdrive has cached the query results, Hyperdrive will now return the results from the nearest cache. By caching data closer to your users, the latency for cache hits reduces by up to 90%.
This reduction in cache hit latency is reflected in a reduction of the session duration for all queries (cached and uncached) from Cloudflare Workers to Hyperdrive, as illustrated below.
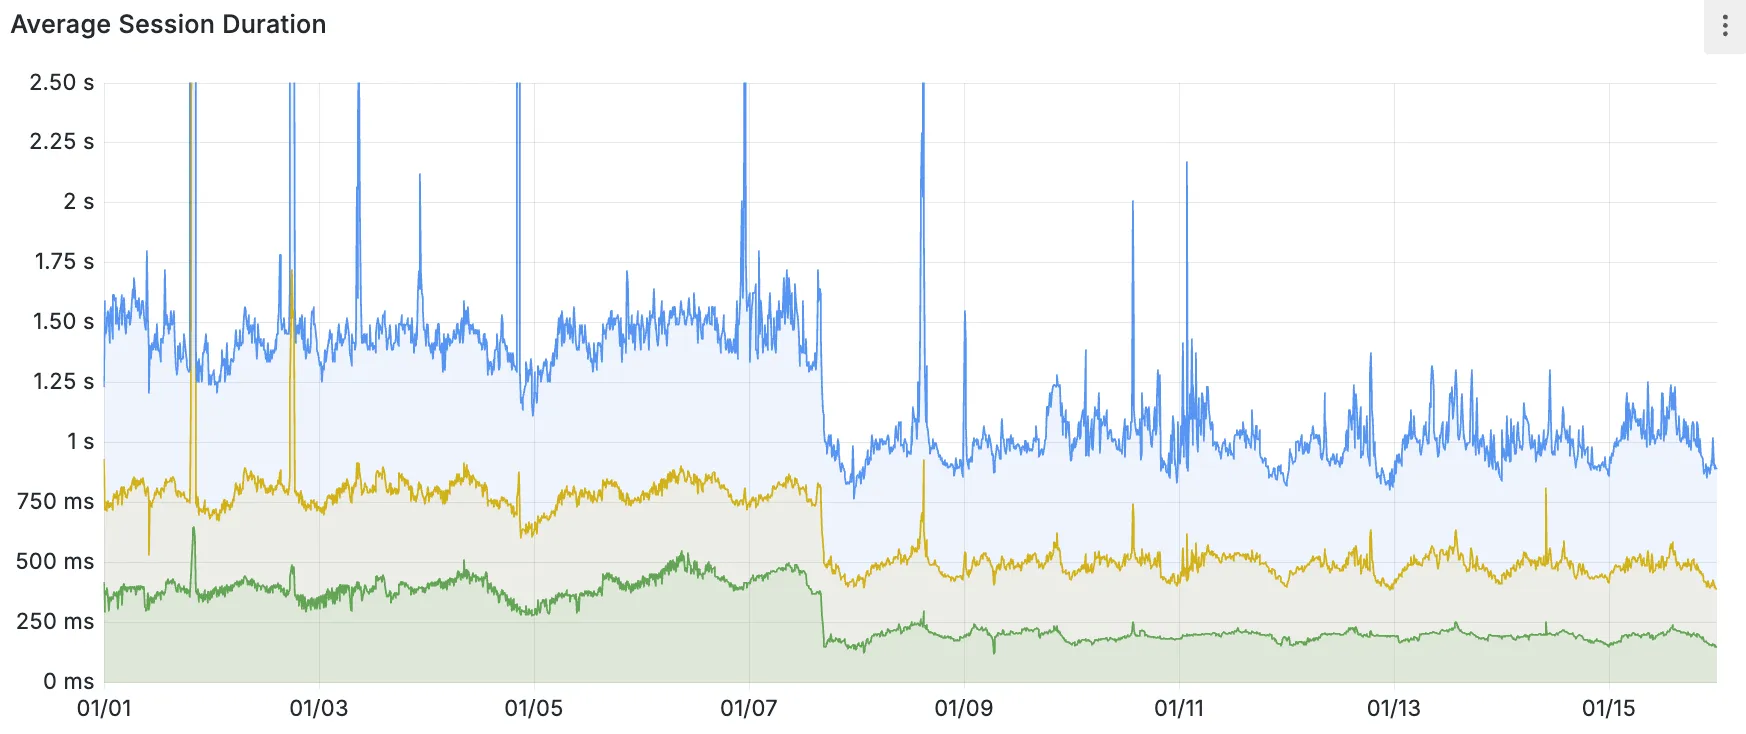
P50, P75, and P90 Hyperdrive session latency for all client connection sessions (both cached and uncached queries) for Hyperdrive configurations with caching enabled during the rollout period.
This performance improvement is applied to all new and existing Hyperdrive configurations that have caching enabled.
For more details on how Hyperdrive performs query caching, refer to the Hyperdrive documentation.
Now, you can manage Cloudflare Snippets with Terraform. Use infrastructure-as-code to deploy and update Snippet code and rules without manual changes in the dashboard.
Example Terraform configuration:
resource "cloudflare_snippet" "my_snippet" {zone_id = "<ZONE_ID>"name = "my_test_snippet_1"main_module = "file1.js"files {name = "file1.js"content = file("file1.js")}}resource "cloudflare_snippet_rules" "cookie_snippet_rule" {zone_id = "<ZONE_ID>"rules {enabled = trueexpression = "http.cookie eq \"a=b\""description = "Trigger snippet on specific cookie"snippet_name = "my_test_snippet_1"}depends_on = [cloudflare_snippet.my_snippet]}Learn more in the Configure Snippets using Terraform documentation.
You can now generate customized terraform files for building cloud network on-ramps to Magic WAN.
Magic Cloud can scan and discover existing network resources and generate the required terraform files to automate cloud resource deployment using their existing infrastructure-as-code workflows for cloud automation.
You might want to do this to:
- Review the proposed configuration for an on-ramp before deploying it with Cloudflare.
- Deploy the on-ramp using your own infrastructure-as-code pipeline instead of deploying it with Cloudflare.
For more details, refer to Set up with Terraform.
You can now use CASB to find security misconfigurations in your AWS cloud environment using Data Loss Prevention.
You can also connect your AWS compute account to extract and scan your S3 buckets for sensitive data while avoiding egress fees. CASB will scan any objects that exist in the bucket at the time of configuration.
To connect a compute account to your AWS integration:
- In Cloudflare One ↗, go to Cloud & SaaS findings > Integrations.
- Find and select your AWS integration.
- Select Open connection instructions.
- Follow the instructions provided to connect a new compute account.
- Select Refresh.
Now, you can use Cloud Connector to route traffic to your R2 buckets based on URLs, headers, geolocation, and more.
Example setup:
Terminal window curl --request PUT \"https://api.cloudflare.com/client/v4/zones/{zone_id}/cloud_connector/rules" \--header "Authorization: Bearer <API_TOKEN>" \--header "Content-Type: application/json" \--data '[{"expression": "http.request.uri.path wildcard \"/images/*\"","provider": "cloudflare_r2","description": "Connect to R2 bucket containing images","parameters": {"host": "mybucketcustomdomain.example.com"}}]'Get started using Cloud Connector documentation.
You can now type in languages that use diacritics (like á or ç) and character-based scripts (such as Chinese, Japanese, and Korean) directly within the remote browser. The isolated browser now properly recognizes non-English keyboard input, eliminating the need to copy and paste content from a local browser or device.
You can now reduce latency and lower R2 egress costs automatically when using Smart Tiered Cache with R2. Cloudflare intelligently selects a tiered data center close to your R2 bucket location, creating an efficient caching topology without additional configuration.
When you enable Smart Tiered Cache for zones using R2 as an origin, Cloudflare automatically:
- Identifies your R2 bucket location: Determines the geographical region where your R2 bucket is stored.
- Selects an optimal Upper Tier: Chooses a data center close to your bucket as the common Upper Tier cache.
- Routes requests efficiently: All cache misses in edge locations route through this Upper Tier before reaching R2.
- Automatic optimization: No manual configuration required.
- Lower egress costs: Fewer requests to R2 reduce egress charges.
- Improved hit ratio: Common Upper Tier increases cache efficiency.
- Reduced latency: Upper Tier proximity to R2 minimizes fetch times.
To get started, enable Smart Tiered Cache on your zone using R2 as an origin.
You can now use the
cacheproperty of theRequestinterface to bypass Cloudflare's cache when making subrequests from Cloudflare Workers, by setting its value tono-store.index.js export default {async fetch(req, env, ctx) {const request = new Request("https://cloudflare.com", {cache: "no-store",});const response = await fetch(request);return response;},};index.ts export default {async fetch(req, env, ctx): Promise<Response> {const request = new Request("https://cloudflare.com", { cache: 'no-store'});const response = await fetch(request);return response;}} satisfies ExportedHandler<Environment>When you set the value to
no-storeon a subrequest made from a Worker, the Cloudflare Workers runtime will not check whether a match exists in the cache, and not add the response to the cache, even if the response includes directives in theCache-ControlHTTP header that otherwise indicate that the response is cacheable.This increases compatibility with NPM packages and JavaScript frameworks that rely on setting the
cacheproperty, which is a cross-platform standard part of theRequestinterface. Previously, if you set thecacheproperty onRequest, the Workers runtime threw an exception.If you've tried to use
@planetscale/database,redis-js,stytch-node,supabase,axiom-jsor have seen the error messageThe cache field on RequestInitializerDict is not implemented in fetch— you should try again, making sure that the Compatibility Date of your Worker is set to on or after2024-11-11, or thecache_option_enabledcompatibility flag is enabled for your Worker.- Learn how the Cache works with Cloudflare Workers
- Enable Node.js compatibility for your Cloudflare Worker
- Explore Runtime APIs and Bindings available in Cloudflare Workers